Linking a source EBS R12.2 instance
This topic describes the process of linking an EBS R12.2 instance and creating the necessary dSources.
Prerequisite
Prepare your source EBS R12.2 instance for linking by following the outline in Preparing a Source EBS R12.2 instance for linking
Procedure
Link the Oracle database
Link the Oracle database used by EBS, as outlined in Linking an Oracle data source
Link the Oracle Pluggable database for 19c MT, as outlined in Linking an Oracle pluggable database
Link the EBS dbTechStack
Prerequisite
Upload the EBS 12.2 dbTechStack plugin and refresh the environments during the preparation of the source environment. For more information, see Upgrade EBS objects to 6.0
For successful linking of DBTECHSTACK from the standby site, follow any one of the procedures below:
Place the physical standby database in READ ONLY/ READ ONLY WITH APPLY mode and run linking of source DBTECHSTACK. Even during subsequent snapsync operations, you have to make sure that the standby database container & its PDB is in READ ONLY / READ ONLY WITH APPLY mode.
Note: Make sure that the PDB is in READ ONLY mode, also the two default EBS PDB servicesebs_and should be in READY STATE. Linking will fail if the PDB is not in READ ONLY mode.Perform the linking of dbTechStack(ORACLE_HOME) from the primary source site which is in READ_WRITE mode.
Note:Before DBTechStack linking, to ensure that the hook operation succeeds during database provision, the ETCC patch level should be the latest. In the configure clone 1 hook adcfgclone dbconfig will perform the ETCC patch level check and will fail if it's not the latest.
While linking using the EBS plugin, the plugin runs
adpreclone.pldbTier in the background, which asks for apps database user password and connects with standby DB. If database is in MOUNT state then linking fails, as apps schema will not be able to login into standby DB.
Login to the Delphix Management application.
Click Manage.
Select Environments.
Select the source dbTier environment containing the source dbTechStack.
Note: If you are linking from a RAC dbTier, select the environment for a single running node of the RAC cluster.Click the Environment Details tab.
If the
oracleenvironment user described in Preparing a source EBS R12.2 instance for linking is not already added to the Delphix Engine, add the user.Click the Databases tab.
Click the Plus icon within E-Business Suite R12.2 dbTechStack section under installations.
Add Database dialog box pops to add source config for dbTechStack.
Provide a user-defined name to the `Database Name` field and Oracle base install directory in the `Path` field.
Click on the Add button to successfully add the source config.
Re-check the E-Business Suite R12.2 dbTechStack section under installations for the `Add dSource` option mapped to the source config that is added in the above step.
Click Manage > Datasets.
Click the Plus icon next to Datasets and select Add dSource.
In the Add dSource wizard, select the Linked dSource as the type.
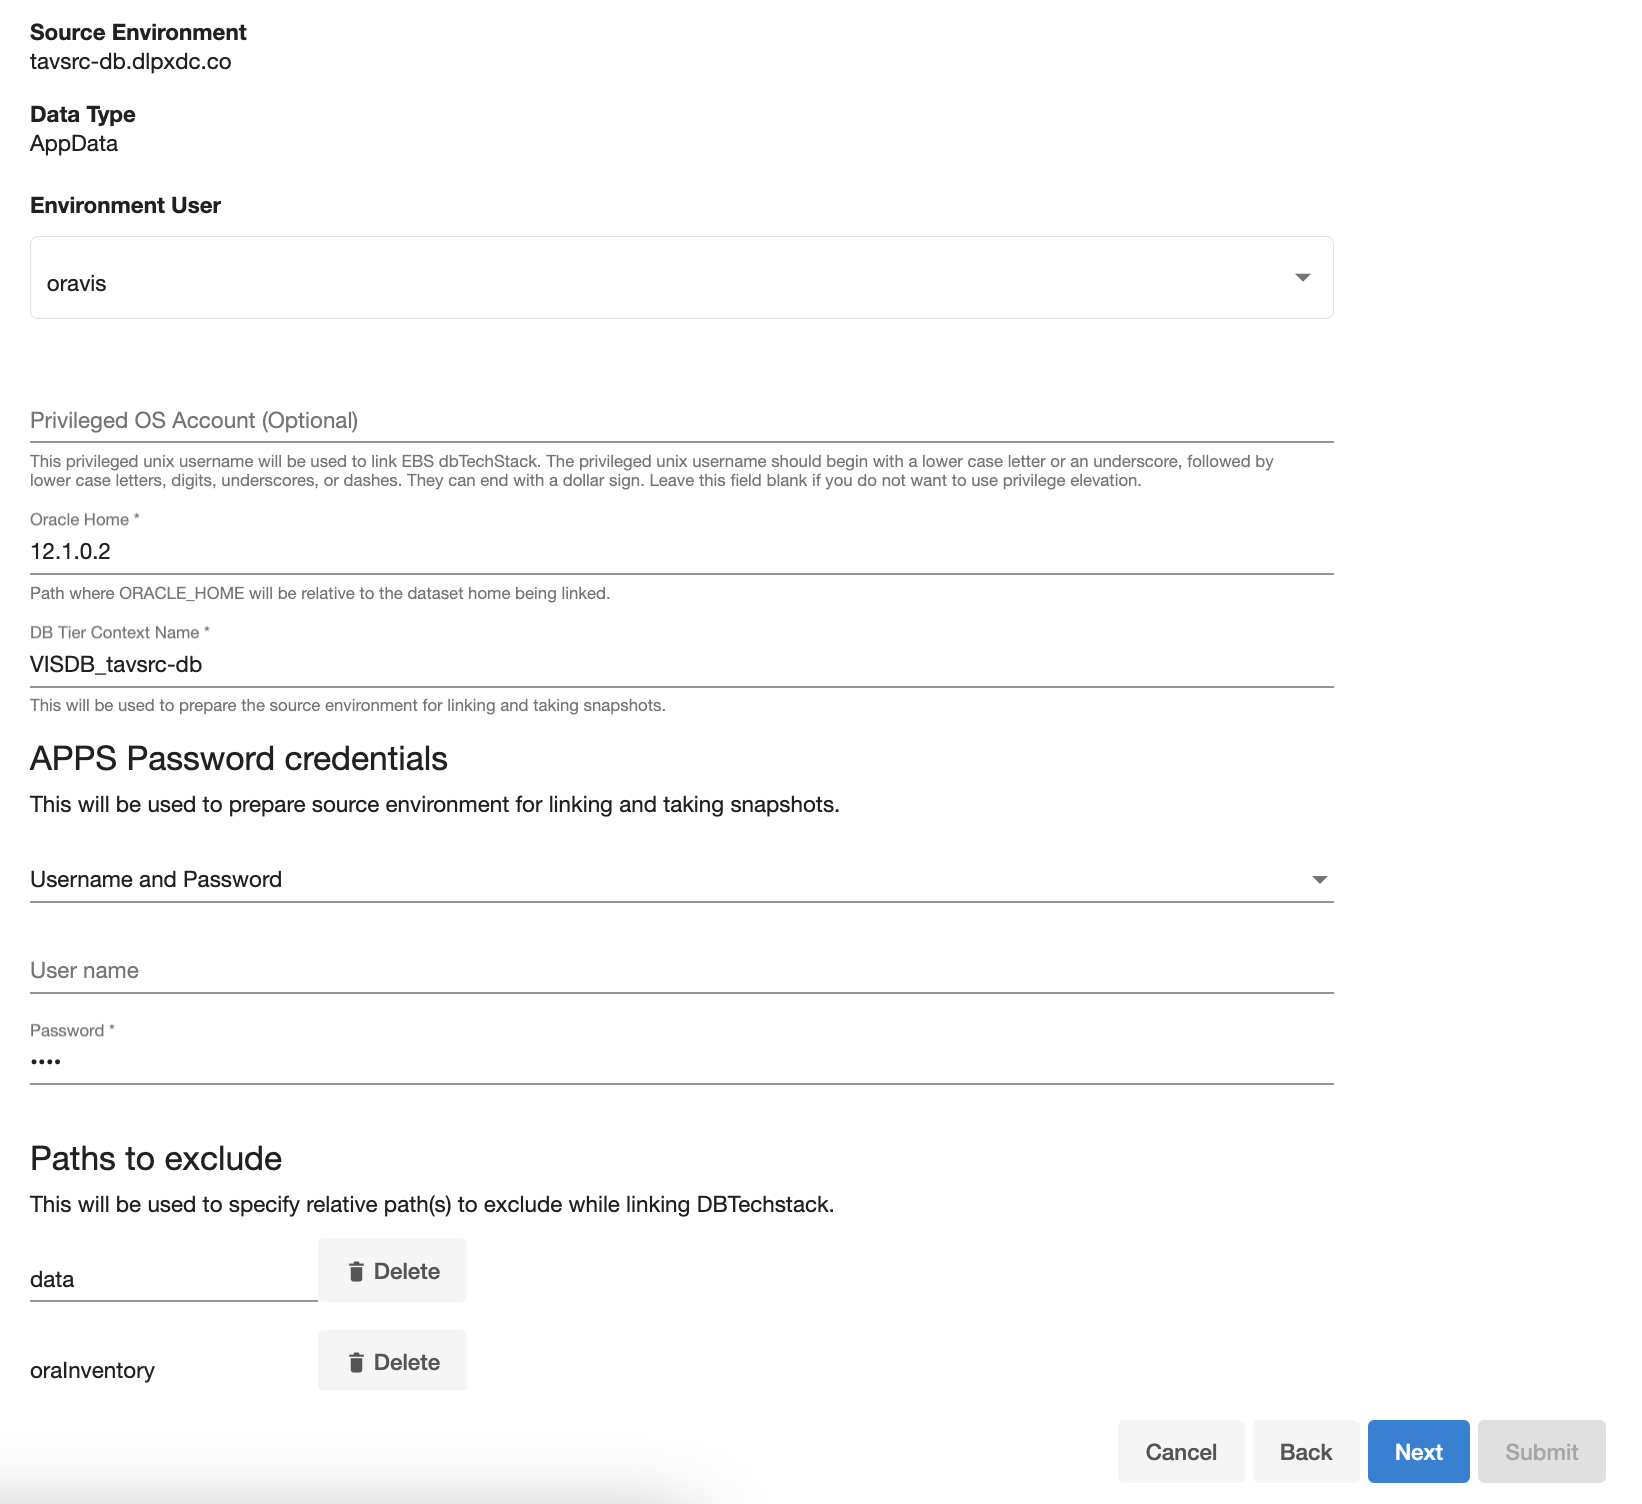
Enter the EBS-specific parameters for your dbTechStack.
These parameter values will be used when
adpreclone.plis run. Ensure that the DB Tier Context Name uses the short hostname.Select an Environment user.
Privileged OS Account (Optional) field should contain a high privileged user when the low privileged user is being used for linking.
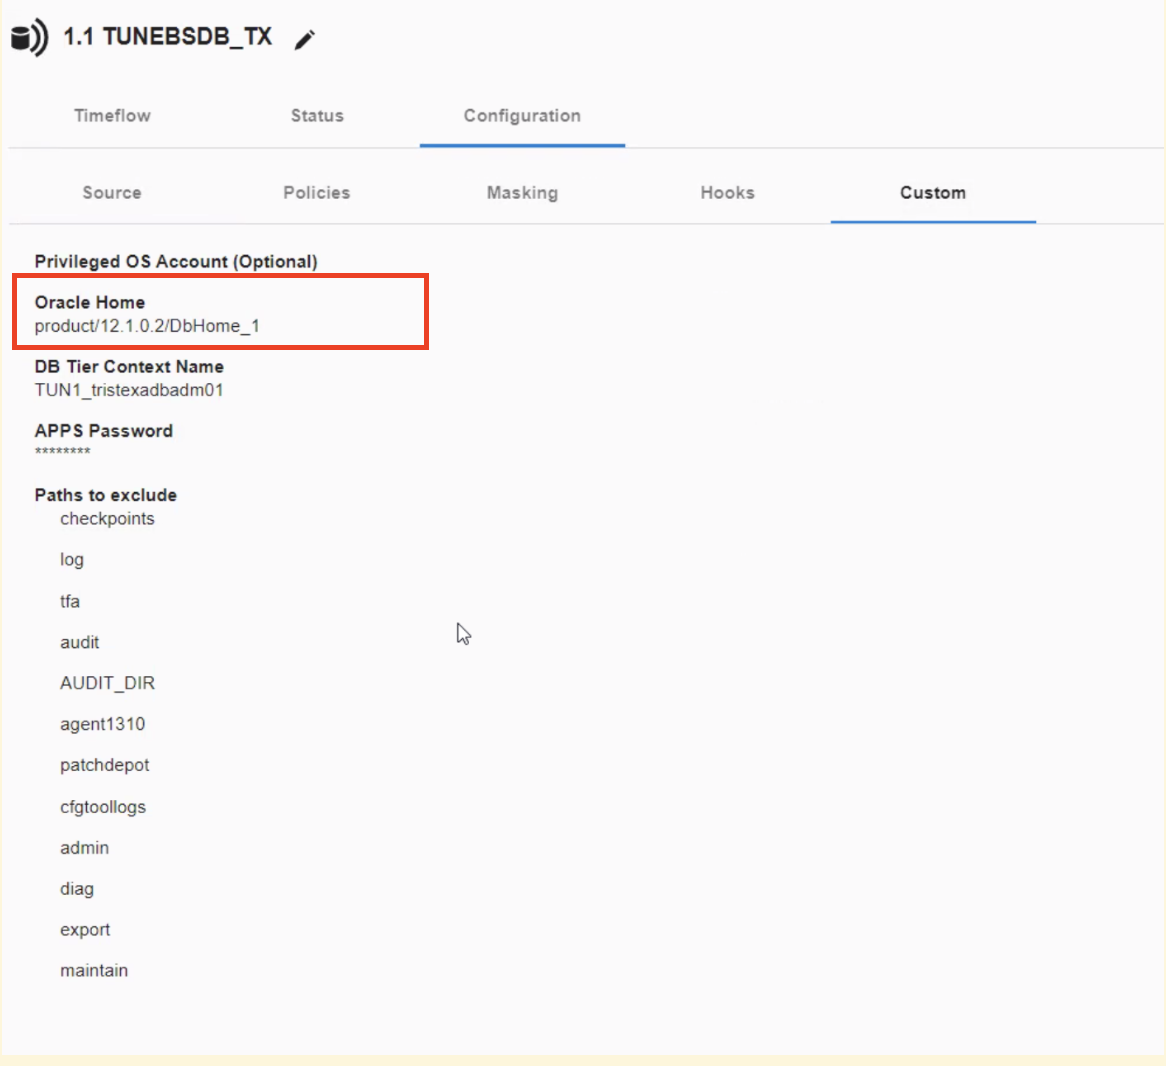
Provide source oracle home directory name relative to oracle base installation directory in Oracle Home input field.
In the DB Tier Context Name field, provide the source context name; To get the DB Tier context name on source side:
For Oracle 12.1.0.2 version,
CODEcd $ORACLE_HOME source SID_hostname.env file echo $CONTEXT_NAMEBelow is an example, Consider VISDB as the database SID and tavsrc-db as the short hostname.
CODE[oravis@tavsrc-db VIS]$ source /u01/oracle/VIS/12.1.0.2/VISDB_tavsrc-db.env [oravis@tavsrc-db VIS]$ echo $CONTEXT_NAME VISDB_tavsrc-db

For multi-tenant database, CONTEXT_NAME will be (<PDB_NAME>_<short hostname>)
For RAC, CONTEXT_NAME will be <INSTANCE_SID>_<HOSTNAME>
For example: VIS2_exaukdb02
Note: When preparing the source Oracle RAC system for cloning, make sure that the linking is performed against the primary database node.
Provide apps schema password in the Apps Password Credentials section by selecting the Username and Password from the dropdown, leaving the username field empty.
Exclude the EBS database's data files if they are stored underneath the Oracle base install directory.
These data files will be linked with the database instead of with the dbTechStack. Add the "relative path" to the data files to the Paths to Exclude list. If the audit files (located under $ORACLE_HOME/rdbms/audit) are large in size, the path of these files could also be excluded so as to avoid dbTechStack timeout issues during provisioning.
Note: Ensure that you add the relative paths and NOT the absolute paths. For example, if you want to exclude the /u01/oracle/VIS/data path, then add "data" only under the Paths to Exclude list. Here, /u01/oracle/VIS/data is the absolute path and "data" is the relative path to be added.Click Next.
Enter a dSource Name.
Select a Database Group for the dSource.
Click Next. Adding a dSource to a database group enables you to set Delphix Domain user permissions for that dSource's objects, such as snapshots.
Select a SnapSync policy.
Click Next.
Enter any custom pre or post sync logic as Pre-Sync or Post-Sync hook operations. Remember that
adpreclone.pl dbTieris already run prior to every Snapshot of the dbTechStack. The Pre-Sync hook operations will be run prior to running theadpreclone.pltool.Click Next.
Review the dSource Configuration and Data Management information, and then click Finish. The Delphix Engine will initiate two jobs to create the dSource, DB_Link and DB_Sync . You can monitor these jobs by clicking Active Jobs in the top menu bar, or by selecting System > Event Viewer. When the jobs have completed successfully, the files icon will change to a dSource icon on the Environments > Databases screen, and the dSource will be added to the list of Datasets under its assigned group.
Link the EBS appsTier
Prerequisite
Upload the EBS 12.2 dbTechStack plugin and refresh the environments during the preparation of source environment. For more information, see Upgrade EBS Objects to 6.0
Login to the Delphix Management application using Delphix Admin credentials.
Click Manage.
Select Environments.
Select the source appsTier environment.
Note: If you are linking from a multi-node appsTier, select the environment for the node on which EBS admin services reside.
Click the Environment Details tab.
If the
applmgrenvironment user described in Preparing a Source EBS R12.2 Instance for Linking is not already added to the Delphix Engine, add the user.Click the Databases tab.
Click the Plus icon within E-Business Suite R12.2 appsTier section under installations.
Add Database dialog box pops to add source config for dbTechStack.
Provide a user-defined name to the `Database Name` field and Oracle base install directory in the `Path` field.
Click on the Add button to successfully add the source config.
Re-check the E-Business Suite R12.2 appsTier section under installations for the Add dSource option mapped to the source config that is added in the above step.
Click Manage > Datasets.
Click the Plus icon next to Datasets and select Add dSource.
In the Add dSource wizard, select the Linked dSource as the type.
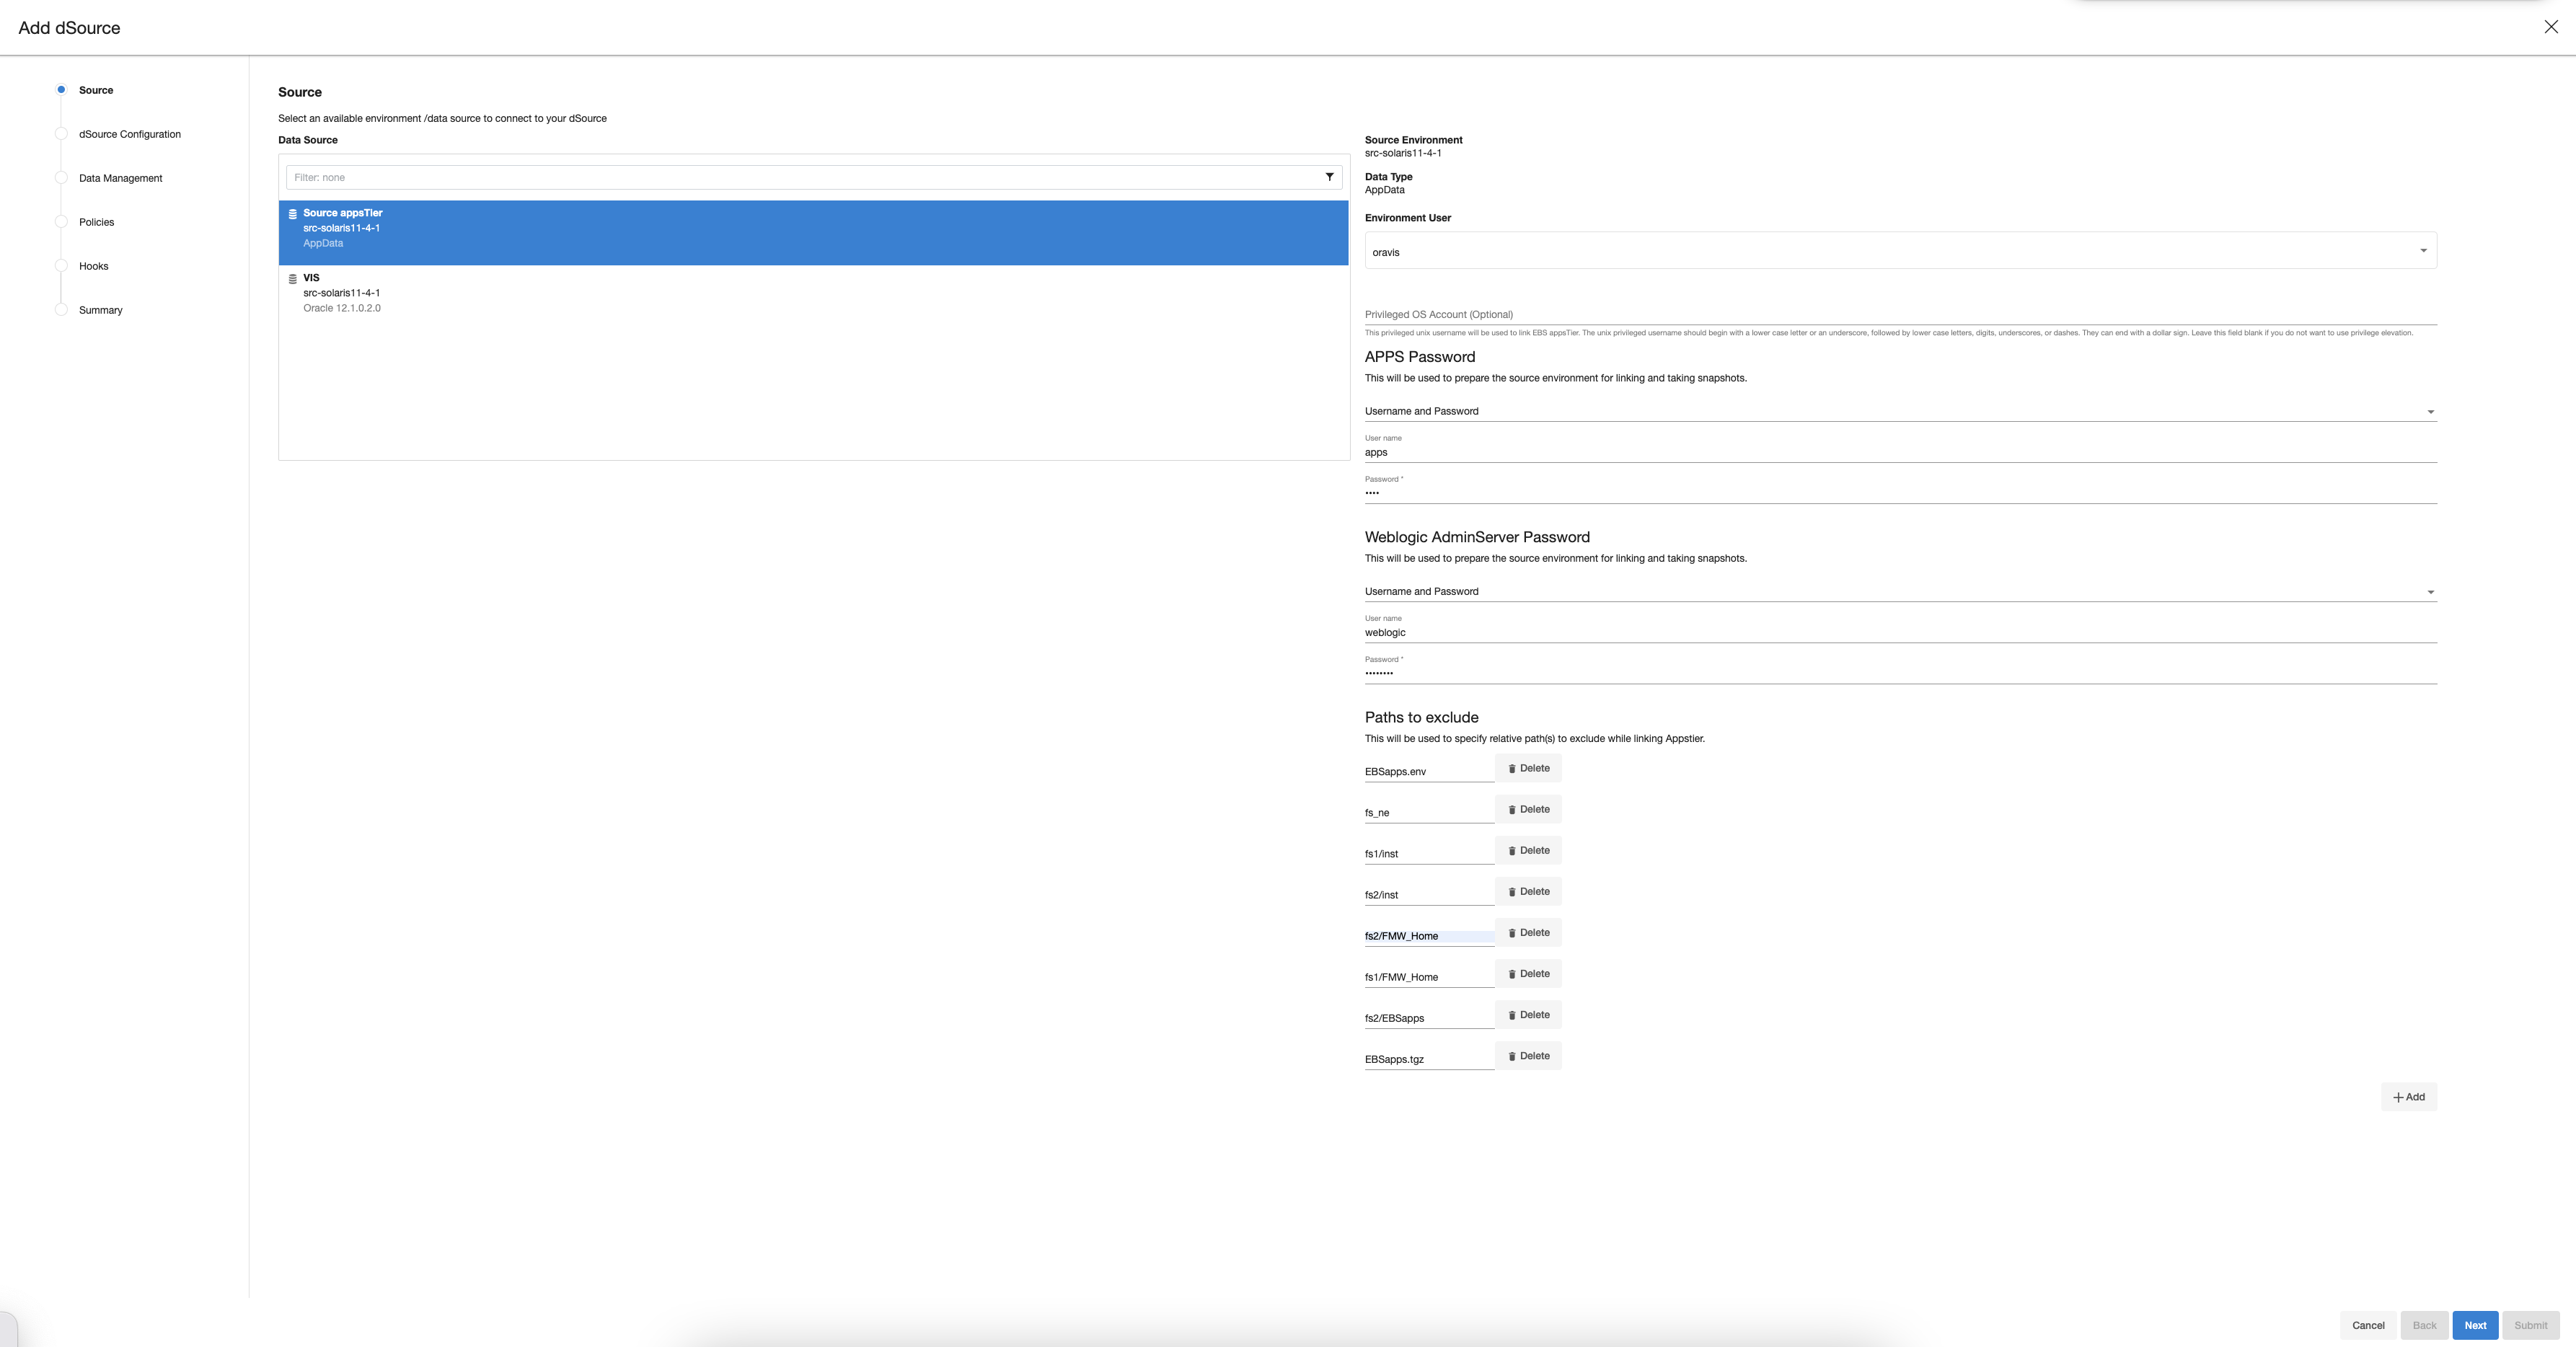
In the Add dSource wizard, select the appsTier files source you just created.
Enter the EBS-specific parameters for your appsTier. These parameter values will be used when
adpreclone.plis run.

Select an Environment User.
Privileged OS Account (Optional) field should contain a high privileged user when the low privileged user is being used for linking.
Provide the apps schema password in the Apps Password section by choosing the Username and Password from the dropdown, leaving the username field empty.
Provide the weblogic password in the Weblogic AdminServer Password section by choosing the Username and Password from the dropdown, leaving the username field empty.
Add the "relative paths" of files to exclude to the Paths to Exclude list.
Exclude the non-edition file system, instance directories, FMW home directories and Patch file system EBSapps directory which will be recreated when provisioning a virtual EBS appsTier. These paths should typically include:
fs_nefs1/instfs2/instfs1/FMW_Homefs2/FMW_Homefs2/EBSappsorfs1/EBSappsdepending on patch FS in your environment.EBSapps.envYou can exclude all other directories or files placed in $APPS_BASE path.
Note: Ensure that you add the relative paths and NOT the absolute paths. For example, if you want to exclude the /u01/oracle/VIS/fs1/inst path, then add "fs1/inst" only under the Paths to Exclude list. Here, /u01/oracle/VIS/fas1/inst is the absolute path and "fs1/inst" is the relative path to be added.
Click Next.
Enter a dSource Name.
Select a Database Group for the dSource.
Click Next. Adding a dSource to a database group enables you to set Delphix Domain user permissions for that dSource's objects, such as snapshots.
Click Next.
Select a SnapSync policy.
Click Next.
Enter any custom pre- or post-sync logic as Pre-Sync or Post-Sync hook operations. Remember that
adpreclone.pl appsTieris already run prior to every SnapSync of the appsTier. The Pre-Sync hook operations will be run prior to running theadpreclone.pltool.Click Next.
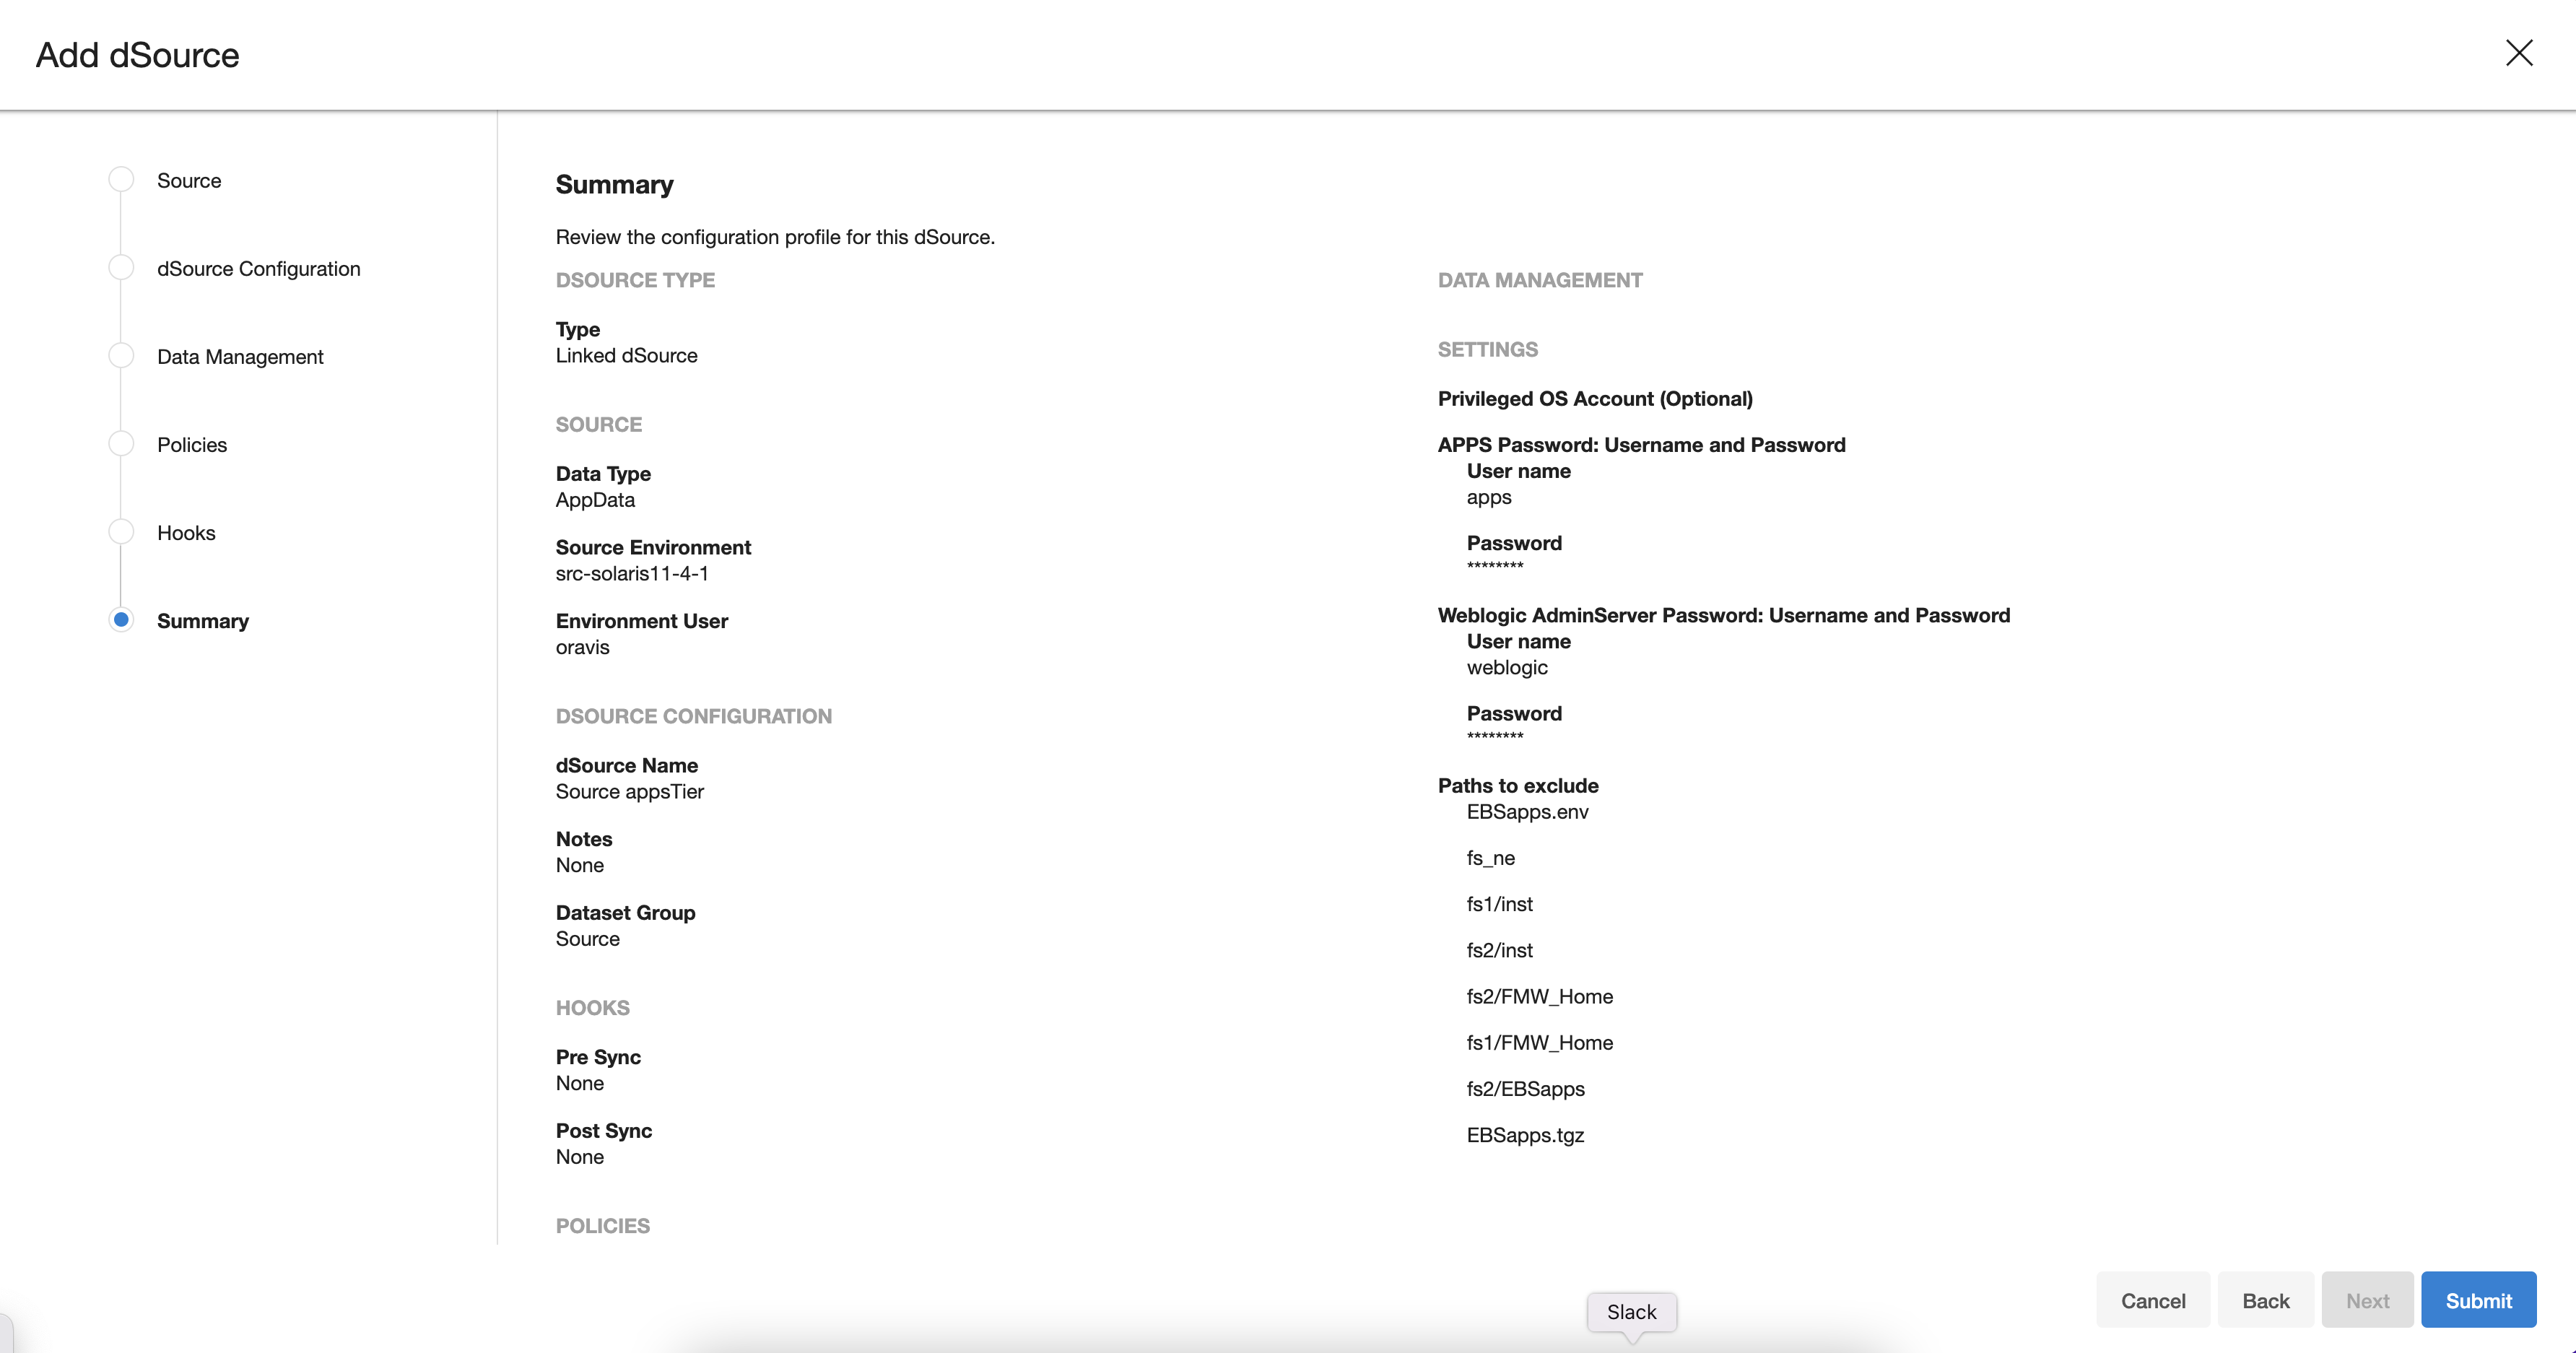
Review the dSource Configuration and Data Management information, and then click Finish. The Delphix Engine will initiate two jobs to create the dSource, DB_Link, and DB_Sync. You can monitor these jobs by clicking Active Jobs in the top menu bar, or by selecting System > Event Viewer. When the jobs have completed successfully, the files icon will change to a dSource icon on the Environments > Databases screen, and the dSource will be added to the list of Datasets under its assigned group.
