
Initial setup
Overview
Delphix runs as a virtual appliance deployed in various types of platforms, as outlined in these Deployment articles. When first logging into an instance, the setup wizard will help with initial configurations for network, storage, authentication, and more. This article describes each step in the setup process and will outline and the different options available.
When first connecting to the Delphix Engine via any supported browser, enter the default sysadmin login; username: sysadmin, password: sysadmin. On the first login, there will be a prompt to change the default password for security purposes.
A login failure issue could occur if the Delphix Engine clock is not in sync with the IdP (identity provider) clock. To resolve the issue, either use the NTP (network time) clock or set up the skew time property in the SSO (Single Sign-On) configuration.
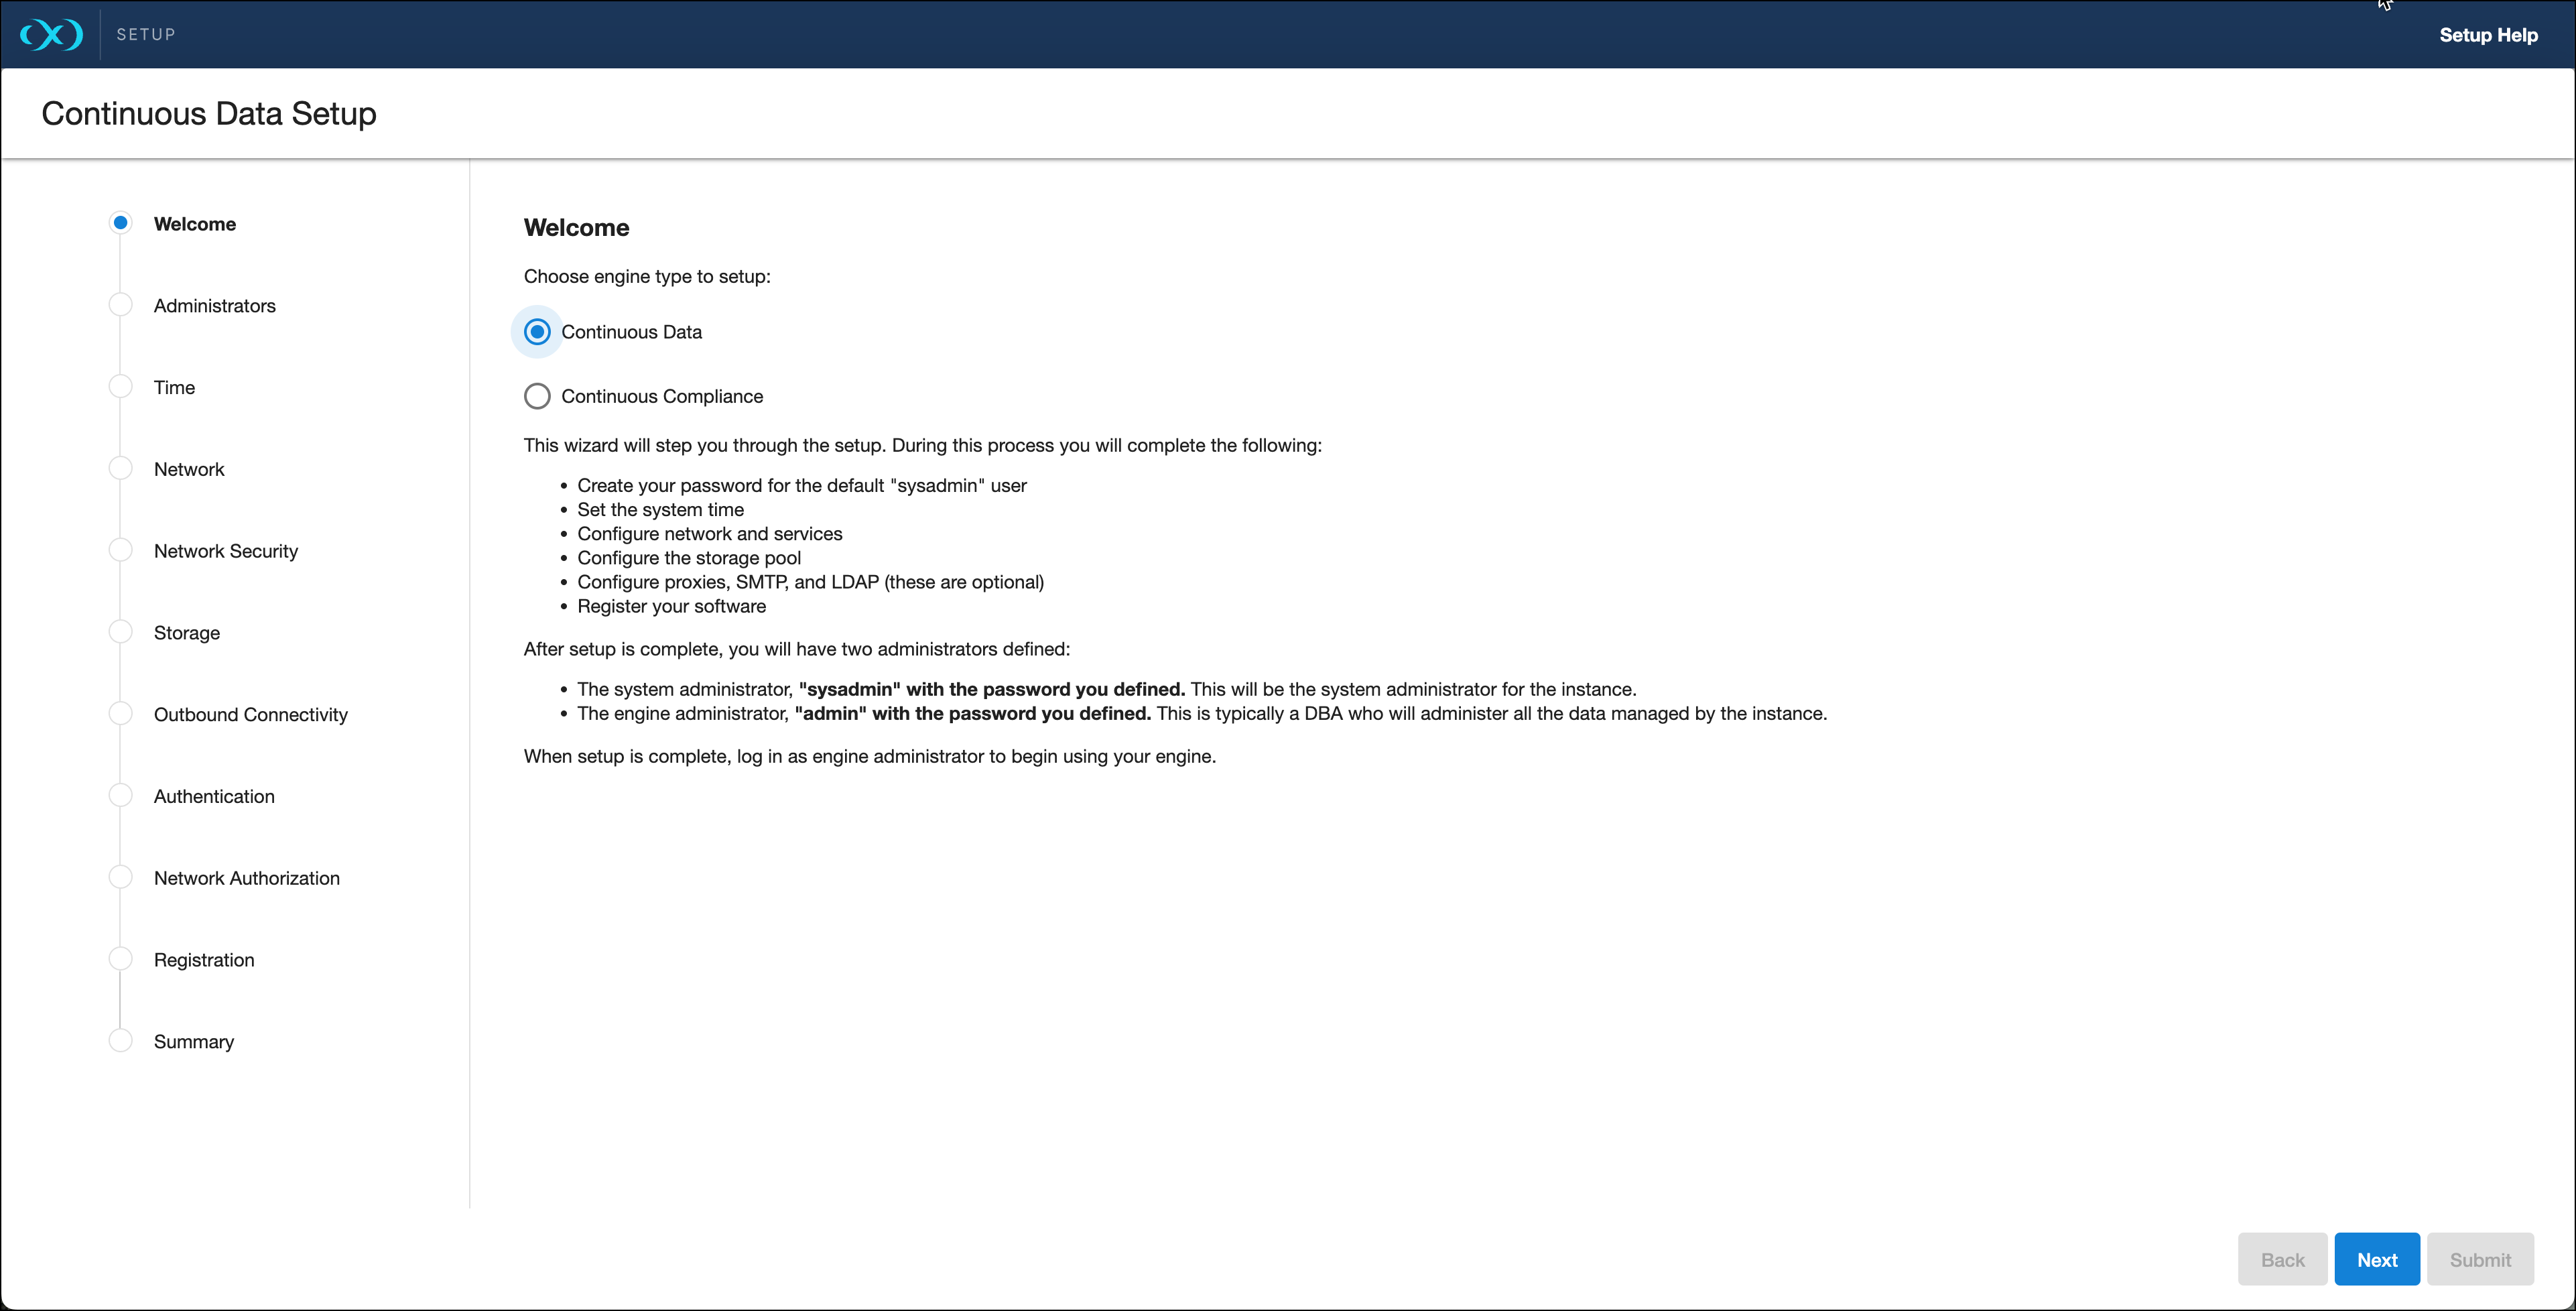
Welcome
The Welcome section asks users to select the engine type being setup, whether Continuous Data or Continuous Compliance. This article explains the Continuous Data setup, the Continuous Compliance version can be found
The Welcome tab asks users to select the engine type for setup, and choose from Virtualization or Masking. This document explains the setup for Virtualization engines. For Masking engines, please visit the Masking documentation.
Administrators
Each Continuous Data engine has two default accounts:
System Administrator:
sysadminwith a user-defined password. This will be the system administrator for the instance.Engine Administrator:
adminwith a user-defined password. This is typically a DBA who will administer all the data managed by the instance.
Provide an email address and password for both users in the Administrator section.
Each Continuous Compliance engine has this default account:
Masking Administrator:
adminwith a user-defined password. This will be the user responsible for setting up other users and handling administrative actions.
Time
The Delphix engine leverages its time setting to determine policies and actions that take place within the application. Manually set the time or choose from an NTP server, an explanation of these options are shown below.
Option | Notes |
|---|---|
Set NTP Server (recommended) | After selecting this option, select an NTP server from the list, or select Add NTP Server to manually enter one or more server(s). When configuring a Delphix Engine on VMware, be sure to configure the NTP client on the host to use the same servers that are entered here. |
Manually Select Time and Date | Select the Use browser time and date option to set the system time, or select the date and time by using the calendar and clock icons. If this option is selected, the date and time will persist as the local time, even if time zones are changed. |
Network
The initial network configuration will be pre-populated based on the deployment platform used for Delphix. For VMware deployments, Delphix defaults to the VMXNET3 network adapter.
Select Settings for each Network interface to manage the following options:
Option | Notes |
|---|---|
DHCP or Static network addressing | For Static addressing, enter an IP Address and Subnet Mask. The static IP address must be specified in CIDR notation (for example, 192.168.1.2/24). |
Jumbo Frames | This setting is highly recommended. VMXNET3 supports Ethernet jumbo frames, which can be used to maximize throughput and minimize CPU utilization. |
Routing | A default gateway will be specified in this section. |
DNS Services | Enter a DNS Domain Name and DNS Server to be used for this engine. |
Network security
Delphix installs certificates signed by the engine’s Certificate Authority. Users have the ability to manage their own certificates for HTTPS and DSP (Delphix Session Protocol) connections to and from the Delphix Engine. You can add or modify certificates and certificate signing requests (CSRs) via the ... option.
When you update the Certificate Authority certificate, your HTTPS and DSP certificates will be automatically updated.
For more information please refer to Certificate management in the Security section of this documentation.
Storage
Storage for engines backed by block devices
The Delphix engine automatically discovers and displays storage devices. For each device, confirm that Usage Assignment is set to Data.
You can associate additional storage devices with the Delphix engine after initial configuration, as described in Adding, expanding, and removing storage devices.
There are two options for storage disk usage assignment:
Enabled: Once you set the storage unit assignment for a disk and save the configuration, you cannot change it again.
Unassigned: These are disks being held for later use.
Configure at least four disks for the storage of user data. This makes the Delphix engine storage manager function more efficient since duplicated metadata can be distributed across multiple disks.
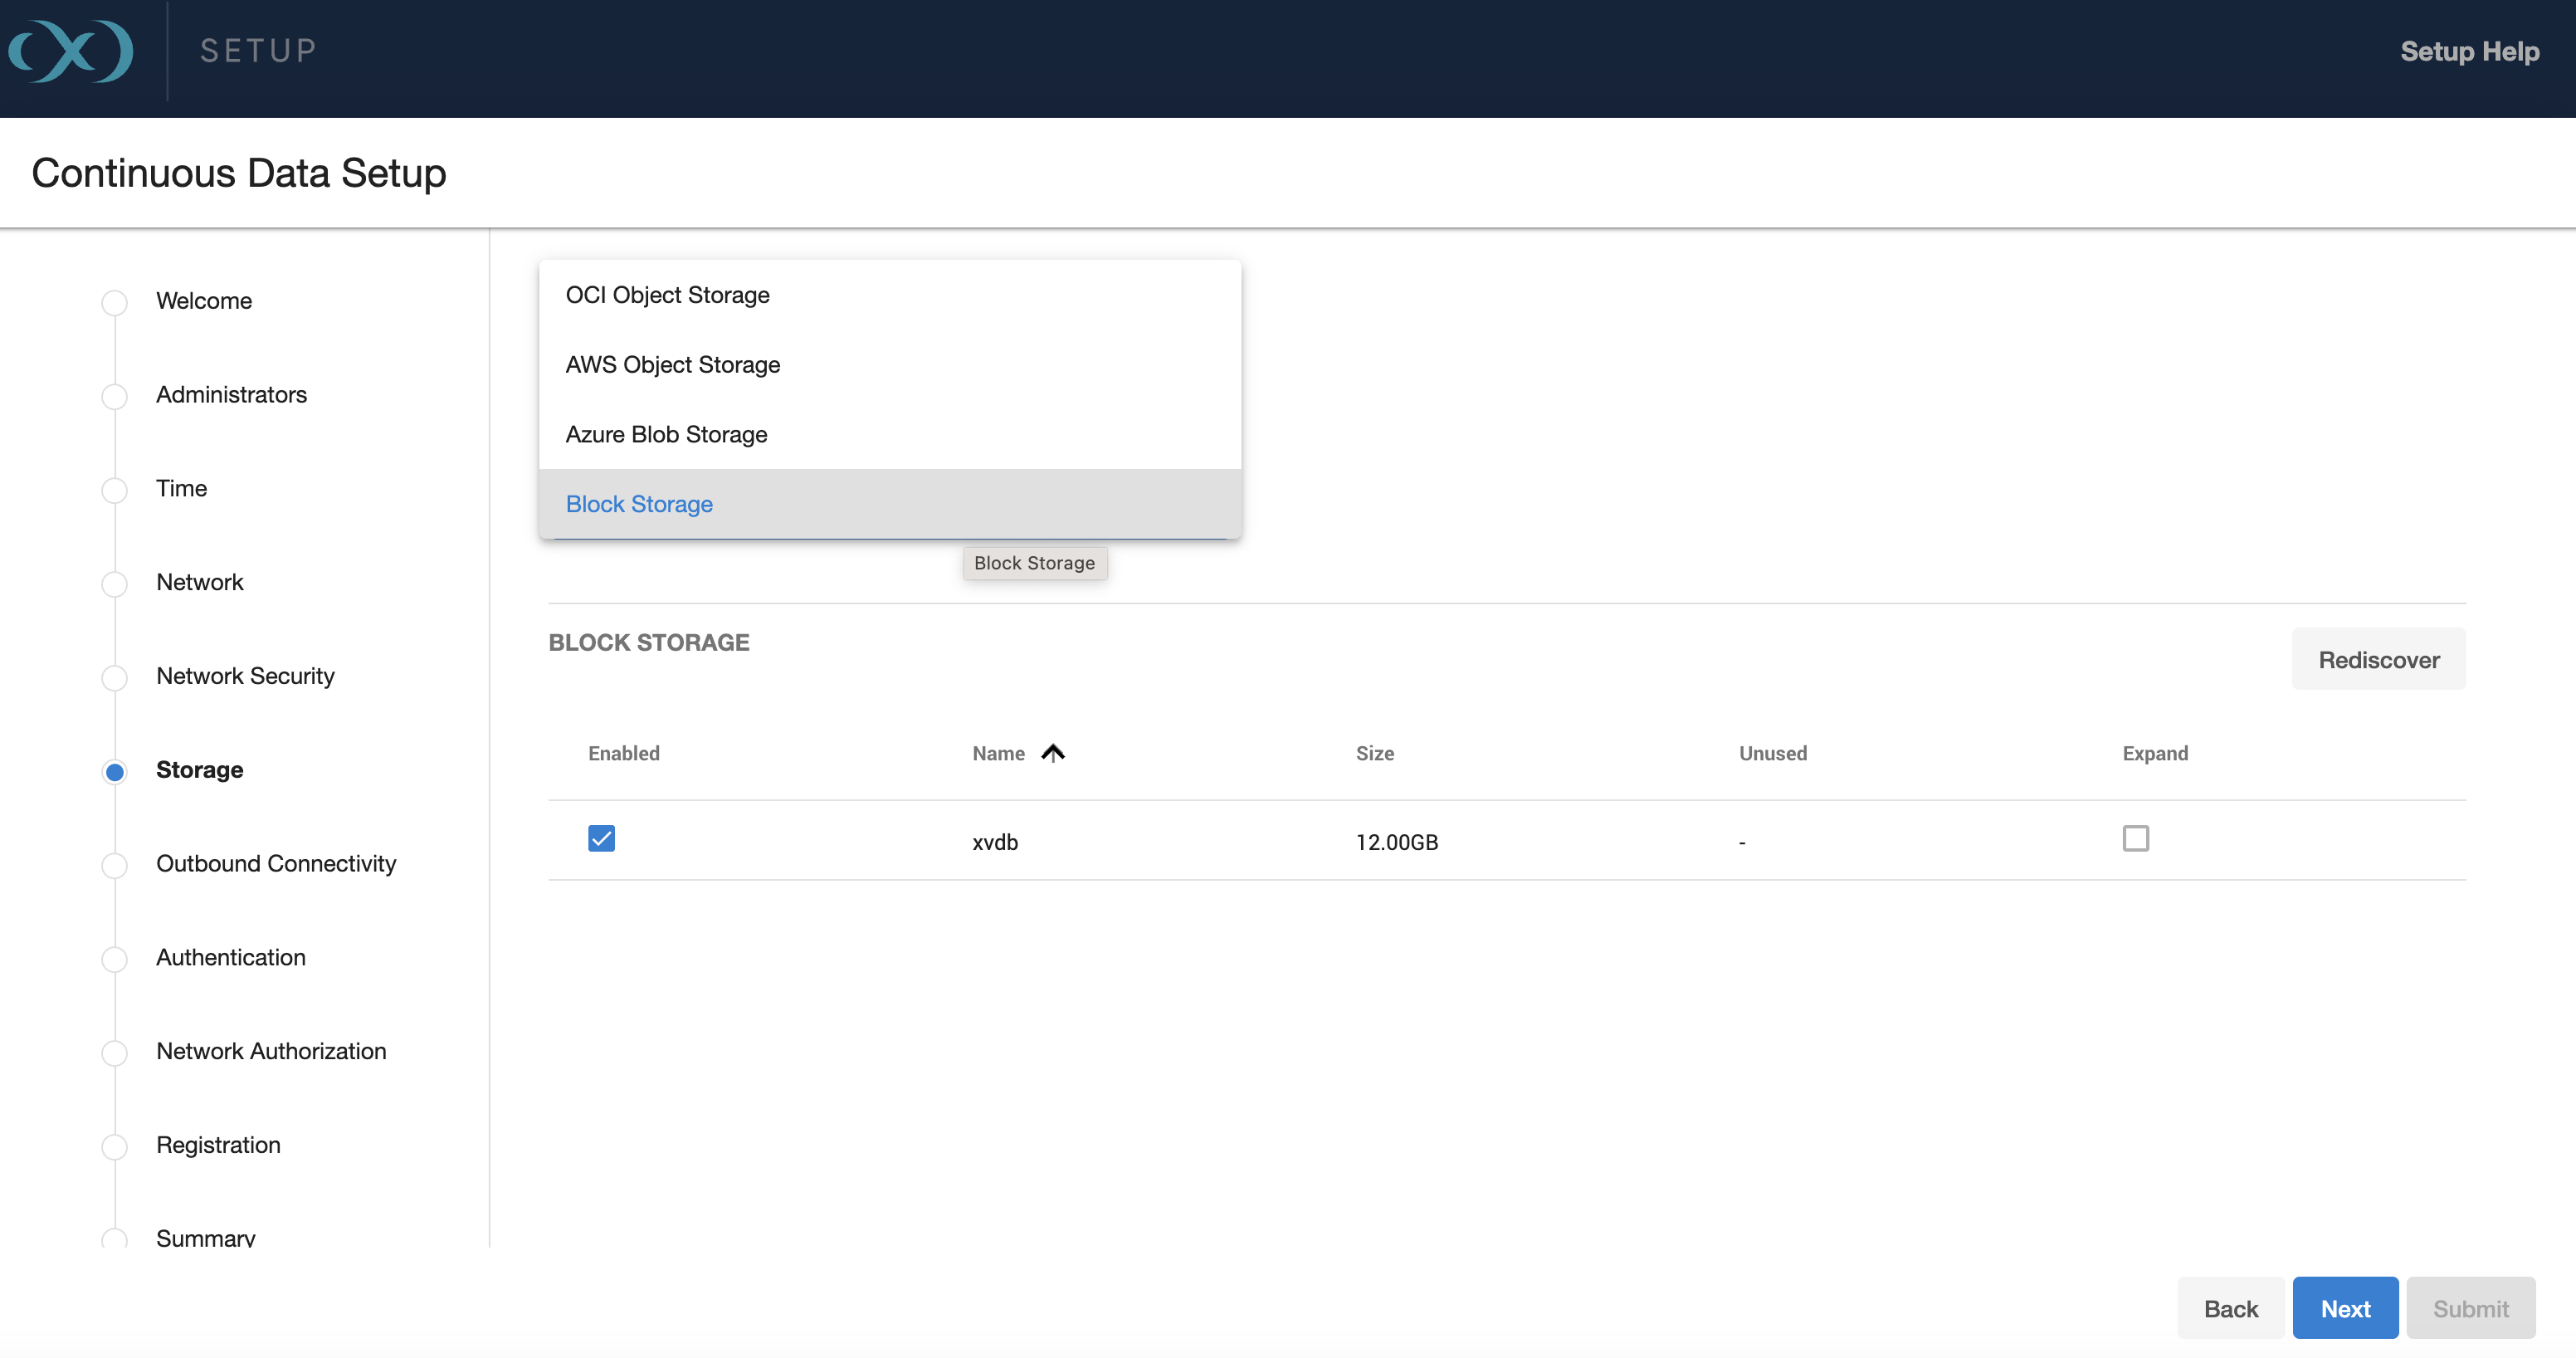
Delphix Elastic Data Engines (Engines backed by object storage)
Elastic Data Engines require a valid NTP server configured to ensure communication between the engine and the object storage.
Select one of the four options from the drop-down menu: Block Storage, AWS Object Storage, OCI Object Storage or Azure Blob Storage. For on premise object storage select AWS Object Storage. Block storage usage is covered in the previous section, Elastic Data engines should select the corresponding storage type.
Delphix only supports the Online access tier (hot tier of Standard GPv2) for Azure-Blob.
For on premise object storage we currently support storage vendors that confirm to the following
s3 REST API compatibility
strong read-after-write consistency
supports s3 key id and secret access key authentication
perpetual key support
Once one of these options is selected, enter the corresponding information with the fields that appear.
For AWS Object Storage, select whether the engine should access the storage bucket via Role (Instance profile) or via Access Key. For on-prem object storage only Access Key authentication is supported. For Azure-Blob, select whether the engine should access the storage bucket via Managed Identities or via Access Key. Make sure you do not have versioning on your blob/bucket, otherwise deleted space will not be reclaimed since it will be held by the versioning logic of the cloud vendor. For OCI object storage, Role (instance principals) is only supported.
Select the Region Enter the Base URL, Region, and Bucket that you want to use for the engine. For on-prem object storage, select Other from the Region dropdown menu, then enter the region and endpoint URL in the provided fields. For Azure-Blob, there is no region to configure. In addition, “endpoint” is an optional field (hidden in the Advanced tab). For OCI object storage, only the bucket information is needed.
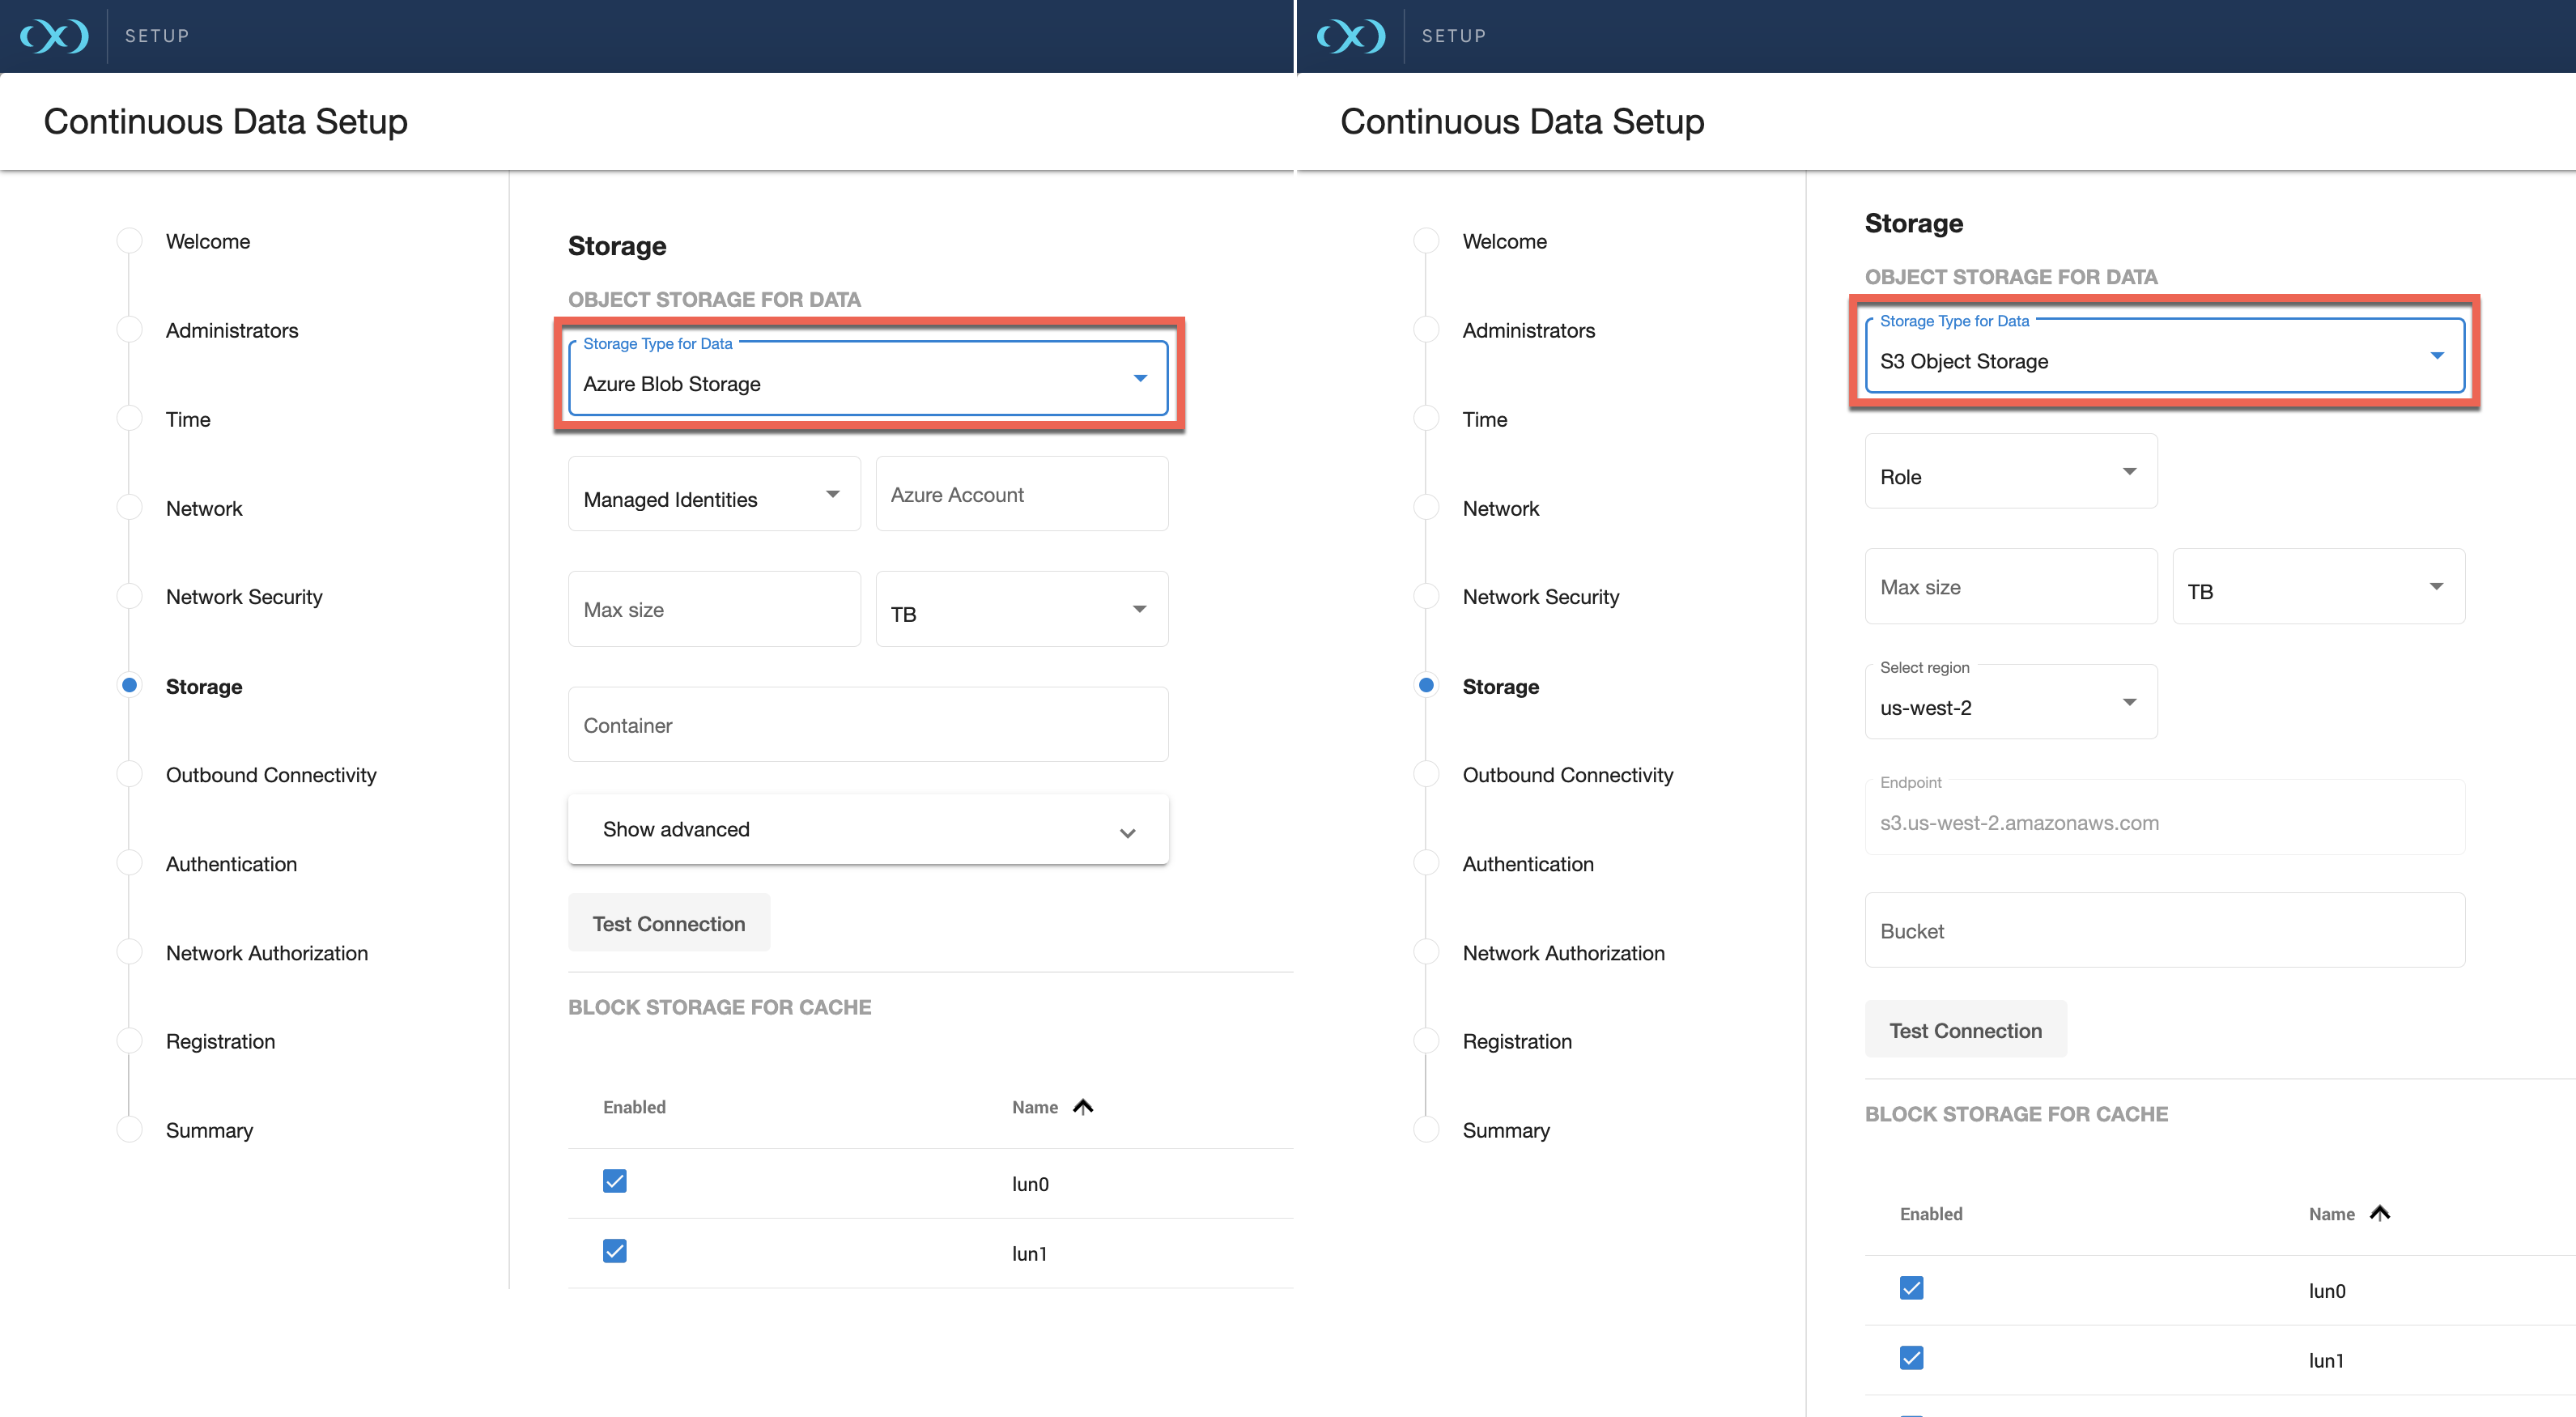
Enter the amount of data that you would like to store on the engine. The size would be similar to the total storage on a traditional engine. Delphix Elastic Data engines provide the following advantages:
Blob/Object storage only charges for the amount of storage used (In traditional EBS-backed engines, AWS charges based on provisioned storage). I.e., if the size was 10TB but the engine only uses 1TB, then AWS only charges for the 1TB of storage used.
Increasing or reducing this number after setup is simple. It involves editing this number from the sysadmin login (size cannot be reduced to a number lesser than what the Delphix engine is already using).
This number acts as a quota in case you do not want S3 storage and costs to grow beyond a certain number.
Make sure to Test the connection to confirm that the VM can access the bucket.
Block storage for cache
Block devices as cache are used to reduce latencies for frequently read data and as temporary storage for synchronous writes before the writes are sent to blob/object storage.
Sizing: If you already know the size of the frequently accessed data, then size the cache equal to (size of frequently accessed data + Extra 10% for bookkeeping purposes), If not, start off with sizing the cache to 50% of the size of all dSources that will be added to the engine.
For specific block storage requirements for each platform, refer to:
See, EBS Configuration section of Deployment for AWS EC2 .This is only applicable to AWS.
See, Storage configuration section of Deployment for Microsoft Azure
See, General storage configuration section of Deployment for OCI
See, General storage section of Deployment for VMware
Setup the disks such that they can support the throughput of the engine. For example
AWS
gp3 disks are recommended as they offer good performance at a lower cost. At 500 IOPS per 1GiB ratio, a 32 GiB volume can be configured to have the gp3 volume 16K IOPS limit and 1000 MB/s throughput. For reference, r5n.8xlarge instance has a 30K IOPS and 850 MB/s throughput limits so two gp3 devices would be sufficient for the instance.
io2 disks have lower latency at a higher cost. However, the lower latency is not beneficial once the instance IOPS or throughput limit is reached.
Azure
Ultra disks are recommended as they can be configured to have high IOPS and throughput at relatively small sizes. At 300 IOPS per GiB ratio, a 256 GB volume can have 76,800 IOPS and 4000 MB/s throughput.
Premium SSD disks can have high performance though they need to be much larger, e.g. P80 32TiB volume has 20K IOPS and 900 MB/s. The new Premium SSD v2 disks have better IOPS per GiB ratio though they’re not available in all regions. SSD v2 is currently untested due to this unavailability.
OCI
Ultra High Performance and Higher Performance volumes are supported.
Max IOPs and Throughput are proportional to the volume size. A minimum size of 200G using Higher Performance volumes is required.
Elastic Data engines on Azure - storage account and permission setup
Storage container
To have a dedicated Storage Account for your Delphix Elastic Data engine, create a new Storage Account. This can be done by navigating to Storage Accounts and clicking Create. Note that Azure places restrictions on ingress and egress per storage account (https://docs.microsoft.com/en-us/azure/storage/common/scalability-targets-standard-account).
Create a Storage Container in the Storage Account being used for your Delphix Engine. Navigate to the Storage Account you want to use, click Containers under the Data Storage section, and click + Container. Take note of the Storage Container Name, the Storage Account name, and the Resource Group name.
Managed role
Create a custom role that gives access to the storage account. This role will be assigned to the virtual machine after creation.
Navigate to the Resource Group for the Storage Account that contains the Storage Container that was created above.
Click on Access Control (IAM) and then Create a custom role.
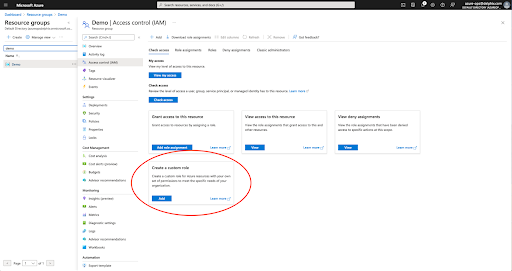
Create a role with the following permissions with a minimum scope of the storage account that your Delphix Engine will be using
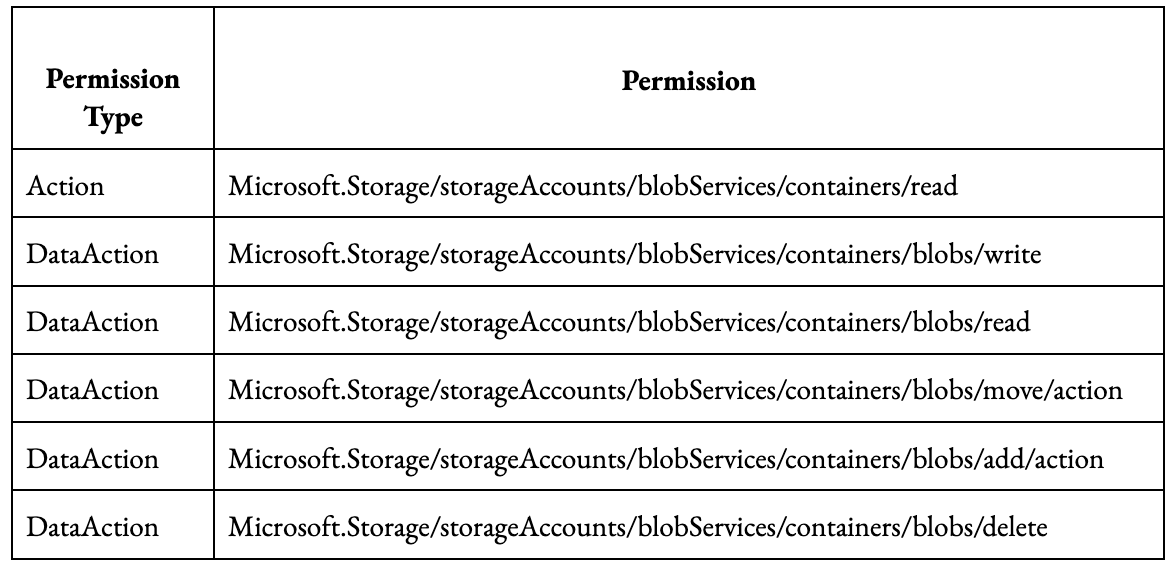
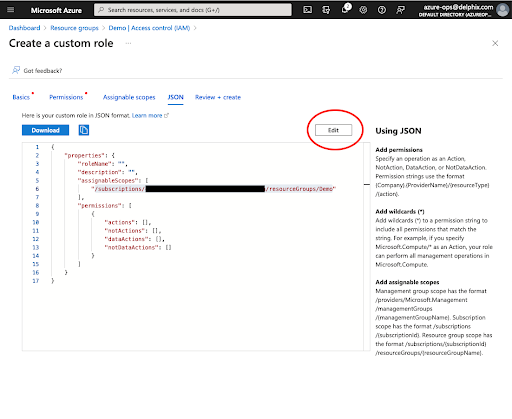
Alternatively, in the Create a custom role navigate to the JSON view of the role and click Edit in the upper right. Copy the JSON below with the bolded section replaced with your values, namely Your_Role_Name, Your_Subscription_ID, Your_Resource_Group_Name, Your_Storage_Account_Name. Be sure to click Save after adding the JSON.
CODE{ "properties": { "roleName": "<Your_Role_Name>", "description": "Delphix object storage Azure role permissions", "assignableScopes": [ "/subscriptions/<Your_Subscription_ID>/resourceGroups/<Your_Resource_Group_Name>/providers/Microsoft.Storage/storageAccounts/<Your_Storage_Account_Name>" ], "permissions": [ { "actions": [ "Microsoft.Storage/storageAccounts/blobServices/containers/read" ], "notActions": [], "dataActions": [ "Microsoft.Storage/storageAccounts/blobServices/containers/blobs/write", "Microsoft.Storage/storageAccounts/blobServices/containers/blobs/read", "Microsoft.Storage/storageAccounts/blobServices/containers/blobs/move/action", "Microsoft.Storage/storageAccounts/blobServices/containers/blobs/add/action", "Microsoft.Storage/storageAccounts/blobServices/containers/blobs/delete" ], "notDataActions": [] } ] } }
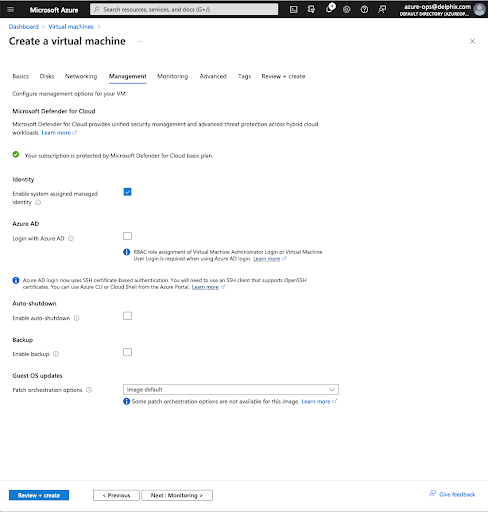
Virtual machine
When creating your virtual machine ensure that system-assigned managed identity is enabled for the VM.
After the virtual machine is created, you need to assign the role that was created above to the virtual machine. Navigate to the virtual machine and click on Identity and then Azure role assignments.
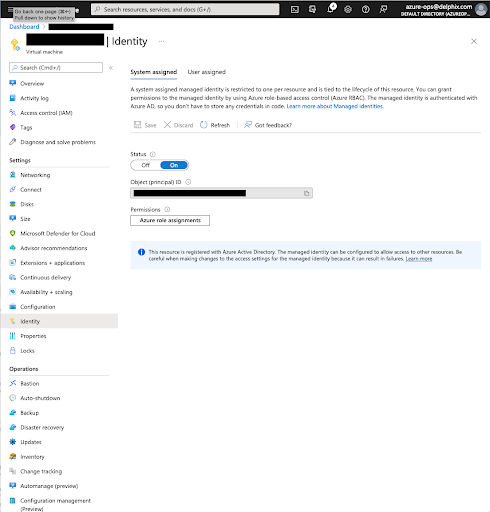
Click Add role assignment. For the scope, select Storage. Select your subscription, for Resource select the Storage Account you will be using, and for the Role, select the new role you created above.
Testing permissions
To test that the role permissions are working correctly, assign the role you created above to a generic Ubuntu VM. Install the Azure CLI following Azure’s documentation https://learn.microsoft.com/en-us/cli/azure/install-azure-cli
Run the following commands to test access to the storage container that you wish to use:
delphix@demo-vm:~$ az login --identity
[
  {
	"environmentName": "AzureCloud",
	"homeTenantId": "<Tenant>",
	"id": "<ID>",
	"isDefault": true,
	"managedByTenants": [],
	"name": "Pay-As-You-Go",
	"state": "Enabled",
	"tenantId": "<Tenant>",
	"user": {
  	"assignedIdentityInfo": "MSI",
  	"name": "systemAssignedIdentity",
  	"type": "servicePrincipal"
	}
  }
]

# List the storage containers
delphix@demo-vm:~$ az storage container list --account-name <Your_Storage_Account_Name> --output table --auth-mode login
Name                                                     	Lease Status	Last Modified
-----------------------------------------------------------  --------------  -------------------------
<Your_Storage_Container_Name>                                           	2022-04-28T18:57:01+00:00

# List the contents of the new empty container
delphix@demo-vm:~$ - <Your_Storage_Account_Name> --container-name <Your_Storage_Container_Name> --output table --auth-mode login

# Create a test file
delphix@demo-vm:~$ echo "This is a test" > test.txt

# Upload the file to the VM's storage container
delphix@demo-vm:~$ az storage blob upload --file test.txt --account-name <Your_Storage_Account_Name> --container-name <Your_Storage_Container_Name> --output table --auth-mode login
Finished[#############################################################]  100.0000%
Client_request_id                 	Content_md5           	Date                   	LastModified           	Request_id                        	Request_server_encrypted	Version
------------------------------------  ------------------------  -------------------------  -------------------------  ------------------------------------  --------------------------  ----------
741a4bb4-c72a-11ec-95be-0022487dab78  /yKUEzaVYJiumlZCidG/Gw==  2022-04-28T19:36:09+00:00  2022-04-28T19:36:09+00:00  d254d8c6-a01e-00fe-1937-5bf5c0000000  True                    	2021-04-10

# List the contents of the storage container again
delphix@demo-vm:~$ az storage blob list --account-name <Your_Storage_Account_Name> --container-name <Your_Storage_Container_Name> --output table --auth-mode login
Name  	Blob Type	Blob Tier	Length	Content Type	Last Modified          	Snapshot
--------  -----------  -----------  --------  --------------  -------------------------  ----------
test.txt  BlockBlob             	15    	text/plain  	2022-04-28T19:36:09+00:00

# Download the storage blob
delphix@demo-vm:~$ az storage blob download  --account-name <Your_Storage_Account_Name> --container-name <Your_Storage_Container_Name> --output table --auth-mode login --name test.txt --file downloaded-test.txt
Finished[#############################################################]  100.0000%
Name  	Blob Type	Blob Tier	Length	Content Type	Last Modified          	Snapshot
--------  -----------  -----------  --------  --------------  -------------------------  ----------
test.txt  BlockBlob             	15    	text/plain  	2022-04-28T19:36:09+00:00
delphix@demo-vm:~$ cat downloaded-test.txt
This is a test

# Delete the storage blob
delphix@demo-vm:~$ az storage blob delete  --account-name <Your_Storage_Account_Name> --container-name <Your_Storage_Container_Name> --output table --auth-mode login --name test.txt
delphix@demo-vm:~$ az storage blob list --account-name <Your_Storage_Account_Name> --container-name <Your_Storage_Container_Name> --output table --auth-mode login
Key based access
While managed identities are the recommended authentication method, users can also use static Storage Account access keys. Azure has detailed instructions here on how to manage Storage Account access keys here, including best practices on key security and rotation.
Elastic Data engines on AWS: Permissions
A role with at least the following permissions for that bucket assigned to the instance:
AWS: [
“s3:PutObject”,
“s3:GetObject”,
“s3:ListBucket”,
“s3:DeleteObject”
]
OCI: Permissions and Setup
Setup
OCI IAM has the capability to provide access to different services from an OCI instance, you don't need any API key or customer secrets or credentials to call the services.
OCI IAM Instance principals serves the same purpose as AWS IAM Role does.
Instance principals helps you in accessing OCI services from OCI instance.
For creating a dynamic group:
Login to the OCI Console
Go to Identity → Dynamic Groups → Create Dynamic Group
Specify Name and Description
You have a choice whether you want one of the matching rule to match or all the rules to be matched. You can select all the rules to be matched.
.jpg?inst-v=59d9d052-b7b3-4a4a-bc01-08f681df7a2d)
Creating Rules
When you create a dynamic group, you need to define some set of rules using which it would be determined which instances would be part of that dynamic group.
In this usecase, you can define 2 rules :
Check the tag value on the instance and match it with some defined value.
tag.InstanceType.value='prod'All the instances present in a specific compartment.
instance.compartment.id = 'ocid1.compartment.oc1..aaaaaaxx'Policy
After creating the group, we need to define a policy which specifies who can access the service. We need policy to tell OCI IAM to give access to the dynamic group which we created. For understanding OCI policies in detail How Policies Work (without Identity Domains).
For creating a policy:
Log into OCI Console
Go to Identities → Policies → Create PolicySpecify Name, Description, Compartment and policy statement. Here you are giving manage access to objects and not buckets. If needed, you can add another statement providing access to manage buckets also.
Create the following policy:
Allow dynamic-group <dynamic group name> to manage buckets in compartment id <compartment id> where target.bucket.name=<regex for bucket name>
Allow dynamic-group <dynamic group name> to inspect buckets in compartment id <compartment id>
Allow dynamic-group <dynamic group name> to manage objects in compartment id <compartment id> where target.bucket.name=<regex for bucket name>
Once all this is done, it would mean the instances launched in the specific compartment with specified tag would have access to manage object storage objects in that compartment.
Testing Permissions
You can use OCI CLI to demonstrate how you can use instance principals for authorising OCI requests without the need of managing any security credentials.
OCI CLI does not come preinstalled with different variants other than Oracle Linux 8 and Oracle Linux Cloud Developer 7. You can install it by following Quickstart.
Now you can make any call using oci cli by passing — auth instance_principal with the calls.
oci os bucket get -bn prodbucket --auth instance_principal
oci os object put -bn prodbucket --auth instance_principal --file object.txt
You could also define it as an environment variable.
OCI_CLI_AUTH=instance_principalInstance principals could be used by OCI CLI and Python SDK/JAVA SDK. But does not works with Amazon S3 Compatibility API. For that you need customer secret keys.
Outbound connectivity
Web proxy
If a Web Proxy Server is necessary for your environment, select Configure web proxy and enter the hostname and credentials for that server.
Phone home
The support and phone home bundles contain metadata from the Delphix Engine, but do not include the customer data that has been ingested into the engine. Redaction of known PII data (i.e. names and email addresses for Delphix users) is done on-engine before bundles are uploaded, and again after bundles are uploaded to Delphix, to ensure that the latest redaction rules are applied to each bundle without requiring the engine to be continually upgraded. There may be some limited environment data in the bundle (i.e., IP addresses and database names) that are needed for debugging purposes. Support bundles are automatically deleted within 30 days after the support case is closed, or 30 days after upload, whichever comes later.
Enabling/disabling phone home
Enabling this option sends information to Delphix periodically over HTTPS (SSL). This data is securely managed by the internal team for product analysis and improvements. This feature requires a connection to the internet and will use the Web Proxy Server configuration.
Perform the following steps to enable/disable phone home.
Login to the Delphix Virtualization engine setup using the sysadmin credentials.
From the Outbound Connectivity widget, click Modify.
To enable phone home, select the checkbox before the Enable phone home service option. If enabled, this service will automatically send a stream of anonymous, non-personal metadata describing user interaction with the product's user interface.
To disable, deselect the checkbox before the Enable phone home service option.
Click Save to save for the settings.
User-click analytics
User-click analytics is a lightweight method to capture how users interact with Delphix product UIs, allowing Delphix to collect browser-based, user-click data. Delphix does not collect, transmit, or store any personally identifiable information (PII) such as email addresses, IP addresses, usernames, etc.
SMTP server
Select Use an SMTP Server and enter the server name or IP address to enable email notifications for events and alerts. When a critical fault occurs with the Delphix Engine, it will automatically send an email alert to the admin user. Make sure to configure the SMTP server so that alert emails can be sent to this user. See System Faults for more information.
Authentication
On the Authentication page, configure authentication protocols such as LDAP and SAML/SSO. See User and authentication management for further details.
LDAP
To avoid configuration issues, consult with the lightweight directory access protocol (LDAP) administrator before attempting to set up LDAP authentication of users for the Delphix engine. When configuring LDAP, provide an LDAP Server. Two authentication methods are currently supported: SIMPLE and DIGEST_MD5.
Select to Protect LDAP traffic with SSL/TLS if desired. This option requires an import of the server certificate. If LDAP has been set up as an authentication service for the Delphix Engine, add new users with LDAP as their authentication mechanism. For more information, see the User groups article.
SAML/SSO
To enable SAML/SSO, there are two properties to set:
Audience Restriction: The audience restriction must be set to the entity id configured in the Delphix Server via the Delphix Setup. Its default value is https://Delphix Server ID, where Delphix Server ID is a 36-character hexadecimal string of the form xxxxxxxx-xxxx-xxxx-xxxxxxxxxxxx.
See Determining the Delphix server ID and host name for more on the Delphix Server ID. If the Delphix engine does not exist or is unreachable, enter a temporary value (such asdelphix-sp-id) which must later be replaced by the actual Delphix Server ID.IdP Metadata: an XML document that must be exported from the application created in the IdP. Paste its contents into the provided field.
Kerberos
The Kerberos page allows for Kerberos authentication to communicate between hosts connected with Delphix. Enabling this option will allow Kerberos key-based authentication when adding new environments to Delphix.
Realm: the domain over which a Kerberos authentication server has the authority to authenticate a user, host, or service.
Principal: a unique identity to which Kerberos can assign tickets.
Keytab: a file containing pairs of Kerberos principals and encrypted keys (which are derived from the Kerberos password).
Registration
As described in Registration management, registration allows Delphix Support to access the engine, properly diagnose, and identify any issues during support cases. If the Delphix Engine has access to the internet, auto-register the Delphix Engine with Delphix Support credentials in the Online Registration section.
If external connectivity is not immediately available, perform the manual registration.
Copy the Delphix Engine registration code displayed.
Transfer the Delphix Engine's registration code to a workstation with access to the external network Internet. For example, e-mail the registration code to an externally accessible email account.
On a machine with access to the internet, use a browser to navigate to the Delphix Registration Portal at http://register.delphix.com.
Log in with Delphix support credentials.
Paste the Registration Code.
Click Register.
The Delphix engine will work without registration, but it is recommended to register each engine as part of the setup. Failing to register the Delphix Engine will impact its supportability.
Summary
The final Summary section will enable a review of the configurations for each page in the setup tutorial. Confirm that everything looks correct, and click submit to complete the setup.
After Setup
After the configuration is complete, the Delphix engine will restart and launch the browser-based Delphix Management application.
After the Delphix Management application launches, the admin can log in using the initial default username admin and the initial default password Delphix. On the first login, there will be a prompt to change the initial password.