
This topic describes how to link a Db2 staging dSource.
Prerequisites
Be sure that the source and staging instances meet the host requirements and the databases meet the container requirements described in Requirements for Db2 Hosts and Databases
Source database preparation
Instance owner permissions
Delphix uses the Db2 instance owner account on the dSource for multiple operations, including verifying the data inside the databases. In order to ingest a database on the staging server with different instances, we need permissions on the source database in order to perform a restore on the staging server. As an example, if we have an instance named "auto1051" at the source with a database name "delphix" and we want to create a dSource on the "auto1052" instance on the staging server, then you must explicitly grant DBADM and SECADM to the dSource instance "auto1052" on the source instance using the following steps:
-
Connect to the source database as the source instance owner.
-
connect to <DB_NAME> user <SOURCE_INSTANCE_OWNER>
-
-
Issue database grant command
-
grant DBADM, SECADM on the database to user <DSOURCE_INSTANCE_OWNER>
-
grant DBADM, SECADM on the database to user <VDB_INSTANCE_OWNER>
-
-
Repeat step 2 for every database to be included in the dSource, on the corresponding source database.
Determine if your dSource will be a non-HADR instance, a HADR single standby instance, or a HADR multiple standby instance. Non-HADR dSources can only be updated via a full dSource resync from a newer backup file
Non-HADR Database
-
See the "InstanceOwner Permissions" section above.
-
Ensure that the source database has the necessary user permissions for the provisioned VDBs as described in Database Permissions for Provisioned Db2 VDBs
HADR single standby database
-
All items in Non-HADR Database section above.
-
The following database configuration settings must be set:
-
update db cfg for <DB_NAME> using HADR_LOCAL_HOST <PRIMARY_IP> HADR_LOCAL_SVC <PRIMARY_PORT > immediate
-
update db cfg for <DB_NAME> using HADR_REMOTE_HOST <STANDBY_IP> HADR_REMOTE_SVC <STANDBY_PORT> immediate
-
update db cfg for <DB_NAME> using HADR_REMOTE_INST <STANDBY_INSTANCE_NAME> immediate
-
update db cfg for <DB_NAME> using HADR_SYNCMODE SUPERASYNC immediate
-
-
If database configuration parameter LOGINDEXBUILD is set to OFF, do the following:
-
update db cfg for <DB_NAME> using LOGINDEXBUILD ON
-
Force off all connections to the database and reactivate the database
-
-
If database configuration parameter LOGARCHMETH1 is set to OFF, do the following:
-
update db cfg for <DB_NAME> using LOGARCHMETH1 XXXX (must be a valid log archiving method)
-
Take an offline backup
-
-
If LOGARCHMETH1 points to a third-party backup server (i.e. TSM or Netbackup) define LOGARCHMETH2 to disk
-
update db cfg for <DB_NAME> using LOGARCHMETH2 DISK:<full path to archive log directory>
-
Log files in the directory must be available from the time of the backup until the restore has successfully completed on the dSource.
-
-
-
db2 start hadr on db <DB_NAME> as primary by force
-
Take a full online backup as defined in the "Backup Source Database" section below.
-
Record the following information, as it must be entered on the Delphix Engine while creating the dSource.
-
HADR Primary hostname
-
HADR Primary SVC
-
HADR Standby SVC (auxiliary standby port)
-
HADR multiple standby databases
This assumes a single standby database HADR setup already exists. The existing standby will be referred to as the main standby. The new delphix standby will be referred to as the auxiliary standby.
-
The following database configuration settings must be set on the primary database:
-
update db cfg for <DB_NAME> using HADR_SYNCMODE <SYNC MODE> immediate – set whichever sync mode you wish to use on your main standby.
-
update db cfg for <DB_NAME> using HADR_TARGET_LIST "<MAIN_STANDBY_IP:MAIN_STANDBY_PORT|AUXILIARY_STANDBY_IP:AUXILIARY_STANDBY_PORT>" immediate
-
You may have up to two auxiliary standbys defined separated by a '|'; one of which must be the delphix dSource.
-
-
-
stop hadr on db <DB_NAME>
-
start hadr on db <DB_NAME> as primary by force
-
Take a full online backup as defined in the "Backup Source Database" section below. While this backup is running, you may continue with step 5.
-
The following database configuration settings must be set on the existing main standby database:
-
update db cfg for <DB_NAME> using HADR_SYNCMODE <same mode as defined in 1.a above.> – It must be the same value used for the primary database.
-
update db cfg for <DB_NAME> using HADR_TARGET_LIST "<PRIMARY_IP:PRIMARY_PORT|MAIN_STANDBY_IP:MAIN_STANDBY_PORT>"
-
-
stop hadr on db <DB_NAME>
-
start hadr on db <DB_NAME> as standby
-
Record the following information, as it must be entered on the Delphix Engine while creating the dSource (the auxiliary standby database):
-
HADR Primary hostname
-
HADR Primary SVC
-
HADR Standby SVC (auxiliary standby port)
-
HADR_TARGET_LIST <PRIMARY_IP:PRIMARY_PORT|MAIN_STANDBY_IP:MAIN_STANDBY_PORT>
-
Enable SSL for HADR
This assumes all items in the Non-HADR Database section above.
-
Create a local keystore in a dedicated directory with suitable permissions on both the primary and standby instances, using the provided command. Ensure that the DB2 instance user grants 700 permissions to the directory, while for privileged elevation or low privileged users, 750 permissions should be assigned to the directory.
-
gsk8capicmd_64 -keydb -create -db <KEYSTORE_NAME> -pw <PASSWORD> -type pkcs12
Note:-
Use an extension like ".ps12," ".p12," or ".pfx" for the keystore file name.
-
Use
-stashoption to create a stash file at the same path as the keystore, with a file extension of.sth. At instance start-up, GSKit uses the stash file to obtain the password to the keystore.
-
-
-
Update the database manager configuration for SSL_SVR_KEYDB and SSL_SVR_STASH (if the stash file is created) on both the primary and standby instances:
-
db2 update dbm cfg using SSL_SVR_KEYDB <KEYSTORE_FILE_PATH>
-
db2 update dbm cfg using SSL_SVR_STASH <STASH_FILE_PATH>
Note:-
User must restart the instance to apply the configuration changes on both the primary and standby instances.
-
While it's possible to configure HADR with SSL without specifying the stash file, it's generally recommended to use the stash file to enhance security and automation. If you decide not to use a stash file and do not specify the SSL_SVR_STASH parameter in the dbm cfg, you would be prompted to enter the password manually each time you start the Db2 instance. This can be done using the db2start command, and you would be prompted to enter the password.
-
-
-
Must restart the instance to apply the configuration changes on both the primary and standby instances.
-
Add certificates on both the primary and standby instances. User can create a self-signed digital certificate or use a CA-signed certificate.
-
Create Self Signed Digital Certificate
gsk8capicmd_64 -cert -create -db <KEYSTORE_NAME> -pw <PASSWORD> -label <CERT_LABEL_NAME> -dn "CN=<COMMON_NAME>" -
CA signed certificate
gsk8capicmd_64 -cert -import -db <CA_SIGN_CERT> -pw <CA_SIGN_CERT_PWD> -target <KEYSTORE_NAME> -target_pw <PASSWORD>
Note: On the standby instance, use the label naming convention as <DB_NAME>_*_STANDBY.If using CA signed certificate, rename the label based on naming convention for the standby instance.
-
-
Extract the respective certificate’s public key to a certificate file on both the primary and standby instances:
gsk8capicmd_64 -cert -extract -db <KEYSTORE_NAME> -pw <PASSWORD> -label <CERT_LABEL_NAME> -target <CERT_NAME>.crt -
Share the extracted certificates between the primary and standby instances.
-
Add the shared certificates to the keystore on both the primary and standby instances:
gsk8capicmd_64 -cert -add -db <KEYSTORE_NAME> -pw <PASSWORD> -label <CERT_LABEL_NAME> -file <CERT_NAME> -
Check and confirm that the labels used for the certificates are present in both the primary and standby instance's keystore:
-
gsk8capicmd_64 -cert -list -db <KEYSTORE_NAME> -pw <PASSWORD>
-
Delphix recovery with customer supplied archive logs
The Delphix Recovery with Customer Supplied Archive Logs (formerly known as Delphix Backup and Logs ingestion), feature allows users to provide Delphix with the location of the source database archive logs. Full backups only have to be restored during dSource creation, or during RESYNC operations when there are exceptions, for example, lost/corrupt log files. Archived logs get applied during the snapshot operation.
A full backup is required to create a dSource and prior to the snapshot operation, users can provide the archive logs to update the dSource during the snapshot operation, user-provided logs will be applied to the staging database. Applying the logs on a regular basis allows users to keep their dSource in sync with their source database. The staging database will always be in a roll forward pending state. The Plugin performs validation before applying the logs. Plugin managed Pre and Post Hooks can be used for preparing and purging the full backups and archive logs. A list of logs that are available for purging is stored in the snapshot metadata of the dSource. In case DPF is enabled, users need to place archive logs inside a folder with a name as NODE<Partition number> where <Partition number> is a four-digit number. For example, if the source environment has two partitions, then the user-provided log path will have folder names as NODE0000 and NODE0001. Both these folders will have respective archive logs. Snapshot operation will be used to apply the archive logs.
HADR and non-HADR configured dSources can be moved to this feature by performing a RESYNC operation.
Delphix supports Customer Supplied Archive Logs with Db2 version 10.5 and 11.1. To use Customer Supplied Archive Logs simply check the checkbox provided during dSource creation. Customer Supplied Archive Logs require that:
-
A full backup must be accessible on the staging server, it could be a shared location but must be mounted on the staging host and visible as a file system.
-
Archived logs must also be accessible on the staging server
-
The following command can be used to generate archive logs from the source database;
-
db2 archive log for database <database name>
-
-
Instance users must have read permissions on logs so that Delphix-managed recover can apply the logs.
-
Instance users must have read permissions on logs and additional write permissions on customer-provided log location if Delphix is planning to use customer-provided log location for applying the logs.
-
If the user has placed the archive logs at a user-provided log location, then the logs must be valid and the first active log of the staging database must be present in the user-provided log location.
-
-
If database configuration parameter LOGINDEXBUILD is set to OFF, do the following:
-
update db cfg for <DB_NAME> using LOGINDEXBUILD ON
-
Force off all connections to the database and reactivate the database
-
-
The customer does log purging from the provided log location. Delphix only provides the list of logs that are eligible for purging.
Limitations:
-
Continuous updates to the dSource are not available. The DB_SYNC operations apply new logs from the log location and keep the dSource updated with changes on the source.
-
Read access to the staging database is not available.
Staging push
With the "Staging Push" feature, you can now manage the restore and rollforward operations from the CLI.
During dSource creation (or RESYNC), the plugin will create an empty mount point and will provide a restore and rollforward template in the logs under the toolkit scratch path that will assist you in restoring the database. You can restore the dSource using the steps mentioned in the readme or through any other method of their choice. You can also configure the dSource with HADR by following the steps provided in the "HADR Single/Multiple Standby Database" sections above. Staging push is now supported on both DPF and non-DPF Db2 instances.
Once the dSource is ready, you can perform restore and rollforward operations from the CLI. After the restore, the staging database should remain in the rollforward pending state, and prior to the next snapshot, the user can do a rollforward to a specific Point-in-Time (by providing a timestamp to the rollforward command) against the available archive logs. In the case of HADR dSource, you will have to stop HADR before taking a snapshot and starting it back on after the snapshot operation is complete.
The first snapshot created will be an empty directory and doesn’t contain any database and hence a VDB cannot be provisioned using this VDB. (Unless a source backup was restored via a pre-sync hook. In that case, the initial snapshot will be that of source backup and won’t be empty).
Prior to the snapshot operation, the user should validate the backups and the archive logs before applying them to the staging database. Below are the user side validations:
User side validation prior to snapshot operation
-
The user must validate the backup files using db2ckbkp utility on the staging host.
-
The user must validate the archive logs using db2cklog utility on the staging host.
-
The authenticity of archive logs would be managed by the user.
-
The user has to provide the first active log at the staging database log directory location after applying the logs.
-
If there is a scenario where a user performed some load copy (non-logged transactions) operations on the source side then it’s the responsibility of the user to make those non-logged transactions available on the staging database.
Backup source database
New feature: Source database with Raw DEVICE type storage
Several users use raw device-based tablespaces for source Db2 databases. To leverage these environments with Delphix, Delphix has built a workflow using Db2s native tools that allow Delphix to discover and convert a raw device-based tablespace into an automatic storage-based tablespace during ingestion. Once the data is ingested into staging, customers will be able to provision VDBs of the automatic storage-based database.
In order to complete the linking process, the Standby dSource must have access to a full backup of the source Db2 databases on disk. This should be a compressed online Db2 backup and must be accessible to the dSource instance owner on disk. Delphix is currently not set up to accept Db2 backups taken using third-party sources such as Netbackup or TSM. All three features of data ingestion, namely HADR, Non-HADR, and Customer Supplied Archive Logs backups must also include logs. Starting with the Db2 plugin version 3.1.1, we are also supporting full online backups, which are taken using the "exclude logs" syntax. This support is only applicable to the dSources created using the Customer Supplied Archive Logs (Backup and Logs) ingestion mechanism on a single partition.
Support for named pipe type DB2 backup
Users can also provide Db2 backups of type named-pipe. Db2 plugin will check the type (type will be either named-pipe or a file) of backup and will use the restore syntax accordingly.
Example backup command for DB2 Non SSV backups: db2_all "db2 backup database <DB_NAME> online to <Backup File Location> compress include logs"
Backup types supported in DPF
The type of backups supported by Db2 plugin when used with DPF are:
-
SSV backups through backup files or named pipes.
-
Non-SSV backups through backup files or named pipes.
Example backup command for DB2 SSV backups: db2_all "db2 BACKUP DATABASE<DB_NAME> ON all dbpartitionnums online to <Backup File Location> compress include logs"
Example backup command for DB2 Non SSV backups: db2_all "db2 backup database <DB_NAME> online to <Backup File Location> compress include logs"
Best practices for taking a backup
The following best practices can help improve backup and restore performance:
-
Compression should be enabled
-
Following parameters should be optimally configured:
-
Utility Heap Size (UTIL_HEAP_SZ)
-
No. of CPUs
-
No. of Table Spaces
-
Extent Size
-
Page Size
-
-
Parallelism & Buffer configuration may be used to improve backup performance. Parameters that should be configured are:
-
Parallelism
-
Buffer Size
-
No. of Buffers
-
More information about backup best practices is available in IBM Knowledge Center
Procedure
-
Login to the Delphix Management Application.
-
On the Databases tab of the Environment Management screen, add a source config against the discovered staging instance.
-
Then, click Manage and select Datasets.
-
Click the Plus (+) icon and select Add dSource, you’ll get a list of available source configs using which you can go for dSource creation.
-
In the Add dSource wizard, select the required source configuration.
Consider the following when choosing an ingestion method.
-
Users can specify their own mount path to host the dSource dataset by specifying the base path in the Mount Base field.
-
The restore and rollforward operations on the staging database can be managed by selecting the Staging Push checkbox. If the Staging Push checkbox is selected, the other checkboxes are automatically disabled and hidden other than the DPF checkbox.
-
If you are working with a HADR setup and want to ingest the database on a staging using HADR configurations, you need to check the Link against source using HADR checkbox. Checking this checkbox reveals a collapsible group where the HADR related details such as Primary hostname, service ports, target list and SSL/TLS related options if customer wishes to configure HADR using SSL/TLS protocol. However, if you want to setup a dSource using HADR configurations using Staging Push, you need to only select the Staging push checkbox and handle restore and HADR configuration manually on the staging host.
-
To use a non-HADR method for database ingestion, you need to uncheck the Link against the source using HADR.
-
To use the Archive Logs method for database ingestion check the Archive Logs checkbox to reveal the Archive log path field where you can enter Archive log file path.
-
To use the Database partition feature check Use DPF checkbox.For more information on DPF please view IBM Db2 Overview.
-
-
The database name is mandatory and must be unique for a given instance. This is the name that the database was on the instance it was restored from.
-
If you are planning to create a dSource with the "Staging Push" feature then you must need to select the Staging Push checkbox.
-
If you are not using Staging Push, enter the complete Backup Path where the database backup file resides. If no value is entered, the default value used is the instance home directory. If there are multiple backup files for a non-DPF database on the backup path, the most current one will be used. If there are multiple sets of backup files for a DPF database on the backup path, the most recent one will be used.
-
Once Backup path is entered, a new field will pop up below Backup path namely Additional Backup path where you can provide multiple backup paths if the backup is split into multiple filesystems during the backup operation.
-
Optionally, you can add the Parallelism factor for Database restore to provide the degree of parallelisation to run the database restore operation. If no value is entered, the Db2 plugin inherently assigns parallelism factor.
Info:-
Parallelism factor depends on the resources provided on the staging host, you may not see any difference in performance if there aren't enough resources for Db2 plugin to implement the parallelism.
-
You can provide any positive integer value for parallelism factor. Db2 plugin will provide that level of parallelism given that the system has appropriate resources to offer.
-
Parallelism factor is inversely proportional to the Database restore time, which implies that a higher parallelism factor will result in reduced restoration time.
-
For optimal performance during restoration, make sure to provide the same parallelism factor while creating the backups.
-
-
If you want to roll forward a snapshot to a user-specified timestamp, then the user must select the Rollforward to PITcheckbox. You can also manually do this through the snapshot option. This option is visible only if you have selected the Archive logs checkbox since DB2 requires archive logs to rollforward to a specific timestamp.
Info: The user-specified timestamp needs to be provided along with the timezone. For example, 2021-11-14-04.15.00 UTC. If the timezone is not entered, then the user's local timezone is considered.
-
Optionally, users can set the database configuration parameters during the linking operation in the Config Settings section.
-
Optionally, users can provide a bash script as a Plugindefined hook. Delphix has two Plugin managed Hooks:
-
Plugin Pre-Restore Hook: The bash script entered in this field will get executed before restoration. This hook is useful in such cases where the users want to prepare the full backup before the restore operation.
-
Plugin Post-Restore Hook: The bash script entered in this field will get executed after completion of the restore operation. This hook is useful in such cases where the user wants to purge the full backup file after the restore operation.
1. Plugin managed pre-Hook - User can copy the required full backup file from some remote location to staging host. Below is an example of such bash script (name of below script is copyBackup.sh)
#!/bin/bash
# Copying backup file from a remote host remote.delphix.com
scp auto1051@remote.delphix.com:/backuplocation/R74D105A.0.auto1051.DBPART000.20180510073639.001 /db2backup/
The user can provide the above scriptinPlugin managed pre-Hook field as"sh copyBackup.sh"
2. Plugin managed post-Hook - User can purge the full backup file from the staging host. Below is an example of such bash script (name of below script is purgeBackup.sh)
#!/bin/bash
# Purging full backup file from staging host for saving the staging storage
rm -f /db2backup/R74D105A.0.auto1051.DBPART000.20180510073639.001
The user can provide the above scriptinPlugin managed post-Hook field as"sh purgeBackup.sh"
-
-
If the dSource is setup to use HADR please enter the following fields. For more information about HADR please view Linking a dSource from a Db2 Database: An Overview
-
Enter a fully qualified HADR Primary Hostname. This is a required field for HADR and must match the value set for HADR_LOCAL_HOST on the master.
-
Enter the port or /etc/services name for the HADR Primary SVC. This is a required field for HADR and uses the value set for HADR_LOCAL_SVC on the master.
-
Enter the port or /etc/services name for the HADR Standby SVC. This is a required field for HADR and uses the value set for HADR_REMOTE_SVC on the master.
-
-
If the dSource is to use HADR with SSL, check Configure SSL checkbox under HADR DETAILS. If stash file is not available, provide the password for Key Store.
-
If you are using Archive Logs for dSource creation complete the following fields:
-
Check the Archive logs checkbox
-
Provide the log location of the archive logs. In this location, you can supply load copy files by appending schema and table name to it so that plugin can process those load copy files during the rollforward process. Archive logs will be used for applying the logs during the snapshot operation. This location must be a part of the staging server and this location must be different than full backup location.
-
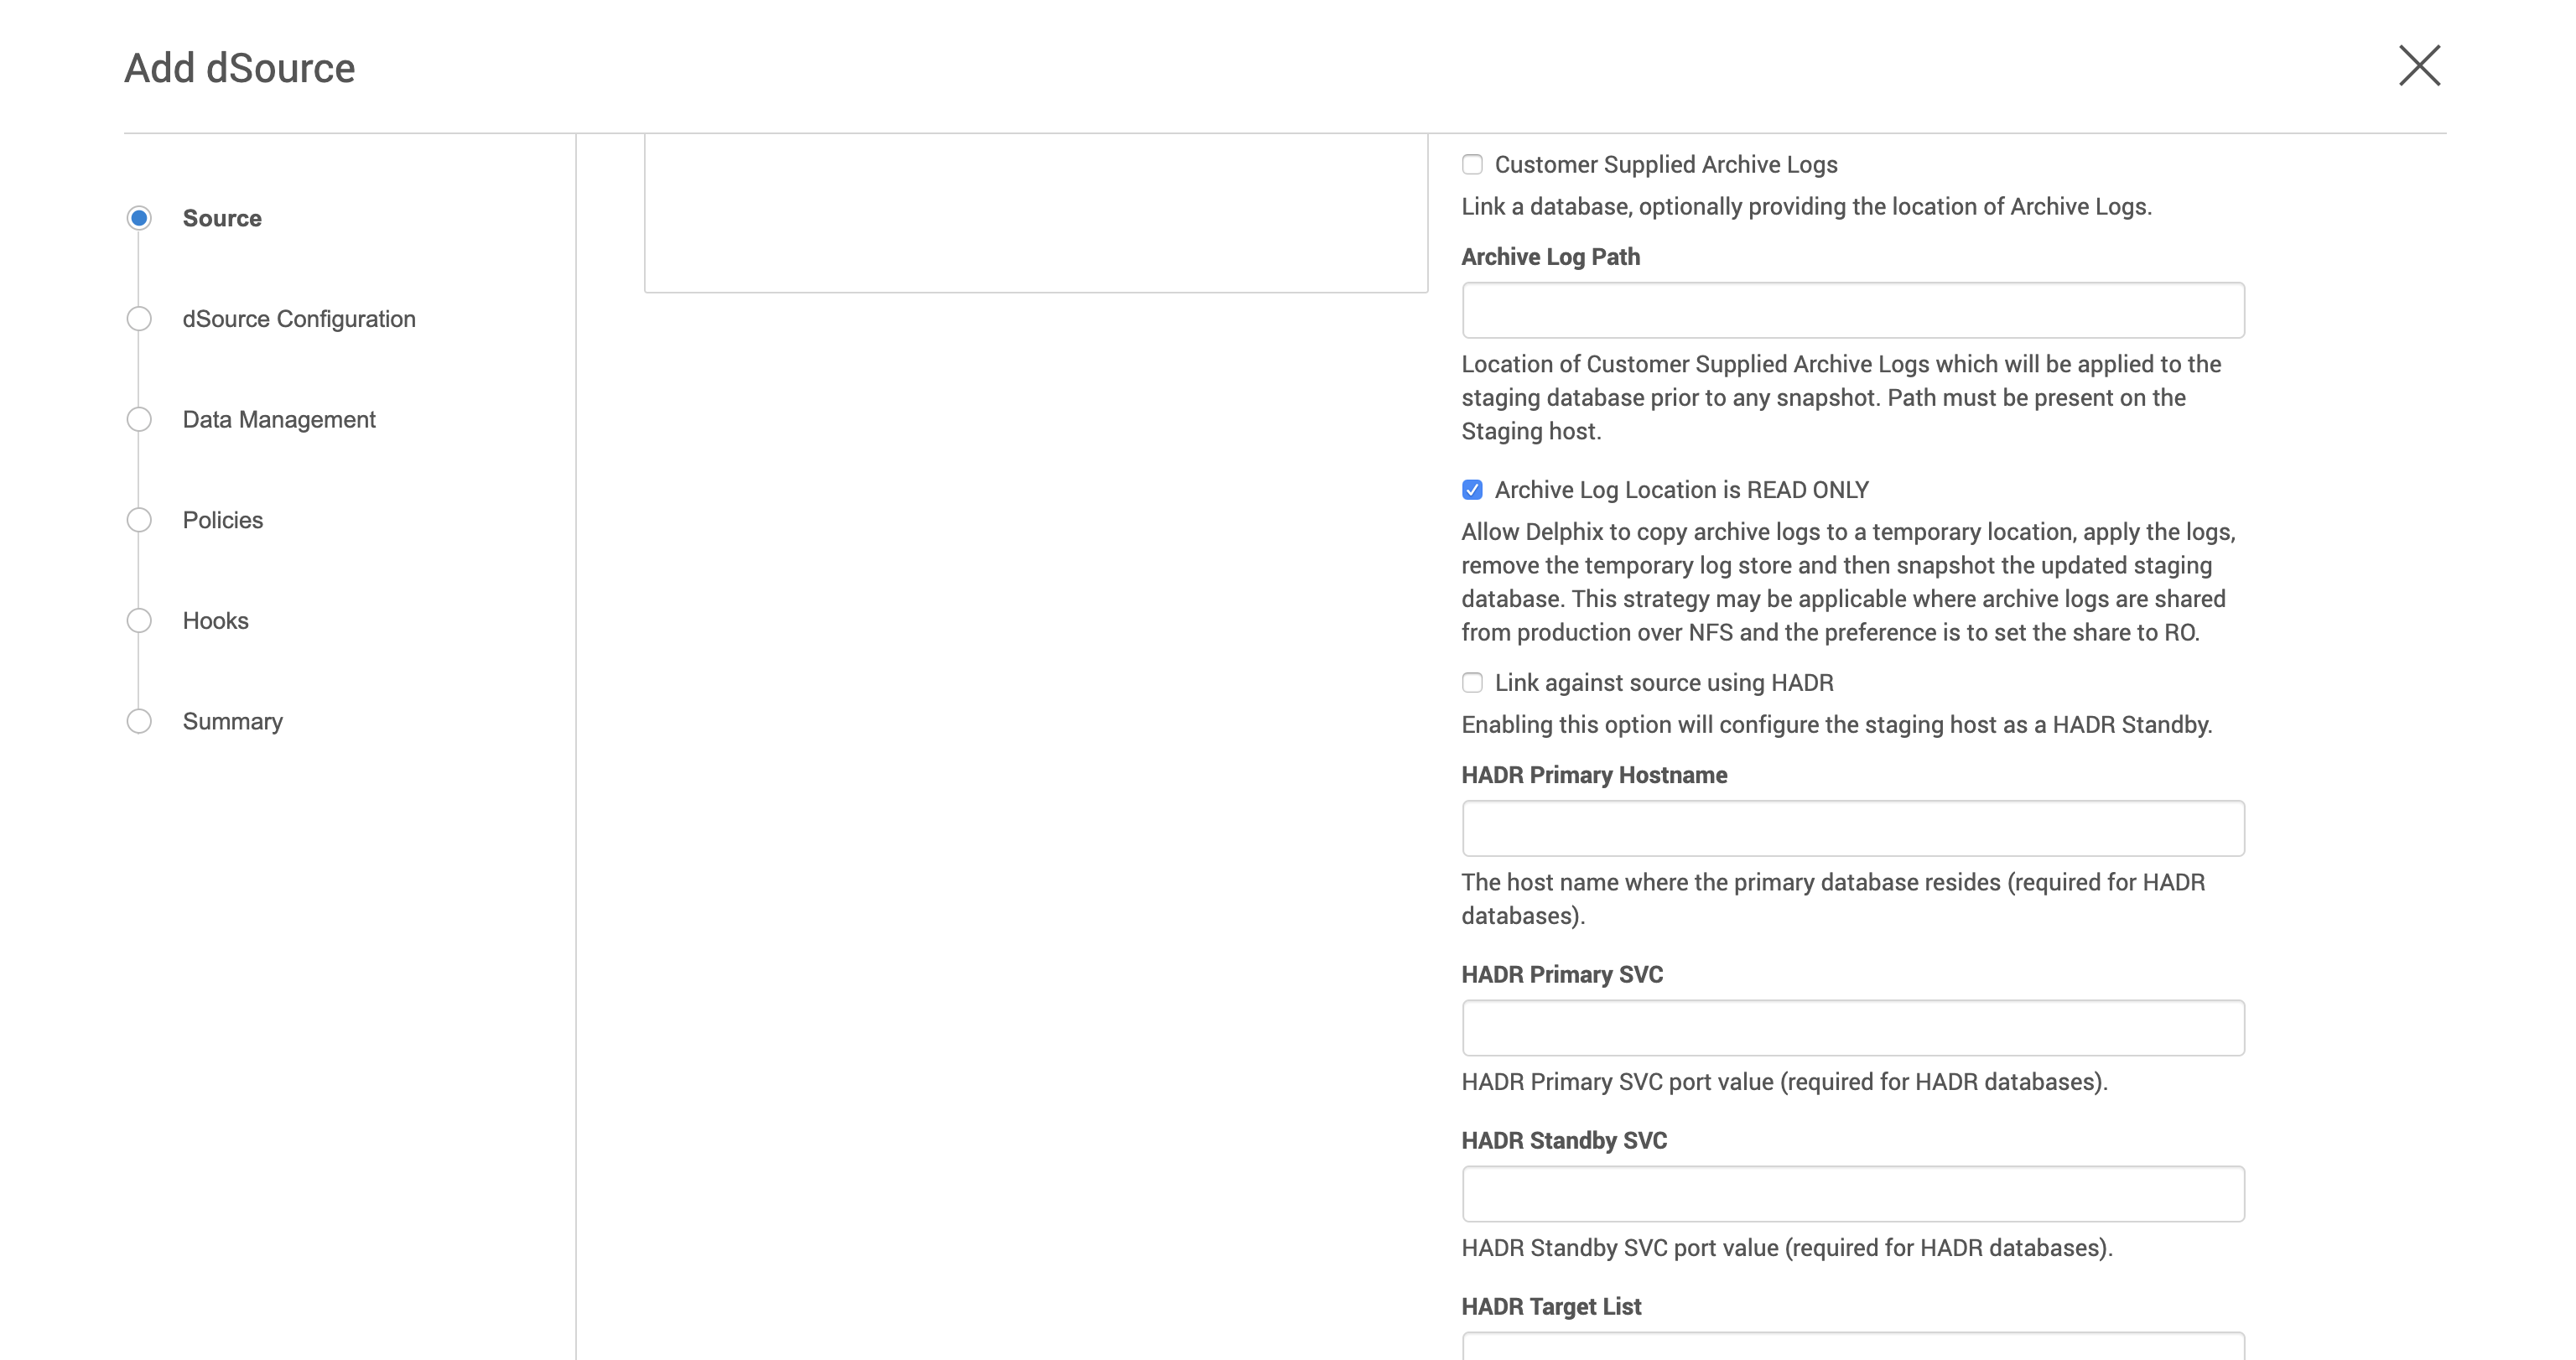
The Archive Log Location is READ ONLY( default) option indicates whether Delphix should copy the log files to the dSource’s filesystem prior to the log apply process. If this is not selected the staging database will read the log files directly from the user-provided log location and perform the log apply operation.
Note: Special considerations for Archive Log Location is READ ONLY
If this operation is performed on the source database and user want the Plugin to process the load files place the load copy files in your location and append the schema and table names (for example: <DB Name>.<Number>.<Instance>.DBPART<partNumber>.<Timestamp>.001.<schema name>.<table name>) to the load copy file names
If you do not want to process load copy files via the Plugin place the load copy files in a similar structure as it is on the source or set a DB2 registry parameter DB2LOADREC
Note: Special consideration during dSource upgrade from older version plugin to Customer Supplied Archive Logs feature enabled plugin
Suppose the user is having a dSource with an older version of the plugin and now wants to upgrade that dSource to Customer Supplied Archive Logs feature then the user needs to perform the following steps :
-
Go to the configuration tab of dSource and then click on the custom sub-tab.
-
Click on the edit icon.
-
Check the Archive Logs and Archive Log Location is READ ONLY checkbox.
-
Click on submit and then go for RESYNC operation to upgrade the dSource.
-
-
-
Click Next.
-
Enter a name and select a group for your dSource.
Adding a dSource to a dataset group lets you set Delphix Domain user permissions for that database and its objects, such as snapshots. See the topics under Users and Groups for more information. -
Click Next and set the Staging Environment to be the same as the dSource host. Select the Staging Environment User to be the same as the instance owner of the dSource instance.
Info: Changing the Environment User
If you need to change or add an environment user for the dSource instance, see Managing Db2 Users and Instance
Info: Ensure that the Staging environment must be the environment that you have chosen to create the source config.
Select the User from the drop-down and set the SNAPSHOT PARAMETERS for the dSource snapshot.
-
Click on the Timestamp input field to enter the timestamp at which the snapshot will be taken.
The user-specified timestamp needs to be provided along with the timezone in YYYY-MM-DD-HH.MM.SS format. For example, 2022-03-12-04.15.00UTC. If the timezone is not entered, then the user's local timezone is considered.Providing the timestamp will only work if the user has checked the Rollforward to PIT option in step 9 above.
-
Select Resynchronize dSource to resynchronize the dSource. This will force a non-incremental load of data from the source similar to when the dSource was created. This action avoids duplicating storage requirements and maintains a Timeflow history.
-
-
The Delphix Engine will initiate two jobs to create the dSource: DB_Link and DB_Sync. You can monitor these jobs by clicking Active Jobs in the top menu bar, or by selecting System > Event Viewer. When the jobs have completed successfully, the database icon will change to a dSource icon on the Environments > Host > Databases screen, and the dSource will also appear in the list of Datasets under its assigned group. Then, click Next and you’ll get the Policies section. Set the desired Snapsync Policy for the dSource. For more information on policies see Advanced Data Management Settings for Db2 dSources
-
Click Next and specify any desired pre- and post-scripts. For details on pre- and post-scripts, refer to Customizing Db2 Management with Hook Operations
-
Click Next. Review the dSource Configuration and Data Management information in the Summary section.
-
Click Submit.
The dSource configuration screen
After you have created a dSource, the dSource Configuration tab allows you to view information about it and make modifications to its policies and permissions. In the Datasets panel, select the dSource you wish to examine. You can now choose the configuration tab to see information such as the Source files, Data Management configuration, and Hook Operations.
Purging of archive logs after snapshot operation
Logs can be purged from your log location after the snapshot operation. The Plugin will preserve the list of logs that are eligible for purging in the snapshot's metadata. The snapshot metadata can be accessed via the Delphix CLI or API.