
This topic describes the process of provisioning a virtual EBS R12.2 instance.
Maintain the integrity in names(CDB name, PDB name, DB hostname, /etc/hosts file format nomenclature). During dbTechStack, VDB provisioning, maintain the same case sensitivity during virtual Appstier provision as well. There is no restriction on using UPPER or LOWER case characters. However, it is recommended to maintain consistency.
Prerequisites
Ensure that you meet the following requirements before provisioning a virtual EBS 12.2 instance.
-
Link a source instance of EBS R12.2. For more information, refer to Linking a source EBS R12.2 instance.
-
Prepare your target EBS R12.2 environments for provisioning by following the outline in Preparing target EBS R12.2 environments for provisioning.
Snapshot coordination
Changes applied to EBS and picked up only in certain dSource snapshots may make certain combinations of snapshots across the appsTier and dbTier incompatible. When provisioning, refreshing or rewinding a virtual EBS instance, be sure the points in time you select for each dataset are compatible with each other.
The source DB host may have multiple DATA_TOPs but the target DB host will be provisioned with a single DATA_TOP that resides on the target Mount Base path provided during the database provisioning.
Provisioning the EBS dbTechStack
-
Login to the Delphix Management application.
-
Click Manage > Datasets.
-
Select the dbTechStack dSource.
-
Click the TimeFlow tab.
-
Select a dSource snapshot.
-
Click Provision.
The Provision VDB wizard will open. -
Select an Environment.
This environment will host the virtual dbTechStack and be used to execute hook operations specified in step 15 in the section. -
Select E-Business Suite R12.2 dbTechStack from the Installation dropdown.
-
Select an Environment User.
-
This user should be the
Oracleuser-outlined in Preparing target EBS R12.2 environments for provisioning. -
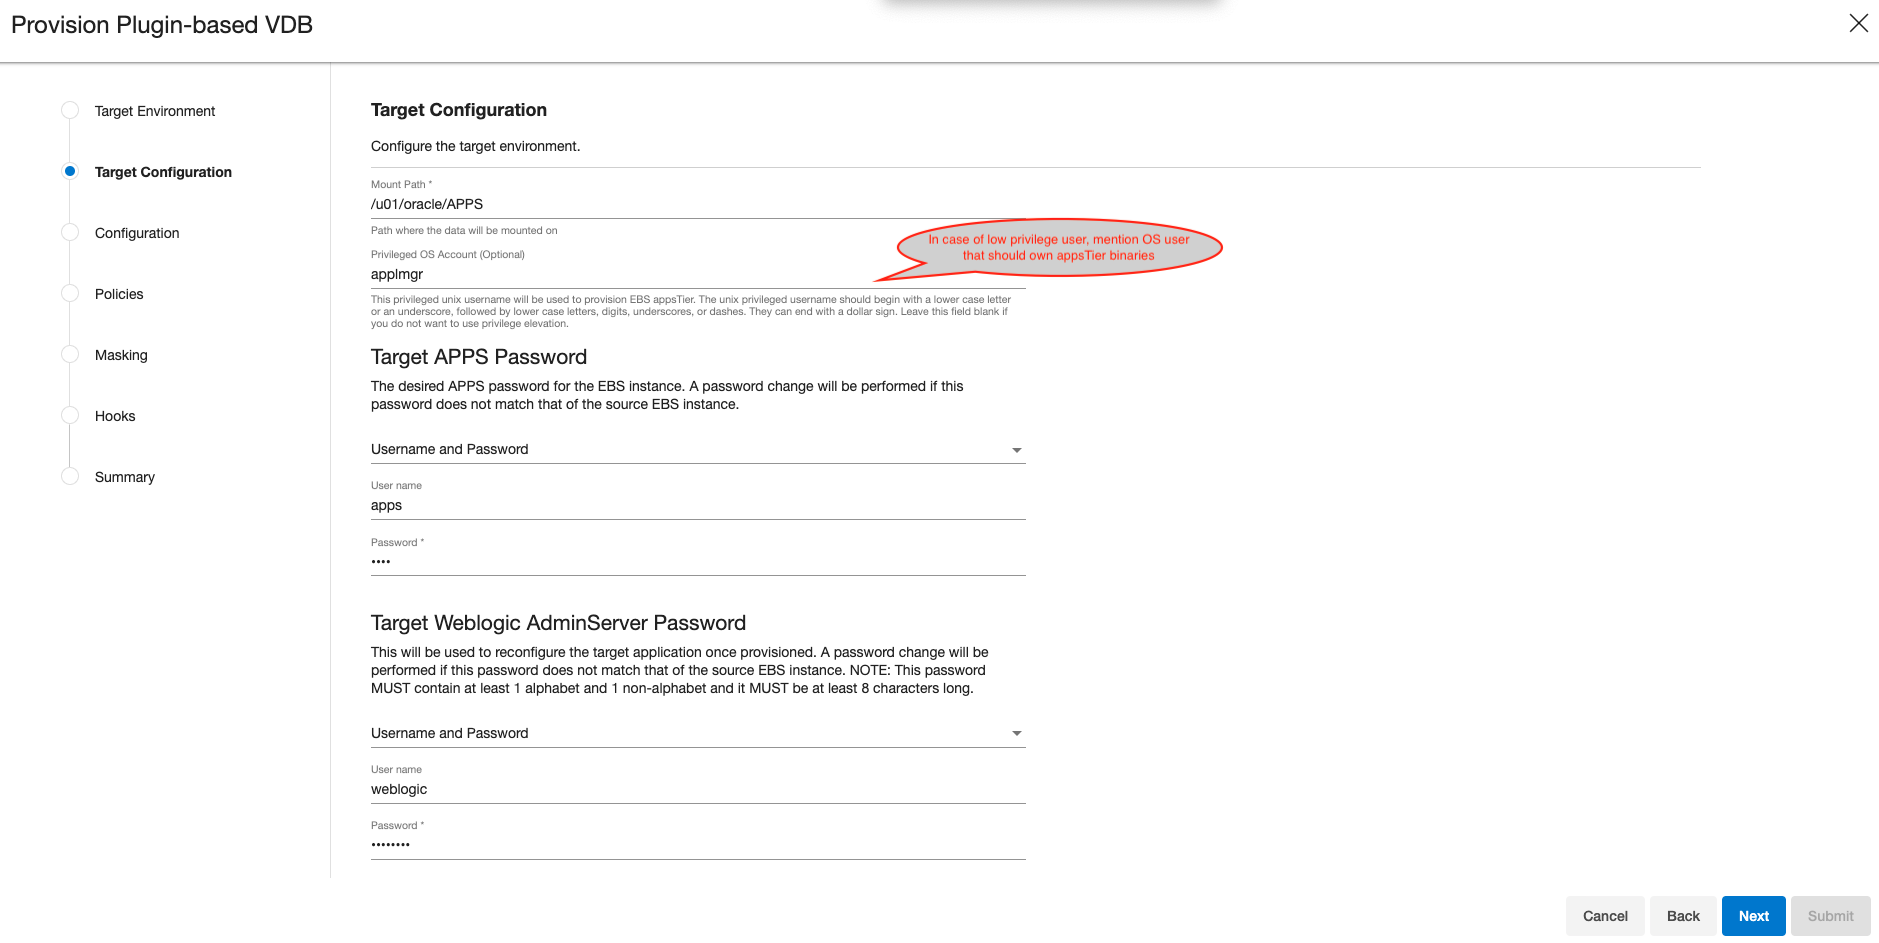
Enter a Mount Path for the virtual dbTechStack files.
-
Enter the EBS-specific parameters for the virtual dbTechStack. A subset of these parameters is discussed in more detail below.
-
The Privileged OS Account (Optional) field should contain the high-privileged user when the low-privileged user is being used for provisioning.
-
The Target APPS Password is the new apps password that is required to configure virtual dbTechStack. This password is encrypted when stored within the Delphix Engine and is available as an environment variable to the
adcfgcloneprocess. -
Provide source Oracle home directory name relative to Oracle base installation directory that was provided during linking of dbTechStack in Oracle Home input field.
-
Ensure that the Target DB Hostname value is the short hostname, not the fully qualified hostname.
-
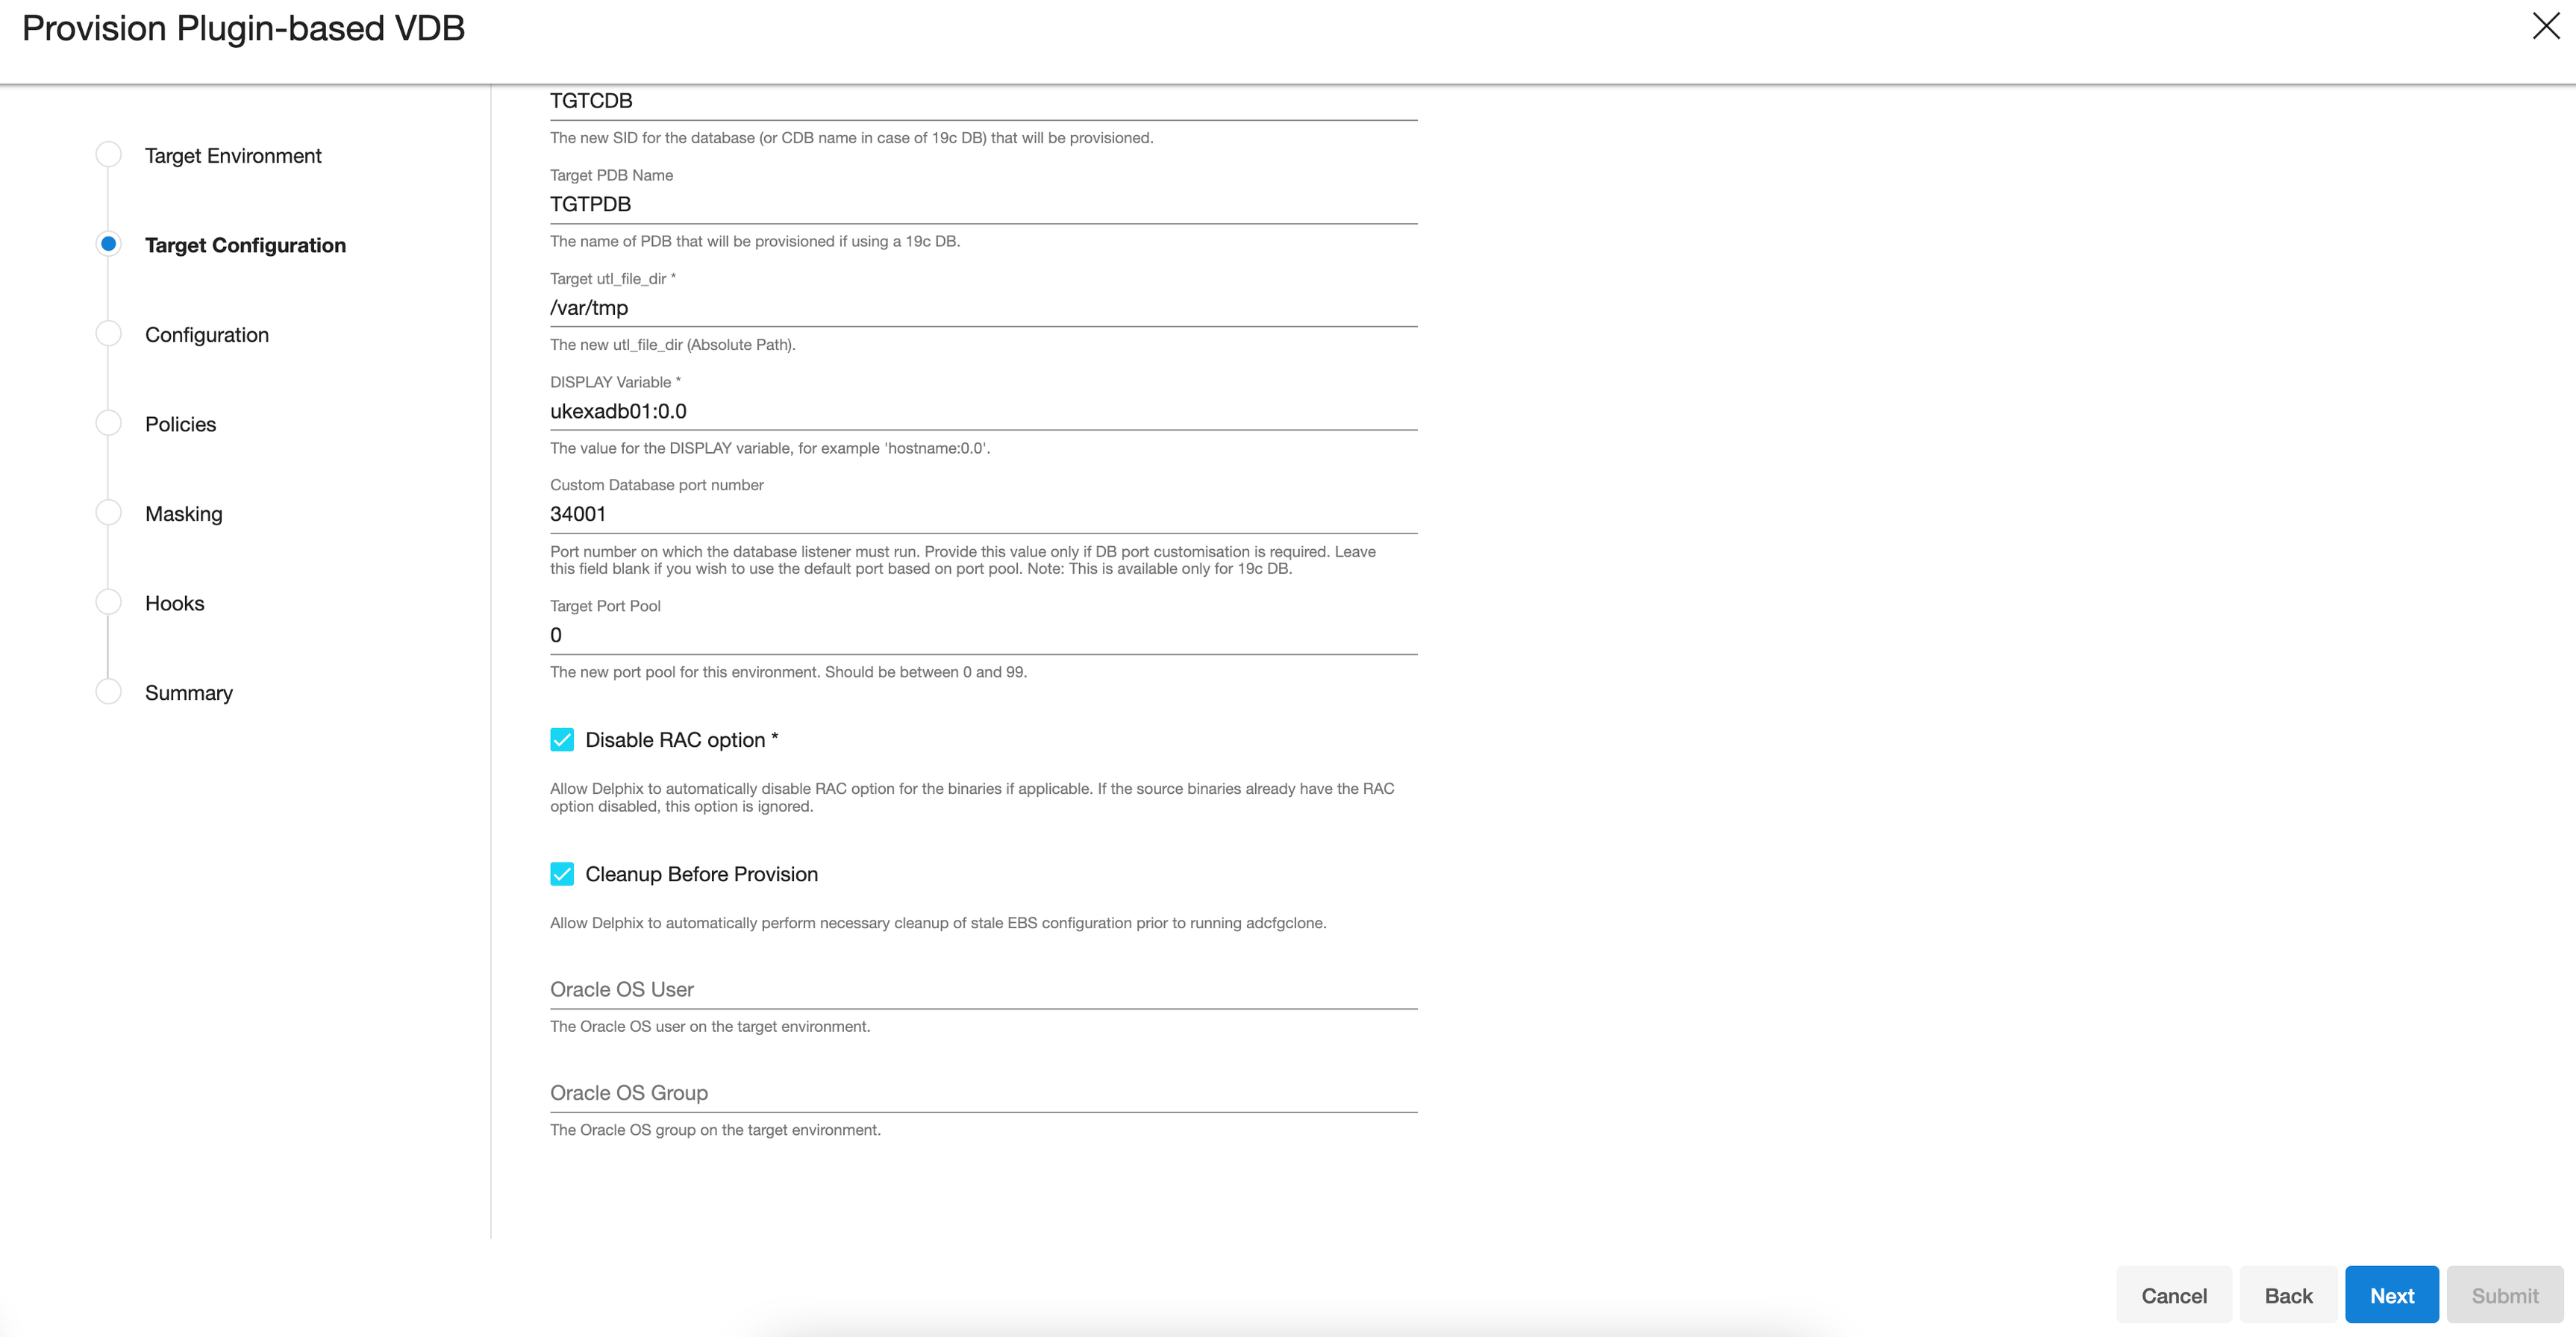
The Target DB/CDB SID is the new database SID (CDB SID in case of 19c) that is required to configure virtual dbTechStack.
-
The Target PDB Name field is added for the pluggable database to be configured for the Oracle 19c database. Please leave this field empty when using the Oracle 11g/12c database.
-
Provide Target utl_file_dir , the default value for this field will be “/var/tmp". The utl_file_dir initialization parameter is deprecated in Oracle Database 12c Release 2 (12.2.0.1), and may be unsupported in a future release.
-
Provide DISPLAY Variable, the default value is hostname:0.0
-
[Optional] Provide the Custom Database Port Number on which the database listener must run.
Info:-
Enter a numeric port value in this field only if you want to use DB port customization. Leaving this field blank automatically uses the default port based on the port pool. The custom database port number is applicable only for the Oracle 19c database.
-
To run the dbTechStack and listener on a custom DB port, it is recommended to provide the Target Port Pool value either as default or 0; also the Target Port Pool value in dbTechStack is not related to Run/Patch Edition Port Pool value in Appstier.
-
-
Provide Target Port Pool, please provide a port pool that is available. By default, the value is 1. The range for this value is 0 to 99.
-
Enable the Disable RAC option if you want to permit the Delphix Engine to automatically disable the RAC option for the binaries when applicable.
This option is necessary if provisioning from a dSource with RAC dbTier because the binaries are relinked with therac_onoption even after runningadcfgclone. If the source binaries already have the RAC option disabled (also the case for SI dbTier), the Delphix Engine ignores this option. -
Enable the Cleanup Before Provision option if you want to permit the Delphix Engine to automatically clean up stale EBS configuration during a refresh. This option is recommended, but only available if your Oracle Home is patched with Oracle Universal Installer (OUI) version 10.2 or above.
-
With this option enabled, the Delphix Engine will inspect the target environment's oraInventory prior to refreshing this virtual dbTechStack. If any Oracle Homes are already registered within the specified Mount Path, the Delphix Engine will detach them from the inventory prior to running
adcfgclone. These homes must be detached prior to running the post-clone configuration. If they are not detached,adcfgclonewill fail, citing conflicting oraInventory entries as an issue. -
Without this option enabled, Oracle Homes that conflict with the specified Mount Path will be reported in an error instead of automatically detached. For refresh to succeed, you must manually detach conflicting Oracle Homes prior to refresh.
-
-
Provide Oracle OS User and Group, it’s optional.

-
-
Click Next.
-
Enter a VDB Name.
-
Select a Target Group for the VDB.
If necessary, click the green Plus icon to add a new group. -
Select a Snapshot Policy for the VDB.
If necessary, click the Plus icon to create a new policy.
Warning: Snapshot conflicts when Snapshot is running against the dbTechStack, database, or appsTier, the Delphix Engine also executes pre-clone logic to ensure the latest configuration is staged in the captured snapshots. Unfortunately, if multiple Snapshots are running against the same EBS instance concurrently, this pre-clone logic may fail and produce bad snapshots.To avoid SnapSync conflicts, spread out your SnapSync policies for an EBS instance by one hour or more.
-
Click Next.
-
Enter any custom hook operations that are needed to help correctly manage the virtual dbTechStack files. For more information about these hooks, when they are run, and how operations are written, visit the Hook scripts for automation and customization page and section.
The Configure Clone hook will be run after theadcfgclone.pltool has both mounted and configured the dbTechStack. -
Click Next.
-
Click Submit.
When provisioning starts, you can review the progress of the job in the Datasets panel, or in the Job History panel of the Dashboard. When provisioning is complete, the dbTechStack VDB will be included in the group you designated and listed in the Datasets panel. If you select the dbTechStack VDB in the Datasets panel and click the Configuration tab, you can view information about the virtual files and their Data Management settings.
For tips on monitoring the progress of dbTechStack provisioning, see Monitoring EBS R12.2 dbTechStack Provisioning Progress.
Provisioning the Oracle 19C database
-
Refresh the Target DB environment from Manage > Environments so that the Listener brought up during dbTechStack provision gets discovered and the Installation Home is listed in the dropdown during Database provision. If the Target DB environment is not refreshed, you will see `This environment has no compatible Oracle Installation Homes` in the Installation Home dropdown in the Database provision.
-
Provision the EBS database to the target dbTier environment by following the steps outlined in Provisioning an Oracle VDB. For the Oracle EBS database for 19c MT, provision the database by following the steps outlined in Provisioning an Oracle Virtual Pluggable Database (vPDB)
Note: Snapshot conflicts: when Snapshot is running against the dbTechStack, database, or appsTier, the Delphix Engine also executes pre-clone logic to ensure the latest configuration is staged in the captured snapshots. Unfortunately, if multiple Snapshots are running against the same EBS instance concurrently, this pre-clone logic may fail and produce bad snapshots.To avoid SnapSync conflicts, spread out your SnapSync policies for an EBS instance by one hour or more.
-
Select the correct Installation Home.
This should be the virtual dbTechStack you just added to the Delphix Engine. -
Select an Environment User.
-
This user should be the Oracle user outlined in Preparing Target EBS R12.2 Environments for Provisioning.
-
For the Container Database option, select the checkbox next to Create a New Container Database, and click Next.
-
Select a Target Group for the VDB.
-
In the vPDB Configuration section, provide the Target PDB name given during dbTechStack provision in the Oracle Pluggable Database Name field and provide any unique user-defined name in the vPDB Name to be displayed in the Delphix Engine.
-
In the vCDB CONFIGURATION section, provide the Target DB/CDB SID name given during dbTechStack provision in the Database Name field and SID and provide any unique user-defined name in the vCDB Name and Database Unique Name field, and click Next.
-
Click Advanced.
-
Select the correct Oracle Node Listeners value.
This should be the listener corresponding to the virtual dbTechStack you just added to the Delphix Engine. -
Add the EBS R12.2 dbTier environment file as a Custom Environment Variables entry.
-
This file can be specified as an Environment File with Path Parameters of
$ORACLE_HOME/<CONTEXT_NAME>.
Replace<CONTEXT_NAME>with the virtual EBS instance's context name. The Delphix Engine will expand the$ORACLE_HOMEvariable at runtime.
For more information, see Customizing Oracle VDB environment variables
Note: To complete the DB Provisioning operation, you must provide content to configure clones and pre-snapshot hooks. You must either follow step 14 to use the hooks utility feature OR proceed with the conventional way by following steps 15-21. -
To complete the DB Provisioning operation, you must provide content to configure clones and pre-snapshot hooks. The following are the content for both the hooks:
-
Configure Clone hook will be
<DBTechStack Mount path>/hooksUtil/hooksRunner --operation configure. You must set a hooks environment variableDLPX_SOURCE_APPS_PASSWORDfor providing the source apps schema password. -
Pre-Snapshot hook:
<DBTechStack Mount path>/hooksUtil/hooksRunner --operation pre-snapshot. You must set a hooks environment variableDLPX_SOURCE_APPS_PASSWORDfor providing the source apps schema password. In case the apps password change is required in the target VDB, you can set hook environment variablesDLPX_TARGET_APPS_PASSWORDandDLPX_SYS_PASSWORDfor providing the target apps schema and system schema passwords.Note:
For versions 19.3 or later, follow the below guidelines if you see any of the following errors:-
ORA-01017: invalid username/password logon denied
-
ORA-28040 During cloning: No Matching Authentication Protocol
EBS application database user accounts created in the earlier release use a case-insensitive password version from an earlier release authentication protocol, such as the 10G password version. If your release user account passwords have not been reset and the following conditions persist, then take the action as described below:
On source, the database server has been configured with SEC_CASE_SENSITIVE_LOGON set to FALSE, so that it can only authenticate users who have a 10G case-insensitive password version. Then, on target container VDB, it becomes necessary to set the SEC_CASE_SENSITIVE_LOGON to FALSE, to make authentication of users successful.
To take advantage of the password protections introduced in Oracle Database 19c, users must change their passwords.
Occasionally, it is necessary to restart the database to resolve connectivity to the database. This is atypical but may be necessary.To set up target, on the target container database, run the following command:
alter system set SEC_CASE_SENSITIVE_LOGON=FALSE scope=both; -
-
-
Add a Run Bash Shell Command operation to the Configure Clone hook to ensure that
adcfgcloneis run against the newly provisioned database for a high-privileged user, as shown in the script below.
Note: You can pass the credentials securely to Hook Operations by setting up the base variables. See Passing credentials securely to hook operations for more details.
Note: It is mandatory to set a hooks environment variableDLPX_SOURCE_APPS_PASSWORDfor providing the source apps schema password. In case the apps password change is required in the target VDB, you can set hook environment variablesDLPX_TARGET_APPS_PASSWORDandDLPX_SYS_PASSWORDfor providing the target apps schema and system schema passwords in respective hooks. The variables will be declared in the Credential Environment Variables hook section.
The hooks environment variable will be declared as,DLPX_SOURCE_APPS_PASSWORD, and then its password value will be the same variable used in hooks, along with the PASSWORD keyword appended at the end so that it will be like DLPX_SOURCE_APPS_PASSWORD_PASSWORDWe assign the value of $DLPX_SOURCE_APPS_PASSWRD to APPS_PASSWD.
In hooks, it will be written asAPPS_PASSWD=$DLPX_SOURCE_APPS_PASSWORD_PASSWORDSame goes for,
SYSTEM_PASSWD=$DLPX_SYS_PASSWORD_PASSWORD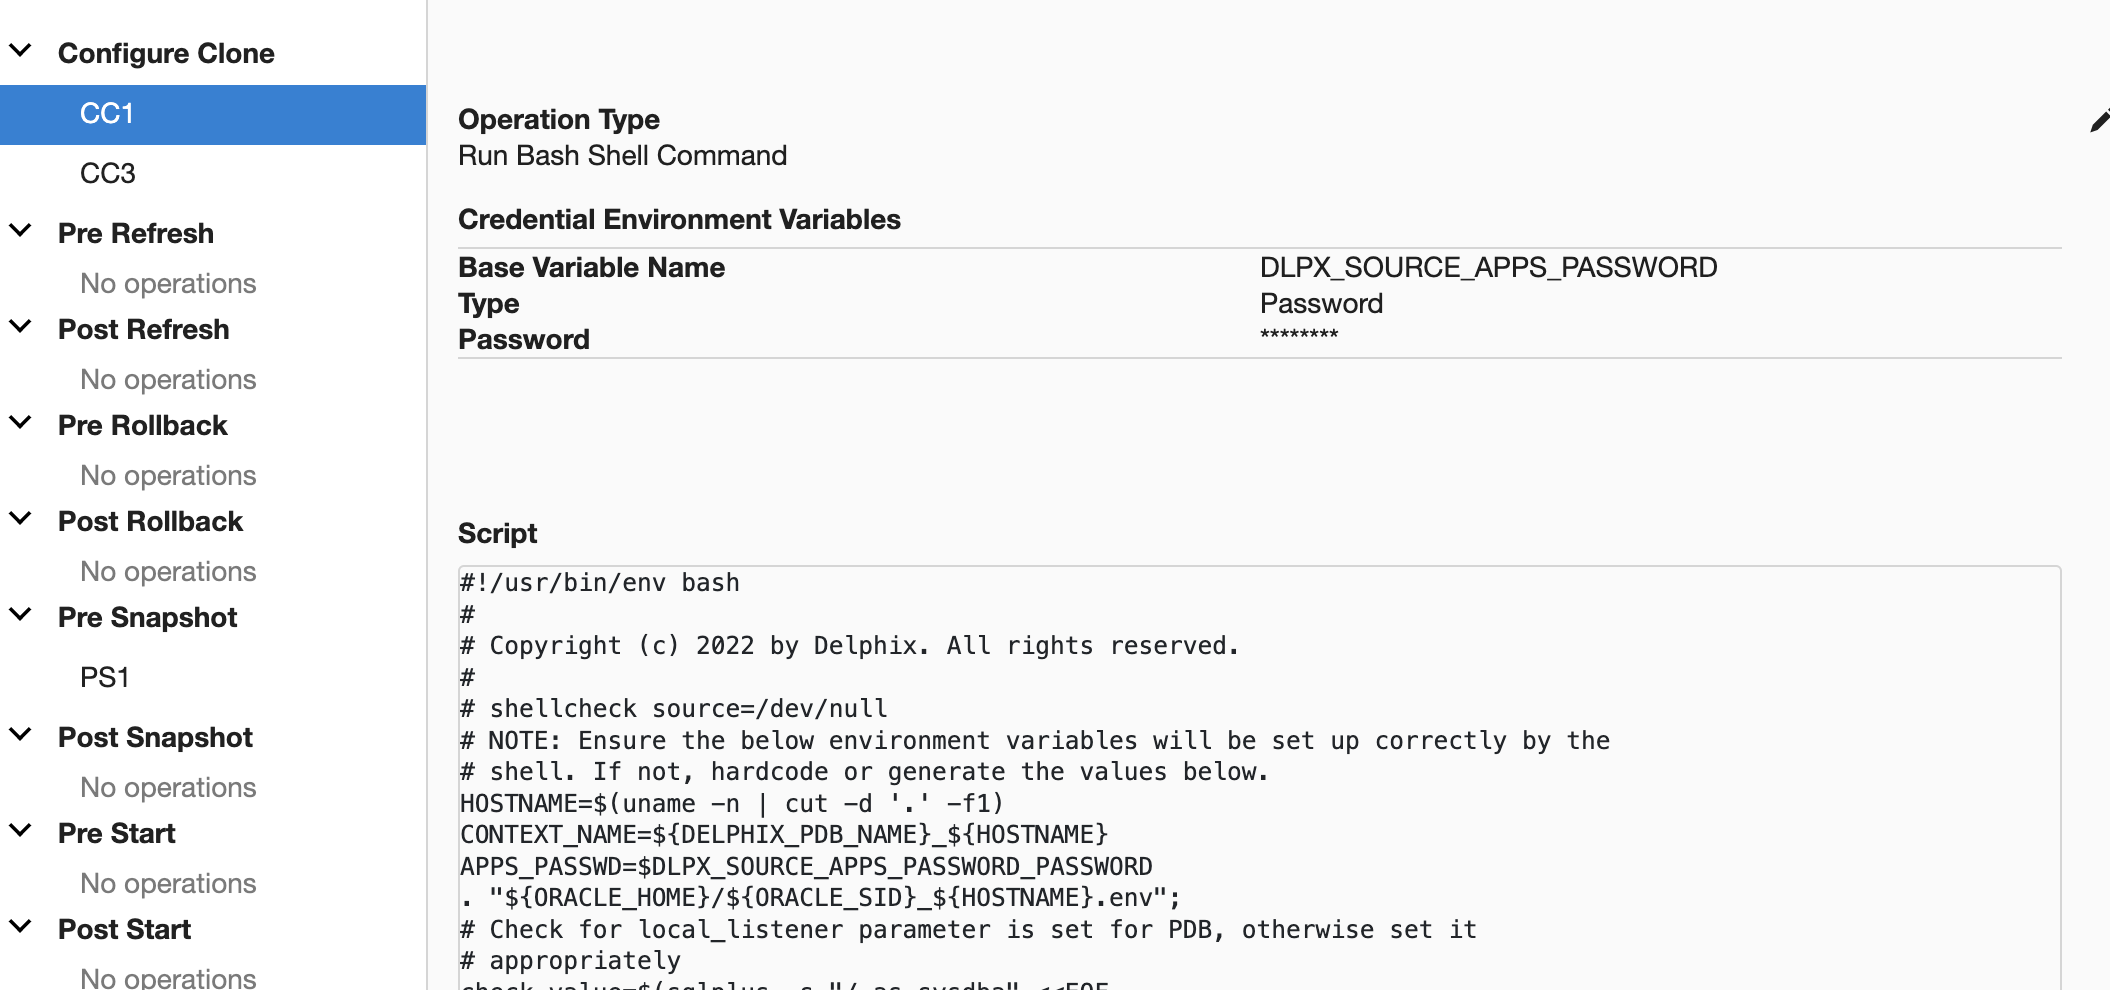
Configure clone first hook for a 19c multi-tenant high-privileged user
Bash#!/usr/bin/env bash # # Copyright (c) 2022 by Delphix. All rights reserved. # # shellcheck source=/dev/null # NOTE: Ensure the below environment variables will be set up correctly by the # shell. If not, hardcode or generate the values below. HOSTNAME=$(uname -n | cut -d '.' -f1) CONTEXT_NAME=${DELPHIX_PDB_NAME}_${HOSTNAME} APPS_PASSWD=$DLPX_SOURCE_APPS_PASSWORD_PASSWORD . "${ORACLE_HOME}/${ORACLE_SID}_${HOSTNAME}.env"; # Check for local_listener parameter is set for PDB, otherwise set it # appropriately check_value=$(sqlplus -s "/ as sysdba" <<EOF alter session set container="${DELPHIX_PDB_NAME}"; show parameter local_listener; EOF ) local_listener=$(echo "$check_value" | awk '{print $11}') value=("${local_listener//:/ }") host="${value[0]}" port="${value[1]}" curr_port=$(grep PORT < "${ORACLE_HOME}/network/admin/listener.ora" | awk '{print $9}' | sed 's/)//g') if [[ $port != "$curr_port" || $host != "${HOSTNAME}" ]]; then sqlplus -s "/ as sysdba" <<EOF alter session set container="${DELPHIX_PDB_NAME}"; alter system set local_listener='${HOSTNAME}:${curr_port}'; alter system register; EOF fi #For compatibility with 6.0.16.0 Delphix engine version . ${ORACLE_HOME}/${ORACLE_SID}_${HOSTNAME}.env; sqlplus -s "/ as sysdba" <<EOF shutdown immediate; startup; ALTER PLUGGABLE DATABASE ALL OPEN read write services=all; alter pluggable database ${DELPHIX_PDB_NAME} open read write services=all; alter pluggable database all save state instances=all; EOF sqlplus "/ as sysdba" <<EOF @${ORACLE_HOME}/appsutil/install/${CONTEXT_NAME}/adupdlib.sql so EOF . "${ORACLE_HOME}/${CONTEXT_NAME}.env"; perl "${ORACLE_HOME}/appsutil/clone/bin/adcfgclone.pl" dbconfig "${ORACLE_HOME}/appsutil/${CONTEXT_NAME}.xml" <<EOF # noqa ${APPS_PASSWD} EOF -
Configure the Clone hook to ensure that
adcfgcloneis run against the newly provisioned database for a low-privileged user, as shown in the script below.
Note:
You have to identify the DLPX_DB_EXEC_SCRIPT value from their remote environment, this would always be inside the toolkit directory provided while adding the environment on Delphix Engine.Configure clone first hook for a 19c multi-tenant low-privileged user
Bash#!/usr/bin/env bash # # Copyright (c) 2022 by Delphix. All rights reserved. # # shellcheck source=/dev/null # NOTE: Ensure the below environment variables will be set up correctly by the # shell. If not, hardcode or generate the values below. DLPX_DB_EXEC_SCRIPT="<Remote BIN location till dlpx_db_exec script>" DLPX_PRIV_USER=oravis HOSTNAME=$(uname -n | cut -d '.' -f1) APPS_PASSWD=$DLPX_SOURCE_APPS_PASSWORD_PASSWORD CONTEXT_NAME=${DELPHIX_PDB_NAME}_${HOSTNAME} "${DLPX_DB_EXEC_SCRIPT}" -u"${DLPX_PRIV_USER}" ". ${ORACLE_HOME}/${ORACLE_SID}_${HOSTNAME}.env;" # Check for local_listener parameter is set for PDB, otherwise set it appropriately check_value=$("${DLPX_DB_EXEC_SCRIPT}" -u"${DLPX_PRIV_USER}" ". ${ORACLE_HOME}/${CONTEXT_NAME}.env; sqlplus -s \"/ as sysdba\" <<-EOF alter session set container=${DELPHIX_PDB_NAME}; show parameter local_listener; EOF ") local_listener=$(echo "$check_value" | awk '{print $11}') value=("${local_listener//:/ }") host="${value[0]}" port="${value[1]}" curr_port=$(grep PORT < "${ORACLE_HOME}/network/admin/listener.ora" | awk '{print $9}' | sed 's/)//g') if [[ $port != "$curr_port" || $host != "${HOSTNAME}" ]]; then "${DLPX_DB_EXEC_SCRIPT}" -u"${DLPX_PRIV_USER}" ". ${ORACLE_HOME}/${ORACLE_SID}_${HOSTNAME}.env; sqlplus -s \"/ as sysdba\" <<EOF alter session set container=${DELPHIX_PDB_NAME}; alter system set local_listener='${HOSTNAME}:${curr_port}'; alter system register; EOF " fi #For compatibility with 6.0.16.0 Delphix engine version "${DLPX_DB_EXEC_SCRIPT}" -u"${DLPX_PRIV_USER}" ". ${ORACLE_HOME}/${ORACLE_SID}_${HOSTNAME}.env; sqlplus -s "/ as sysdba" <<EOF shutdown immediate; startup; ALTER PLUGGABLE DATABASE ALL OPEN read write services=all; alter pluggable database ${DELPHIX_PDB_NAME} open read write services=all; alter pluggable database all save state instances=all; EOF " "${DLPX_DB_EXEC_SCRIPT}" -u"${DLPX_PRIV_USER}" ". ${ORACLE_HOME}/${ORACLE_SID}_${HOSTNAME}.env; sqlplus \"/ as sysdba\" <<-EOF @${ORACLE_HOME}/appsutil/install/${CONTEXT_NAME}/adupdlib.sql so EOF " "${DLPX_DB_EXEC_SCRIPT}" -u"${DLPX_PRIV_USER}" ". ${ORACLE_HOME}/${CONTEXT_NAME}.env; perl ${ORACLE_HOME}/appsutil/clone/bin/adcfgclone.pl dbconfig ${ORACLE_HOME}/appsutil/${CONTEXT_NAME}.xml <<-EOF1 ${APPS_PASSWD} EOF1 " -
For the EBS database Oracle 12.2, add a Run Bash Shell Command operation to the Configure Clone hook to ensure that
sqlnet.oraorsqlnet_ifile.oraspecify a value forSQLNET.ALLOWED_LOGON_VERSION_SERVERfor a high-privileged user, as shown in the script below.
This requirement is outlined in Cloning Oracle E-Business Suite Release 12.2 with Rapid Clone (Doc ID 1383621.1) found at http://docs.oracle.com -
When prompted, if your environment is on R12.TXK.C.Delta.13 or later, enter the password for the EBS_SYSTEM user, if your environment is on R12.TXK.C.Delta.12 or earlier, enter the password for the SYSTEM user, or if your source EBS setup is running on AD-TXK Delta 13 then you need to supply the EBS_SYSTEM schema password in the below second hook script.
This requirement is outlined in the FAQ: Oracle E-Business Suite and System Schema Migration (DocID 2758999.1) Using UTL_FILE_DIR or Database Directories for PL/SQL File I/O in Oracle E-Business Suite Releases 12.1 and 12.2 (DocID 2525754.1) found at http://docs.oracle.comConfigure clone second hook for a 19c multi-tenant high-privileged user
Bash#!/usr/bin/env bash # # Copyright (c) 2022 by Delphix. All rights reserved. # # shellcheck source=/dev/null # Set the target UTL_FILE_DIR values in the Oracle 19c database in the below # variable UTL_FILE_DIR_PATH separated by commas # Example UTL_FILE_DIR_PATH=/u01/oracle/VIS/temp/VISPDB,\ # /u01/oracle/VIS/19.3.0/appsutil/outbound/UTL,/u01/tmp # UTL_FILE_DIR_PATH=<provide utl_file_dir locations separated by commas> # If your environment is on R12.TXK.C.Delta.13 or later, enter the password # for the EBS_SYSTEM user. If your environment is on R12.TXK.C.Delta.12 or # earlier, enter the password for the SYSTEM user. SYSTEM_PASSWD=$DLPX_SYS_PASSWORD_PASSWORD DLPX_HOSTNAME=$(uname -n | cut -d '.' -f1) TIMESTAMP=$(date +%d-%m-%Y_%H-%M-%S) CONTEXT_NAME=${DELPHIX_PDB_NAME}_${DLPX_HOSTNAME} APPS_PASSWD=$DLPX_SOURCE_APPS_PASSWORD_PASSWORD DIR_OBJ_PATH="${ORACLE_HOME}/appsutil/outbound/${DELPHIX_PDB_NAME}_${DLPX_HOSTNAME}" checkExists() { if [[ ! -f $1 ]]; then echo "$1 does not exist." exit 1 fi } checkExists "${ORACLE_HOME}/${CONTEXT_NAME}.env" checkExists "${ORACLE_HOME}/appsutil/bin/txkCfgUtlfileDir.pl" . "${ORACLE_HOME}/${CONTEXT_NAME}.env"; echo "${APPS_PASSWD}" | perl "${ORACLE_HOME}/appsutil/bin/txkCfgUtlfileDir.pl" -contextfile="${ORACLE_HOME}/appsutil/${DELPHIX_PDB_NAME}_${DLPX_HOSTNAME}.xml" -oraclehome="${ORACLE_HOME}" -outdir="${ORACLE_HOME}/appsutil/log" -mode=getUtlFileDir checkExists "${ORACLE_HOME}/dbs/${DELPHIX_PDB_NAME}_utlfiledir.txt" cp "${ORACLE_HOME}/dbs/${DELPHIX_PDB_NAME}_utlfiledir.txt" "${ORACLE_HOME}/dbs/${DELPHIX_PDB_NAME}_utlfiledir.txt${TIMESTAMP}" cat /dev/null > "${ORACLE_HOME}/dbs/${DELPHIX_PDB_NAME}_utlfiledir.txt" if [ -z "$UTL_FILE_DIR_PATH" ]; then mkdir -p "${ORACLE_HOME}/appsutil/outbound/${DELPHIX_PDB_NAME}_${DLPX_HOSTNAME}" echo "${ORACLE_HOME}/appsutil/outbound/${DELPHIX_PDB_NAME}_${DLPX_HOSTNAME}" > "${ORACLE_HOME}/dbs/${DELPHIX_PDB_NAME}_utlfiledir.txt" mkdir -p "${ORACLE_BASE}/temp/${DELPHIX_PDB_NAME}" echo "${ORACLE_BASE}/temp/${DELPHIX_PDB_NAME}" >> "${ORACLE_HOME}/dbs/${DELPHIX_PDB_NAME}_utlfiledir.txt" else echo "$UTL_FILE_DIR_PATH" | awk -F, '{ for (i = 1; i < NF+1; ++i ) print $i >> "${ORACLE_HOME}/dbs/${DELPHIX_PDB_NAME}_utlfiledir.txt" }' fi { echo "${APPS_PASSWD}"; echo "${SYSTEM_PASSWD}"; } | perl "${ORACLE_HOME}/appsutil/bin/txkCfgUtlfileDir.pl" -contextfile="${ORACLE_HOME}/appsutil/${DELPHIX_PDB_NAME}_${DLPX_HOSTNAME}.xml" -oraclehome="${ORACLE_HOME}" -outdir="${ORACLE_HOME}/appsutil/log" -mode=setUtlFileDir { echo "${APPS_PASSWD}"; echo "${SYSTEM_PASSWD}"; echo "${DIR_OBJ_PATH}"; } | perl "${ORACLE_HOME}/appsutil/bin/txkCfgUtlfileDir.pl" -contextfile="${ORACLE_HOME}/appsutil/${DELPHIX_PDB_NAME}_${DLPX_HOSTNAME}.xml" -oraclehome="${ORACLE_HOME}" -outdir="${ORACLE_HOME}/appsutil/log" -mode=createDirObject echo "${APPS_PASSWD}" | perl "${ORACLE_HOME}/appsutil/bin/txkCfgUtlfileDir.pl" -contextfile="${ORACLE_HOME}/appsutil/${DELPHIX_PDB_NAME}_${DLPX_HOSTNAME}.xml" -oraclehome="${ORACLE_HOME}" -outdir="${ORACLE_HOME}/appsutil/log" -mode=syncUtlFileDir -skipautoconfig=yes -
Configure Clone hook to ensure that
sqlnet.oraorsqlnet_ifile.oraspecify a value forSQLNET.ALLOWED_LOGON_VERSION_SERVERfor a low-privileged user, as shown in the script below.When prompted, if your environment is on R12.TXK.C.Delta.13 or later, enter the password for the EBS_SYSTEM user, if your environment is on R12.TXK.C.Delta.12 or earlier, enter the password for the SYSTEM user, or if your source EBS setup is running on AD-TXK Delta 13 then you need to supply the EBS_SYSTEM schema password in the below second hook script.
This requirement is outlined in the FAQ: Oracle E-Business Suite and System Schema Migration (DocID 2758999.1) Using UTL_FILE_DIR or Database Directories for PL/SQL File I/O in Oracle E-Business Suite Releases 12.1 and 12.2 (DocID 2525754.1) found at http://docs.oracle.comConfigure clone second hook for a 19c multi-tenant low-privileged user
Bash#!/usr/bin/env bash # # Copyright (c) 2022 by Delphix. All rights reserved. # # shellcheck source=/dev/null # Set the target UTL_FILE_DIR values in the Oracle 19c database # Example UTL_FILE_DIR_PATH=/u01/oracle/VIS/temp/VISPDB,\ # /u01/oracle/VIS/19.3.0/appsutil/outbound/UTL # UTL_FILE_DIR_PATH=<provide utl_file_dir locations separated by commas> # If your environment is on R12.TXK.C.Delta.13 or later, enter the password # for the EBS_SYSTEM user. If your environment is on R12.TXK.C.Delta.12 or # earlier, enter the password for the SYSTEM user. SYSTEM_PASSWD=$DLPX_SYS_PASSWORD_PASSWORD DLPX_DB_EXEC_SCRIPT="<Remote BIN location till dlpx_db_exec script>" DLPX_PRIV_USER=oravis APPS_PASSWD=$DLPX_SOURCE_APPS_PASSWORD_PASSWORD HOSTNAME=$(uname -n | cut -d '.' -f1) CONTEXT_NAME=${DELPHIX_PDB_NAME}_${HOSTNAME} DIR_OBJ_PATH="${ORACLE_HOME}/appsutil/outbound/${CONTEXT_NAME}" TIMESTAMP=$(date +%d-%m-%Y_%H-%M-%S) checkExists() { if [[ ! -f $1 ]]; then echo "$1 does not exist." exit 1 fi } checkExists "${ORACLE_HOME}/${CONTEXT_NAME}.env" checkExists "${ORACLE_HOME}/appsutil/bin/txkCfgUtlfileDir.pl" . "${ORACLE_HOME}/${CONTEXT_NAME}.env"; "${DLPX_DB_EXEC_SCRIPT}" -u"${DLPX_PRIV_USER}" ". ${ORACLE_HOME}/${CONTEXT_NAME}.env; perl ${ORACLE_HOME}/appsutil/bin/txkCfgUtlfileDir.pl -contextfile=${ORACLE_HOME}/appsutil/${CONTEXT_NAME}.xml -oraclehome=${ORACLE_HOME} -outdir=${ORACLE_HOME}/appsutil/log -mode=getUtlFileDir <<-EOF ${APPS_PASSWD} EOF " checkExists "${ORACLE_HOME}/dbs/${DELPHIX_PDB_NAME}_utlfiledir.txt" "${DLPX_DB_EXEC_SCRIPT}" -u"${DLPX_PRIV_USER}" "cp ${ORACLE_HOME}/dbs/${DELPHIX_PDB_NAME}_utlfiledir.txt" "${ORACLE_HOME}/dbs/${DELPHIX_PDB_NAME}_utlfiledir.txt${TIMESTAMP}" "${DLPX_DB_EXEC_SCRIPT}" -u"${DLPX_PRIV_USER}" "echo "" > \"${ORACLE_HOME}/dbs/${DELPHIX_PDB_NAME}_utlfiledir.txt\"" # Initialise for shell check to succeed i=0 if [ -z "$UTL_FILE_DIR_PATH" ]; then "${DLPX_DB_EXEC_SCRIPT}" -u"${DLPX_PRIV_USER}" "mkdir -p ${ORACLE_HOME}/appsutil/outbound/${CONTEXT_NAME}" "${DLPX_DB_EXEC_SCRIPT}" -u"${DLPX_PRIV_USER}" "echo ${ORACLE_HOME}/appsutil/outbound/${CONTEXT_NAME} > ${ORACLE_HOME}/dbs/${DELPHIX_PDB_NAME}_utlfiledir.txt" "${DLPX_DB_EXEC_SCRIPT}" -u"${DLPX_PRIV_USER}" "mkdir -p ${ORACLE_BASE}/temp/${DELPHIX_PDB_NAME}" "${DLPX_DB_EXEC_SCRIPT}" -u"${DLPX_PRIV_USER}" "echo ${ORACLE_BASE}/temp/${DELPHIX_PDB_NAME} >> ${ORACLE_HOME}/dbs/${DELPHIX_PDB_NAME}_utlfiledir.txt" else "${DLPX_DB_EXEC_SCRIPT}" -u"${DLPX_PRIV_USER}" "echo $UTL_FILE_DIR_PATH | awk -F, '{ for (i = 1; i < NF+1; ++i ) print $i }' > ${ORACLE_HOME}/dbs/${DELPHIX_PDB_NAME}_utlfiledir.txt" fi "${DLPX_DB_EXEC_SCRIPT}" -u"${DLPX_PRIV_USER}" ". ${ORACLE_HOME}/${CONTEXT_NAME}.env; perl ${ORACLE_HOME}/appsutil/bin/txkCfgUtlfileDir.pl -contextfile=${ORACLE_HOME}/appsutil/${CONTEXT_NAME}.xml -oraclehome=${ORACLE_HOME} -outdir=${ORACLE_HOME}/appsutil/log -mode=setUtlFileDir <<-EOF1 ${APPS_PASSWD} ${SYSTEM_PASSWD} EOF1 " "${DLPX_DB_EXEC_SCRIPT}" -u"${DLPX_PRIV_USER}" ". ${ORACLE_HOME}/${CONTEXT_NAME}.env; perl ${ORACLE_HOME}/appsutil/bin/txkCfgUtlfileDir.pl -contextfile=${ORACLE_HOME}/appsutil/${CONTEXT_NAME}.xml -oraclehome=${ORACLE_HOME} -outdir=${ORACLE_HOME}/appsutil/log -mode=createDirObject <<-EOF2 ${APPS_PASSWD} ${SYSTEM_PASSWD} ${DIR_OBJ_PATH} EOF2 " "${DLPX_DB_EXEC_SCRIPT}" -u"${DLPX_PRIV_USER}" ". ${ORACLE_HOME}/${CONTEXT_NAME}.env; perl ${ORACLE_HOME}/appsutil/bin/txkCfgUtlfileDir.pl -contextfile=${ORACLE_HOME}/appsutil/${CONTEXT_NAME}.xml -oraclehome=${ORACLE_HOME} -outdir=${ORACLE_HOME}/appsutil/log -mode=syncUtlFileDir -skipautoconfig=yes <<-EOF3 ${APPS_PASSWD} EOF3 " -
Configure Clone hook to ensure that the ebs_<PDB_SID> listener services do not disappear at the stop or start of the VDB, as shown in the script below
Configure clone third hook for 19c multi-tenant high privileged and low privileged users
PowerShell#!/usr/bin/env bash # # Copyright (c) 2022 by Delphix. All rights reserved. # # shellcheck source=/dev/null HOSTNAME=$(uname -n | cut -d '.' -f1) . "${ORACLE_HOME}/${ORACLE_SID}_${HOSTNAME}.env"; sqlplus "/ as sysdba" <<-EOF alter pluggable database ${DELPHIX_PDB_NAME} close; alter pluggable database ${DELPHIX_PDB_NAME} open read write services=all; alter pluggable database ${DELPHIX_PDB_NAME} save state; EOF -
Set up a Pre-Snapshot hook Run Bash Shell Command operation to run any pre-clone steps necessary and specific to your EBS database for a high-privileged user, as shown in the script below.
Normally, these steps will include running Oracle'sadpreclonetool.Pre-snapshot hook for a 19c multi-tenant high-privileged user
Bash#!/usr/bin/env bash # # Copyright (c) 2022 by Delphix. All rights reserved. # # shellcheck source=/dev/null # As grep has to check all the matches in making decision on L58 # shellcheck disable=SC2143 # NOTE: Ensure the below environment variables will be set up correctly by the # shell. If not, hardcode or generate the values below. DLPX_DB_EXEC_SCRIPT="<Remote BIN location till dlpx_db_exec script>" DLPX_PRIV_USER=oravis HOSTNAME=$(uname -n | cut -d '.' -f1) CONTEXT_NAME=${DELPHIX_PDB_NAME}_${HOSTNAME} SOURCE_APPS_PASSWD=$DLPX_SOURCE_APPS_PASSWORD_PASSWORD TARGET_APPS_PASSWD=$DLPX_TARGET_APPS_PASSWORD_PASSWORD timeout=3600 waittime=0 # Query active PDB services . "${ORACLE_HOME}/${ORACLE_SID}_${HOSTNAME}.env"; check_value=$(sqlplus -s "/ as sysdba" <<EOF SELECT NAME FROM v\$active_services; exit; EOF ) checkService() { if ! echo "$1" | grep -q "$2"; then . "${ORACLE_HOME}/${ORACLE_SID}_${HOSTNAME}.env"; sqlplus -s "/ as sysdba" <<EOF alter session set container="${DELPHIX_PDB_NAME}"; BEGIN DBMS_SERVICE.START_SERVICE( service_name => '$2'); end; / EOF fi } # Check for ebs_PDB service checkService "$check_value" "ebs_${DELPHIX_PDB_NAME}" # Check for PDB_ebs_patch service checkService "$check_value" "${DELPHIX_PDB_NAME}_ebs_patch" . "${ORACLE_HOME}/${CONTEXT_NAME}.env"; testAppsPassword() { local passwordInQuestion=$1 ERROR=$("${DLPX_DB_EXEC_SCRIPT}" -u"${DLPX_PRIV_USER}" ". ${ORACLE_HOME}/${CONTEXT_NAME}.env; sqlplus apps/\"${passwordInQuestion}\"@${DELPHIX_PDB_NAME} <<< \"exit;\"") grep ORA-01017 <<< "${ERROR}" >/dev/null && return 1 return 0 } testAppsPassword "${SOURCE_APPS_PASSWD}" testResult=$? if [[ ${testResult} == 0 ]]; then APPS_PASSWD=${SOURCE_APPS_PASSWD} else APPS_PASSWD=${TARGET_APPS_PASSWD} fi while [[ -f "${ORACLE_HOME}/.delphix_adpreclone.lck" || $(pgrep -au "${DLPX_PRIV_USER}" | grep "^${ORACLE_HOME}" | grep -v grep | grep "adpreclone") ]] ; do if [[ $waittime -gt $timeout ]]; then echo "Another adpreclone process is still running from the last 60 mins.Delphix cannot proceed until it is complete. Exiting Now." exit 1 fi echo " Another adpreclone process is running. waiting for the process to complete before starting the adpreclone of the database...." (( timeout += 10 )) sleep 10 done echo "No other adpreclone process is running on the database, proceeding ...." "${DLPX_DB_EXEC_SCRIPT}" -u"${DLPX_PRIV_USER}" ". ${ORACLE_HOME}/${CONTEXT_NAME}.env; ${ORACLE_HOME}/perl/bin/perl ${ORACLE_HOME}/appsutil/scripts/${CONTEXT_NAME}/adpreclone.pl dbTier <<-EOF ${APPS_PASSWD} EOF "
Pre-Snapshot hook Run Bash Shell Command operation to run any pre-clone steps necessary and specific to your EBS database for a low-privileged user, as shown in the script below.
${ORACLE_SID}_source_apps_file.txt will be created automatically inside the /var/tmp/ location of the target database host once the DBTechStack provisioning is completed.
Pre-snapshot hook for a 19c multi-tenant low-privileged user
#!/usr/bin/env bash
#
# Copyright (c) 2022 by Delphix. All rights reserved.
#
# shellcheck source=/dev/null
# As grep has to check all the matches in making decision on L58
# shellcheck disable=SC2143
# NOTE: Ensure the below environment variables will be set up correctly by the
# shell. If not, hardcode or generate the values below.
DLPX_DB_EXEC_SCRIPT="<Remote BIN location till dlpx_db_exec script>"
DLPX_PRIV_USER=oravis
HOSTNAME=$(uname -n | cut -d '.' -f1)
CONTEXT_NAME=${DELPHIX_PDB_NAME}_${HOSTNAME}
SOURCE_APPS_PASSWD=$DLPX_SOURCE_APPS_PASSWORD_PASSWORD
TARGET_APPS_PASSWD=$DLPX_TARGET_APPS_PASSWORD_PASSWORD

# Query active PDB services
. "${ORACLE_HOME}/${ORACLE_SID}_${HOSTNAME}.env";
check_value=$(sqlplus -s "/ as sysdba" <<EOF
SELECT NAME FROM v\$active_services;
exit;
EOF
)

checkService() {
if ! echo "$1" | grep -q "$2"; then
. "${ORACLE_HOME}/${ORACLE_SID}_${HOSTNAME}.env";
sqlplus -s "/ as sysdba" <<EOF
alter session set container="${DELPHIX_PDB_NAME}";
BEGIN DBMS_SERVICE.START_SERVICE( service_name => '$2');
end;
/
EOF
fi
}

# Check for ebs_PDB service
checkService "$check_value" "ebs_${DELPHIX_PDB_NAME}"
# Check for PDB_ebs_patch service
checkService "$check_value" "${DELPHIX_PDB_NAME}_ebs_patch"

. "${ORACLE_HOME}/${CONTEXT_NAME}.env";
testAppsPassword() {
    passwordInQuestion=$1
    ERROR=$("${DLPX_DB_EXEC_SCRIPT}" -u"${DLPX_PRIV_USER}" ". ${ORACLE_HOME}/${CONTEXT_NAME}.env; sqlplus apps/\"${passwordInQuestion}\"@${DELPHIX_PDB_NAME} <<< \"exit;\"")
    grep ORA-01017 <<< "${ERROR}" >/dev/null && return 1
    return 0
}
testAppsPassword "${SOURCE_APPS_PASSWD}"
testResult=$?

if [[ ${testResult} == 0 ]]; then
    APPS_PASSWD=${SOURCE_APPS_PASSWD}
else
    APPS_PASSWD=${TARGET_APPS_PASSWD}
fi

${DLPX_DB_EXEC_SCRIPT}" -u"${DLPX_PRIV_USER}" ". ${ORACLE_HOME}/${CONTEXT_NAME}.env; ${ORACLE_HOME}/perl/bin/perl ${ORACLE_HOME}/appsutil/scripts/${CONTEXT_NAME}/adpreclone.pl dbTier <<-EOF
${APPS_PASSWD}
EOF
"
Provisioning the Oracle 12C database
-
Refresh the Target DB environment from Manage > Environments so that the Listener brought up during dbTechStack provision gets discovered and the Installation Home is listed in the dropdown during Database provision. If the Target DB environment is not refreshed, you will see `This environment has no compatible Oracle Installation Homes` in the Installation Home dropdown in the Database provision.
-
Provision the EBS database to the target dbTier environment by following the steps outlined in Provisioning an Oracle VDB. For the Oracle EBS database for 19c MT, provision the database by following the steps outlined in Provisioning an Oracle Virtual Pluggable Database (vPDB)
Note: When Snapshot is running against the dbTechStack, database, or appsTier, the Delphix Engine also executes pre-clone logic to ensure the latest configuration is staged in the captured snapshots. Unfortunately, if multiple Snapshots are running against the same EBS instance concurrently, this pre-clone logic may fail and produce bad snapshots.To avoid SnapSync conflicts, spread out your SnapSync policies for an EBS instance by one hour or more.
-
Select the correct Installation Home.
This should be the virtual dbTechStack you just added to the Delphix Engine. -
Select an Environment User.
-
This user should be the Oracle user outlined in Preparing Target EBS R12.2 Environments for Provisioning.
-
Select a Target Group for the VDB.
-
In the VDB Configuration section, provide the Target DB/CDB SID name provided during dbTechStack provisioning in the Oracle Database Name and Oracle SID field. Provide any unique user-defined name in VDB Name and Oracle Database Unique Name and click Next.
-
Click Advanced.
-
Select the correct Oracle Node Listeners value.
This should be the listener corresponding to the virtual dbTechStack you just added to the Delphix Engine. -
Add the EBS R12.2 dbTier environment file as a Custom Environment Variables entry.
-
This file can be specified as an Environment File with Path Parameters of
$ORACLE_HOME/<CONTEXT_NAME>.
Replace<CONTEXT_NAME>with the virtual EBS instance's context name. The Delphix Engine will expand the$ORACLE_HOMEvariable at runtime.
For more information, see Customizing Oracle VDB Environment Variables. Note: To complete the DB Provisioning operation, you must provide content to configure clones and pre-snapshot hooks. You must either follow step 12 to use the hooks utility feature OR proceed with the conventional way by following steps 13-19. -
To complete the database provisioning operation, It is mandatory to provide content to configure clone and pre-snapshot hooks. You can achieve this task either by using hooks utility provided by EBS plugin or manually pasting the content in configure clone and pre-snapshot hooks.
configure clone hook will be
<DBTechStack Mount path>/hooksUtil/hooksRunner --operation configure. You must set a hook environment variable DLPX_SOURCE_APPS_PASSWORD for providing the source apps schema password.Pre-Snapshot hook :
<DBTechStack Mount path>/hooksUtil/hooksRunner --operation pre-snapshot. You must set a hook environment variable DLPX_SOURCE_APPS_PASSWORD for providing the source apps schema password. In case of apps password change in target VDB, you can set hook environment variables DLPX_TARGET_APPS_PASSWORD for providing the target apps schema passwords.Note : Pre-Snapshot hook is a imperative task when VDB to VDB provision of DBTECHSTACK is needed otherwise you can skip Pre-Snapshot hook.
The hooks environment variable will be declared as DLPX_SOURCE_APPS_PASSWORD and then its password value will be the same variable used in hooks along with the PASSWORD keyword appended at the end so that it will be like DLPX_SOURCE_APPS_PASSWORD_PASSWORD
The value of $DLPX_SOURCE_APPS_PASSWRD will be assigned to APPS_PASSWD.
In hooks, it will be written asSOURCE_APPS_PASSWD=$DLPX_SOURCE_APPS_PASSWORD_PASSWORDSame goes for,
TARGET_APPS_PASSWD=$DLPX_TARGET_APPS_PASSWORD_PASSWORD -
Add a Run Bash Shell Command operation to the Configure Clone hook to ensure that
adcfgcloneis run against the newly provisioned database for a high-privileged user, as shown in the script below.
Note: You must set a hooks environment variableDLPX_SOURCE_APPS_PASSWORDfor providing the source apps schema password.
Configure clone first hook for a high-privileged user#!/usr/bin/env bash # # Copyright (c) 2023 by Delphix. All rights reserved. # # shellcheck source=/dev/null # NOTE: Ensure the below environment variables will be set up correctly by # the shell. If not, hardcode or generate the values below. HOSTNAME=$(uname -n | cut -d '.' -f1) CONTEXT_NAME=${ORACLE_SID}_${HOSTNAME} APPS_PASSWD=$DLPX_SOURCE_APPS_PASSWORD_PASSWORD . "${ORACLE_HOME}/${CONTEXT_NAME}.env"; # Check for local_listener parameter is set for SID, otherwise set it # appropriately check_value=$(sqlplus -s "/ as sysdba" <<EOF show parameter local_listener; EOF ) local_listener=$(echo "$check_value" | awk '{print $11}') value=("${local_listener//:/ }") host="${value[0]}" port="${value[1]}" curr_port=$(grep PORT < "${TNS_ADMIN}/listener.ora" | awk '{print $9}' | sed 's/)//g') if [[ $port != "$curr_port" || $host != "${HOSTNAME}" ]]; then sqlplus -s "/ as sysdba" <<EOF alter system set local_listener='${HOSTNAME}:${curr_port}'; alter system register; EOF fi sqlplus "/ as sysdba" <<EOF @${ORACLE_HOME}/appsutil/install/${CONTEXT_NAME}/adupdlib.sql so EOF perl "${ORACLE_HOME}/appsutil/clone/bin/adcfgclone.pl" dbconfig "${ORACLE_HOME}/appsutil/${CONTEXT_NAME}.xml" <<EOF ${APPS_PASSWD} EOF -
Configure the Clone hook to ensure that
adcfgcloneis run against the newly provisioned database for a low-privileged user, as shown in the script below. You have to identify the DLPX_DB_EXEC_SCRIPT value from their remote environment, this would always be inside the toolkit directory provided while adding the environment on Delphix Engine.Configure clone first hook for a low-privileged user
#!/usr/bin/env bash # # Copyright (c) 2023 by Delphix. All rights reserved. # # shellcheck source=/dev/null # NOTE: Ensure the below environment variables will be set up correctly by the # shell. If not, hardcode or generate the values below. DLPX_DB_EXEC_SCRIPT="<Remote BIN location for dlpx_db_exec script>" DLPX_PRIV_USER=oravis APPS_PASSWD=$DLPX_SOURCE_APPS_PASSWORD_PASSWORD HOSTNAME=$(uname -n | cut -d '.' -f1) CONTEXT_NAME=${ORACLE_SID}_${HOSTNAME} . "${ORACLE_HOME}/${CONTEXT_NAME}.env"; # Check for local_listener parameter is set for SID, otherwise set it # appropriately check_value=$(sqlplus -s "/ as sysdba" <<EOF show parameter local_listener; EOF ) local_listener=$(echo "$check_value" | awk '{print $11}') value=("${local_listener//:/ }") host="${value[0]}" port="${value[1]}" curr_port=$(grep PORT < "${TNS_ADMIN}/listener.ora" | awk '{print $9}' | sed 's/)//g') if [[ $port != "$curr_port" || $host != "${HOSTNAME}" ]]; then sqlplus -s "/ as sysdba" <<EOF alter system set local_listener='${HOSTNAME}:${curr_port}'; alter system register; EOF fi "${DLPX_DB_EXEC_SCRIPT}" -u"${DLPX_PRIV_USER}" ". ${ORACLE_HOME}/${CONTEXT_NAME}.env; sqlplus \"/ as sysdba\" <<-EOF @${ORACLE_HOME}/appsutil/install/${CONTEXT_NAME}/adupdlib.sql so EOF " "${DLPX_DB_EXEC_SCRIPT}" -u"${DLPX_PRIV_USER}" ". ${ORACLE_HOME}/${CONTEXT_NAME}.env; perl ${ORACLE_HOME}/appsutil/clone/bin/adcfgclone.pl dbconfig ${ORACLE_HOME}/appsutil/${CONTEXT_NAME}.xml <<-EOF1 ${APPS_PASSWD} EOF1 " -
For the EBS database Oracle 12.2, add a Run Bash Shell Command operation to the Configure Clone hook to ensure that
sqlnet.oraorsqlnet_ifile.oraspecify a value forSQLNET.ALLOWED_LOGON_VERSION_SERVERfor a high-privileged user, as shown in the script below.
This requirement is outlined in Cloning Oracle E-Business Suite Release 12.2 with Rapid Clone (Doc ID 1383621.1) found at http://docs.oracle.comConfigure clone second hook for a high-privileged user
#!/usr/bin/env bash # Copyright (c) 2023 by Delphix. All rights reserved. # # NOTE: Ensure the below environment variables will be set up correctly by # the shell. If not, hardcode or generate the values below. # If you are using sqlnet_ifile.ora, change the script below to reflect # sqlnet_ifile.ora Initialize dummy variable `parameter` to avoid shellcheck # to fail parameter="" CONTEXT_NAME=${ORACLE_SID}_$(uname -n | cut -d '.' -f1) . "${ORACLE_HOME}/${CONTEXT_NAME}.env"; TNS_ADMIN=${ORACLE_HOME}/network/admin/${CONTEXT_NAME} FILE=${TNS_ADMIN}/sqlnet.ora if [[ ! -f ${FILE} ]]; then { echo "#Creating sqlnet.ora for Delphix hooks" echo "###############################################################" echo "NAMES.DIRECTORY_PATH=(TNSNAMES, ONAMES, HOSTNAME)" echo "SQLNET.EXPIRE_TIME= 10" echo "SQLNET.INBOUND_CONNECT_TIMEOUT =60" echo "SQLNET.ALLOWED_LOGON_VERSION_SERVER=8" } >> "${TNS_ADMIN}/sqlnet.ora" fi echo "sqlnet.ora is created in location ${TNS_ADMIN}" check_value=$(sqlplus -s "/ as sysdba" <<EOF set head off termout off feedback off wrap off select DISPLAY_VALUE from v\\$parameter where NAME='sec_case_sensitive_logon'; EOF ) if [[ ${check_value} = "FALSE" ]]; then sed 's/^SQLNET.ALLOWED_LOGON_VERSION_SERVER=.*/SQLNET.ALLOWED_LOGON_VERSION_SERVER=8/g' "${TNS_ADMIN}/sqlnet.ora" > /var/tmp/temp.ora && mv /var/tmp/temp.ora "${TNS_ADMIN}/sqlnet.ora" elif [[ ${check_value} = "TRUE" ]]; then sed 's/^SQLNET.ALLOWED_LOGON_VERSION_SERVER=.*/SQLNET.ALLOWED_LOGON_VERSION_SERVER=10/g' "${TNS_ADMIN}/sqlnet.ora" > /var/tmp/temp.ora && mv /var/tmp/temp.ora "${TNS_ADMIN}/sqlnet.ora" else echo "sec_case_sensitive_logon parameter is not set in the database. So the sqlnet.ora has not been updated." fi -
Configure Clone hook to ensure that
sqlnet.oraorsqlnet_ifile.oraspecify a value forSQLNET.ALLOWED_LOGON_VERSION_SERVERfor a low-privileged user, as shown in the script below.Configure clone second hook for a low-privileged user
#!/usr/bin/env bash # # Copyright (c) 2023 by Delphix. All rights reserved. # # NOTE: Ensure the below environment variables will be set up correctly by the # shell. If not, hardcode or generate the values below. # If you are using sqlnet_ifile.ora, change the script below to reflect # sqlnet_ifile.ora. # Initialize dummy variable `parameter` to avoid shellcheck to fail parameter="" DLPX_DB_EXEC_SCRIPT="<Remote BIN location for dlpx_db_exec script>" DLPX_PRIV_USER=oravis CONTEXT_NAME=${ORACLE_SID}_$(uname -n | cut -d '.' -f1) TNS_ADMIN=${ORACLE_HOME}/network/admin/${CONTEXT_NAME} check_value=$("${DLPX_DB_EXEC_SCRIPT}" -u"${DLPX_PRIV_USER}" ". ${ORACLE_HOME}/${CONTEXT_NAME}.env; sqlplus \"/ as sysdba\" <<-EOF set head off termout off feedback off wrap off select DISPLAY_VALUE from v\\$parameter where NAME='sec_case_sensitive_logon'; EOF ") if [[ ${check_value} = "FALSE" ]]; then "${DLPX_DB_EXEC_SCRIPT}" -u"${DLPX_PRIV_USER}" "sed 's/^SQLNET.ALLOWED_LOGON_VERSION_SERVER=.*/SQLNET.ALLOWED_LOGON_VERSION_SERVER=8/g' \"${TNS_ADMIN}/sqlnet.ora\" > /var/tmp/temp.ora && mv /var/tmp/temp.ora \"${TNS_ADMIN}/sqlnet.ora\"" elif [[ ${check_value} = "TRUE" ]]; then "${DLPX_DB_EXEC_SCRIPT}" -u"${DLPX_PRIV_USER}" "sed 's/^SQLNET.ALLOWED_LOGON_VERSION_SERVER=.*/SQLNET.ALLOWED_LOGON_VERSION_SERVER=10/g' \"${TNS_ADMIN}/sqlnet.ora\" > /var/tmp/temp.ora && mv /var/tmp/temp.ora \"${TNS_ADMIN}/sqlnet.ora\"" else echo "sec_case_sensitive_logon parameter is not set in the database. So the sqlnet.ora has not been updated." fi -
Configure the Clone hook to ensure that the ebs_<PDB_SID> listener services do not disappear at the stop or start of the VDB, as shown in the script below.
-
Set up a Pre-Snapshot hook Run Bash Shell Command operation to run any pre-clone steps necessary and specific to your EBS database for a high privileged user, as shown in the script below.
It is mandatory to declare DLPX_SOURCE_APPS_PASSWORD and DLPX_TARGET_APPS_PASSWORD apps schema passwords in the Credential Environment Variables hook section for high privileged and low privileged user Pre-snapshot hook.
Make sure you change theORACLE_USER="oravis"according to your target environment’s high privileged user.Pre-snapshot hook for a high privileged user
#!/usr/bin/env bash # # Copyright (c) 2023 by Delphix. All rights reserved. # # shellcheck source=/dev/null # As grep has to check all the matches in making decision on L58 # shellcheck disable=SC2143 # NOTE: Ensure the below environment variables will be set up correctly by # the shell. If not, hardcode or generate the values below. HOSTNAME=$(uname -n | cut -d '.' -f1) CONTEXT_NAME=${ORACLE_SID}_${HOSTNAME} SOURCE_APPS_PASSWD=$DLPX_SOURCE_APPS_PASSWORD_PASSWORD TARGET_APPS_PASSWD=$DLPX_TARGET_APPS_PASSWORD_PASSWORD ORACLE_USER="oravis" . "${ORACLE_HOME}/${CONTEXT_NAME}.env"; testAppsPassword() { passwordInQuestion=$1 ERROR=$(sqlplus "apps/${passwordInQuestion}" <<< "exit;") grep ORA-01017 <<< "${ERROR}" >/dev/null && return 1 return 0 } testAppsPassword "${SOURCE_APPS_PASSWD}" testResult=$? if [[ ${testResult} == 0 ]]; then APPS_PASSWD=${SOURCE_APPS_PASSWD} else APPS_PASSWD=${TARGET_APPS_PASSWD} fi # Query active SID services check_value=$(sqlplus -s "/ as sysdba" <<EOF SELECT NAME FROM v\$active_services; exit; EOF ) checkService() { if ! echo "$1" | grep -q "$2"; then . "${ORACLE_HOME}/${CONTEXT_NAME}.env"; sqlplus -s "/ as sysdba" <<EOF BEGIN DBMS_SERVICE.START_SERVICE( service_name => '$2'); end; / EOF fi } # Check for SID_ebs_patch or ebs_patch service based on the AD-TXK codelevel # version. In AD-TXK Delta 8 and earlier, the service name for connections # to the patch edition of the database was ebs_patch. In AD-TXK Delta 9, the # service name to connect to the patch edition has been changed to # <instance_name>_ebs_patch patch_level=$(sqlplus -s "apps/${APPS_PASSWD}" <<EOF select PATCH_LEVEL from apps.fnd_product_installations where PATCH_LEVEL like 'R12.AD.%'; EOF ) patch_service="${ORACLE_SID}_ebs_patch" if [ "${patch_level: -1}" -le 8 ]; then patch_service="ebs_patch" fi checkService "$check_value" "${patch_service}" "${ORACLE_HOME}"/perl/bin/perl "${ORACLE_HOME}/appsutil/scripts/${CONTEXT_NAME}/adpreclone.pl" dbTier <<-EOF ${APPS_PASSWD} EOF -
Pre-Snapshot hook Run Bash Shell Command operation to run any pre-clone steps necessary and specific to your EBS database for a low-privileged user, as shown in the script below.
Pre-snapshot hook for a low-privileged user
#!/usr/bin/env bash
#
# Copyright (c) 2022 by Delphix. All rights reserved.
#
# shellcheck source=/dev/null
# NOTE: Ensure the below environment variables will be set up correctly by the
# shell. If not, hardcode or generate the values below.
# As grep has to check all the matches in making decision on L58
# shellcheck disable=SC2143
DLPX_DB_EXEC_SCRIPT="<Remote BIN location for dlpx_db_exec script>"
DLPX_PRIV_USER=oravis
HOSTNAME=$(uname -n | cut -d '.' -f1)
CONTEXT_NAME=${ORACLE_SID}_${HOSTNAME}
SOURCE_APPS_PASSWD=$DLPX_SOURCE_APPS_PASSWORD_PASSWORD
TARGET_APPS_PASSWD=$DLPX_TARGET_APPS_PASSWORD_PASSWORD

testAppsPassword() {
    passwordInQuestion=$1
    ERROR=$("${DLPX_DB_EXEC_SCRIPT}" -u"${DLPX_PRIV_USER}" ". ${ORACLE_HOME}/${CONTEXT_NAME}.env; sqlplus apps/\"${passwordInQuestion}\" <<< \"exit;\"")

    grep ORA-01017 <<< "${ERROR}" >/dev/null && return 1
    return 0
}

testAppsPassword "${SOURCE_APPS_PASSWD}"
testResult=$?

if [[ ${testResult} == 0 ]]; then
    APPS_PASSWD=${SOURCE_APPS_PASSWD}
else
    APPS_PASSWD=${TARGET_APPS_PASSWD}
fi

# Query active SID services
. "${ORACLE_HOME}/${CONTEXT_NAME}.env";
check_value=$(sqlplus -s "/ as sysdba" <<EOF
SELECT NAME FROM v\$active_services;
exit;
EOF
)
checkService() {
if ! echo "$1" | grep -q "$2"; then
. "${ORACLE_HOME}/${CONTEXT_NAME}.env";
sqlplus -s "/ as sysdba" <<EOF
BEGIN DBMS_SERVICE.START_SERVICE( service_name => '$2');
end;
/
EOF
fi
}
# Check for SID_ebs_patch or ebs_patch service based on the AD-TXK codelevel
# version. In AD-TXK Delta 8 and earlier, the service name for connections
# to the patch edition of the database was ebs_patch. In AD-TXK Delta 9, the
# service name to connect to the patch edition has been changed to
# <instance_name>_ebs_patch
patch_level=$(sqlplus -s "apps/${APPS_PASSWD}" <<EOF
select PATCH_LEVEL from apps.fnd_product_installations where PATCH_LEVEL like 'R12.AD.%';
EOF
)
patch_service="${ORACLE_SID}_ebs_patch"
if [ "${patch_level: -1}" -le 8 ]; then
    patch_service="ebs_patch"
fi
checkService "$check_value" "${patch_service}"

"${DLPX_DB_EXEC_SCRIPT}" -u"${DLPX_PRIV_USER}" ". ${ORACLE_HOME}/${CONTEXT_NAME}.env; ${ORACLE_HOME}/perl/bin/perl ${ORACLE_HOME}/appsutil/scripts/${CONTEXT_NAME}/adpreclone.pl dbTier <<-EOF
${APPS_PASSWD}
EOF
"
${ORACLE_SID}_source_apps_file.txt will be created automatically inside the /var/tmp/ location of the target database host once the DBTechStack provisioning is completed.
Provisioning the EBS appsTier
-
Login to the Delphix Management application using Admin credentials.
-
Click Manage.
-
Select Datasets.
-
Select the appsTier dSource.
-
Select a dSource snapshot.
All snapshots will have staged configuration prepared byadpreclone.pland any hook operations placed on the dSource. -
Click Provision.
The Provision VDB wizard will open. -
Select an Environment.
This environment will host the virtual appsTier and be used to execute hook operations specified in a few steps. This environment will also run the WebLogic Admin server (Web Administration service) for the virtual appsTier.
If you are provisioning a multi-node appsTier, you will be able to specify additional environments to host the virtual appsTier in a few steps. -
Select E-Business Suite R12.2 appsTier from the Installation dropdown.
-
Select an Environment User.
This user should be theapplmgruser outlined in Preparing Target EBS R12.2 Environments for Provisioning -
Enter a Mount Path for the virtual appsTier VDB.If you are provisioning a multi-node appsTier, this mount path will be used across all target environments.
-
Enter the EBS-specific parameters for the virtual appsTier. A subset of these parameters are discussed in more detail below.
-
Privileged OS Account (Optional) field should contain high privileged user when low privileged user is being used for provisioning.
-
The Target APPS Password is the new apps password that is required to configure and manage the virtual appsTier.
This password is encrypted when stored within the Delphix Engine and is available as an environment variable to theadcfgclone,adstrtal, andadstpallprocesses. -
The Weblogic AdminServer Password is the new WebLogic password required to configure the virtual appsTier. A password change will be performed if this password does not match that of the source EBS instance. This password is encrypted when stored within the Delphix Engine and is available as an environment variable to the
adcfgclone, adstrtal, andadstpallprocesses. -
The SYSTEM Password is required to configure the virtual appsTier with the new apps password. This password is not required if the Target Apps Password is the same as the source.
-
Provide the Target Application hostname.
-
The Target DB/PDB SID is the new database SID (PDB SID in case of 19c) that is required to configure and manage the virtual appsTier.
-
Provide the Target DB server node hostname.
-
Provide Target DB Domain Name, this will be provided to the
adcfgclone. -
Delphix recommends specifying an Instance Home Directory under the Mount Path so that instance-specific EBS files live on Delphix-provided storage.
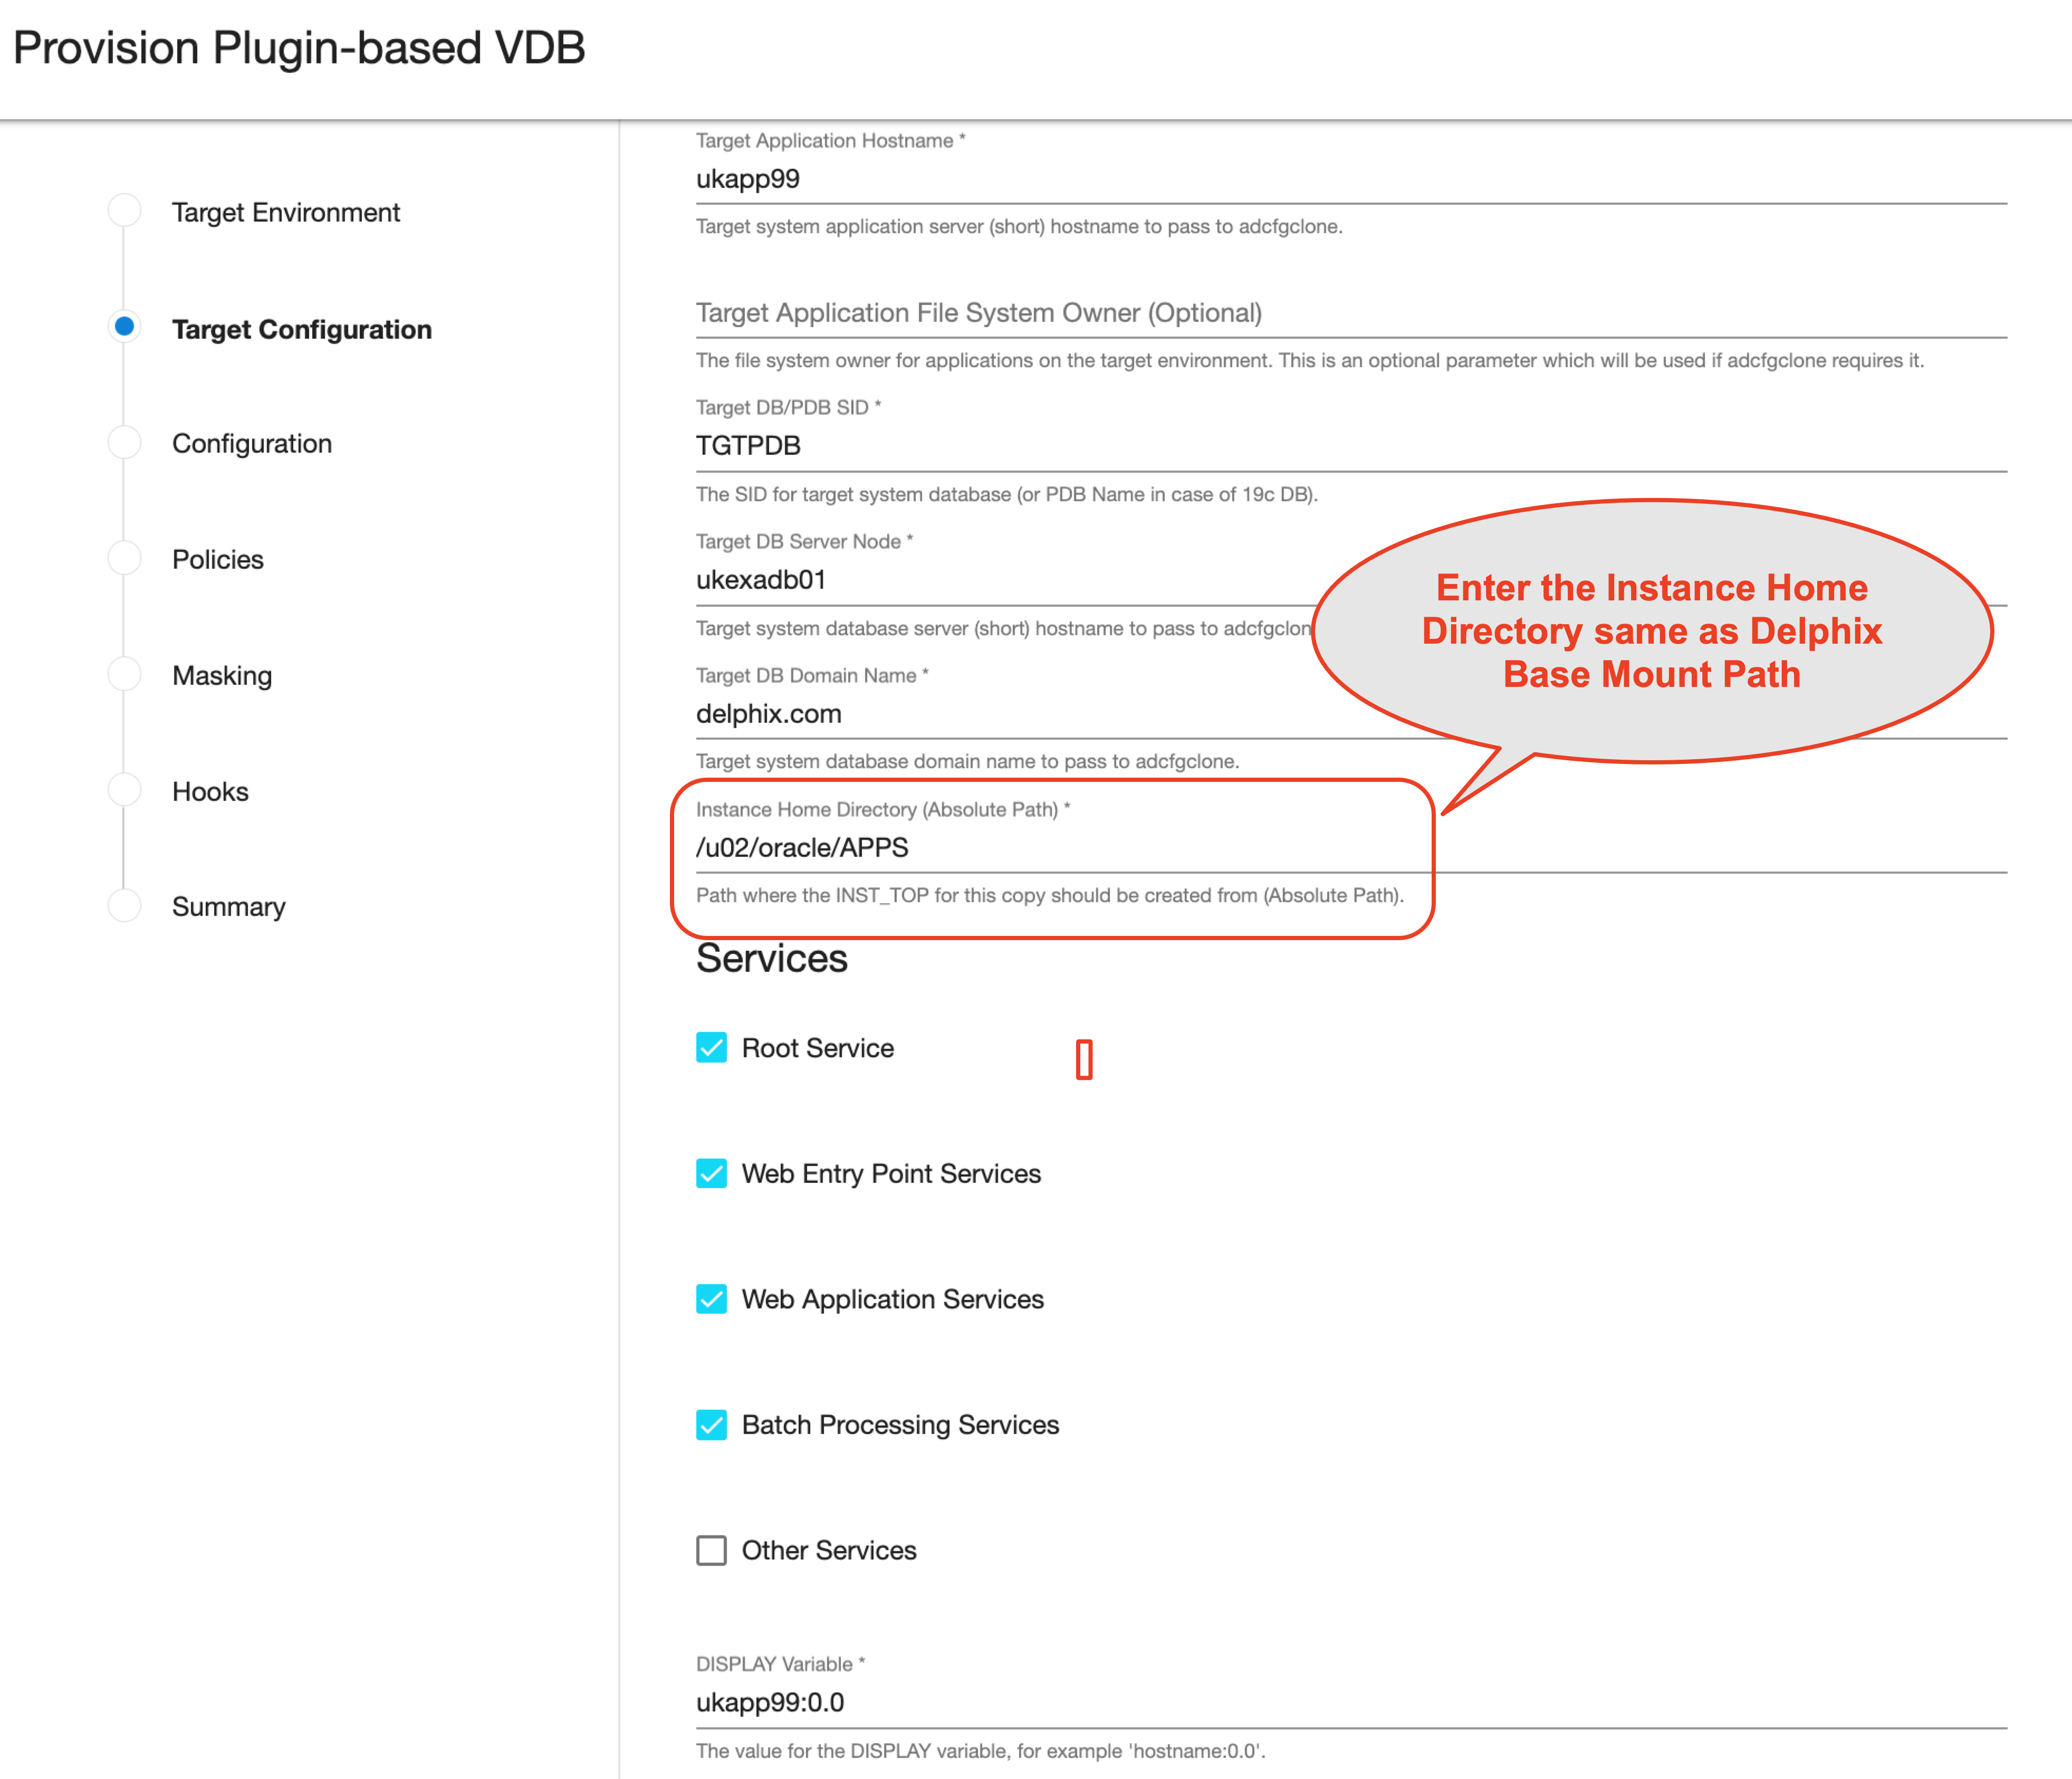
For example, if the provided Mount Path is
/u01/oracle/VIS, then providing an Instance Home Directory of/u01/oracle/VISwould allow EBS to generate virtual application INST_TOP in/u01/oracle/VIS/fs1/inst/apps/<CONTEXT_NAME> and/u01/oracle/VIS/fs2/inst/apps/<CONTEXT_NAME>.-
If you are provisioning a single-node appsTier, this recommendation is OPTIONAL; putting instance-specific EBS files on Delphix-provided storage merely eases the administration of the virtual EBS instance.
-
If you are provisioning a multi-node appsTier, this recommendation is REQUIRED; the Delphix Engine's automation requires that all nodes in the appsTier have access to instance-specific files via Delphix-provided storage.
-
-
Ensure that the Target Application Hostname and Target DB Server Node values are the short hostnames, not the fully qualified hostnames.
-
Select Services, by default all the Root, Web Entry Point, Web Application, and Batch Processing would be checked. In case you are using a multinode environment and want to start a few services on a secondary node then this field is going to be very useful for you.
-
Provide DISPLAY Variable, the default value is hostname:0.0
-
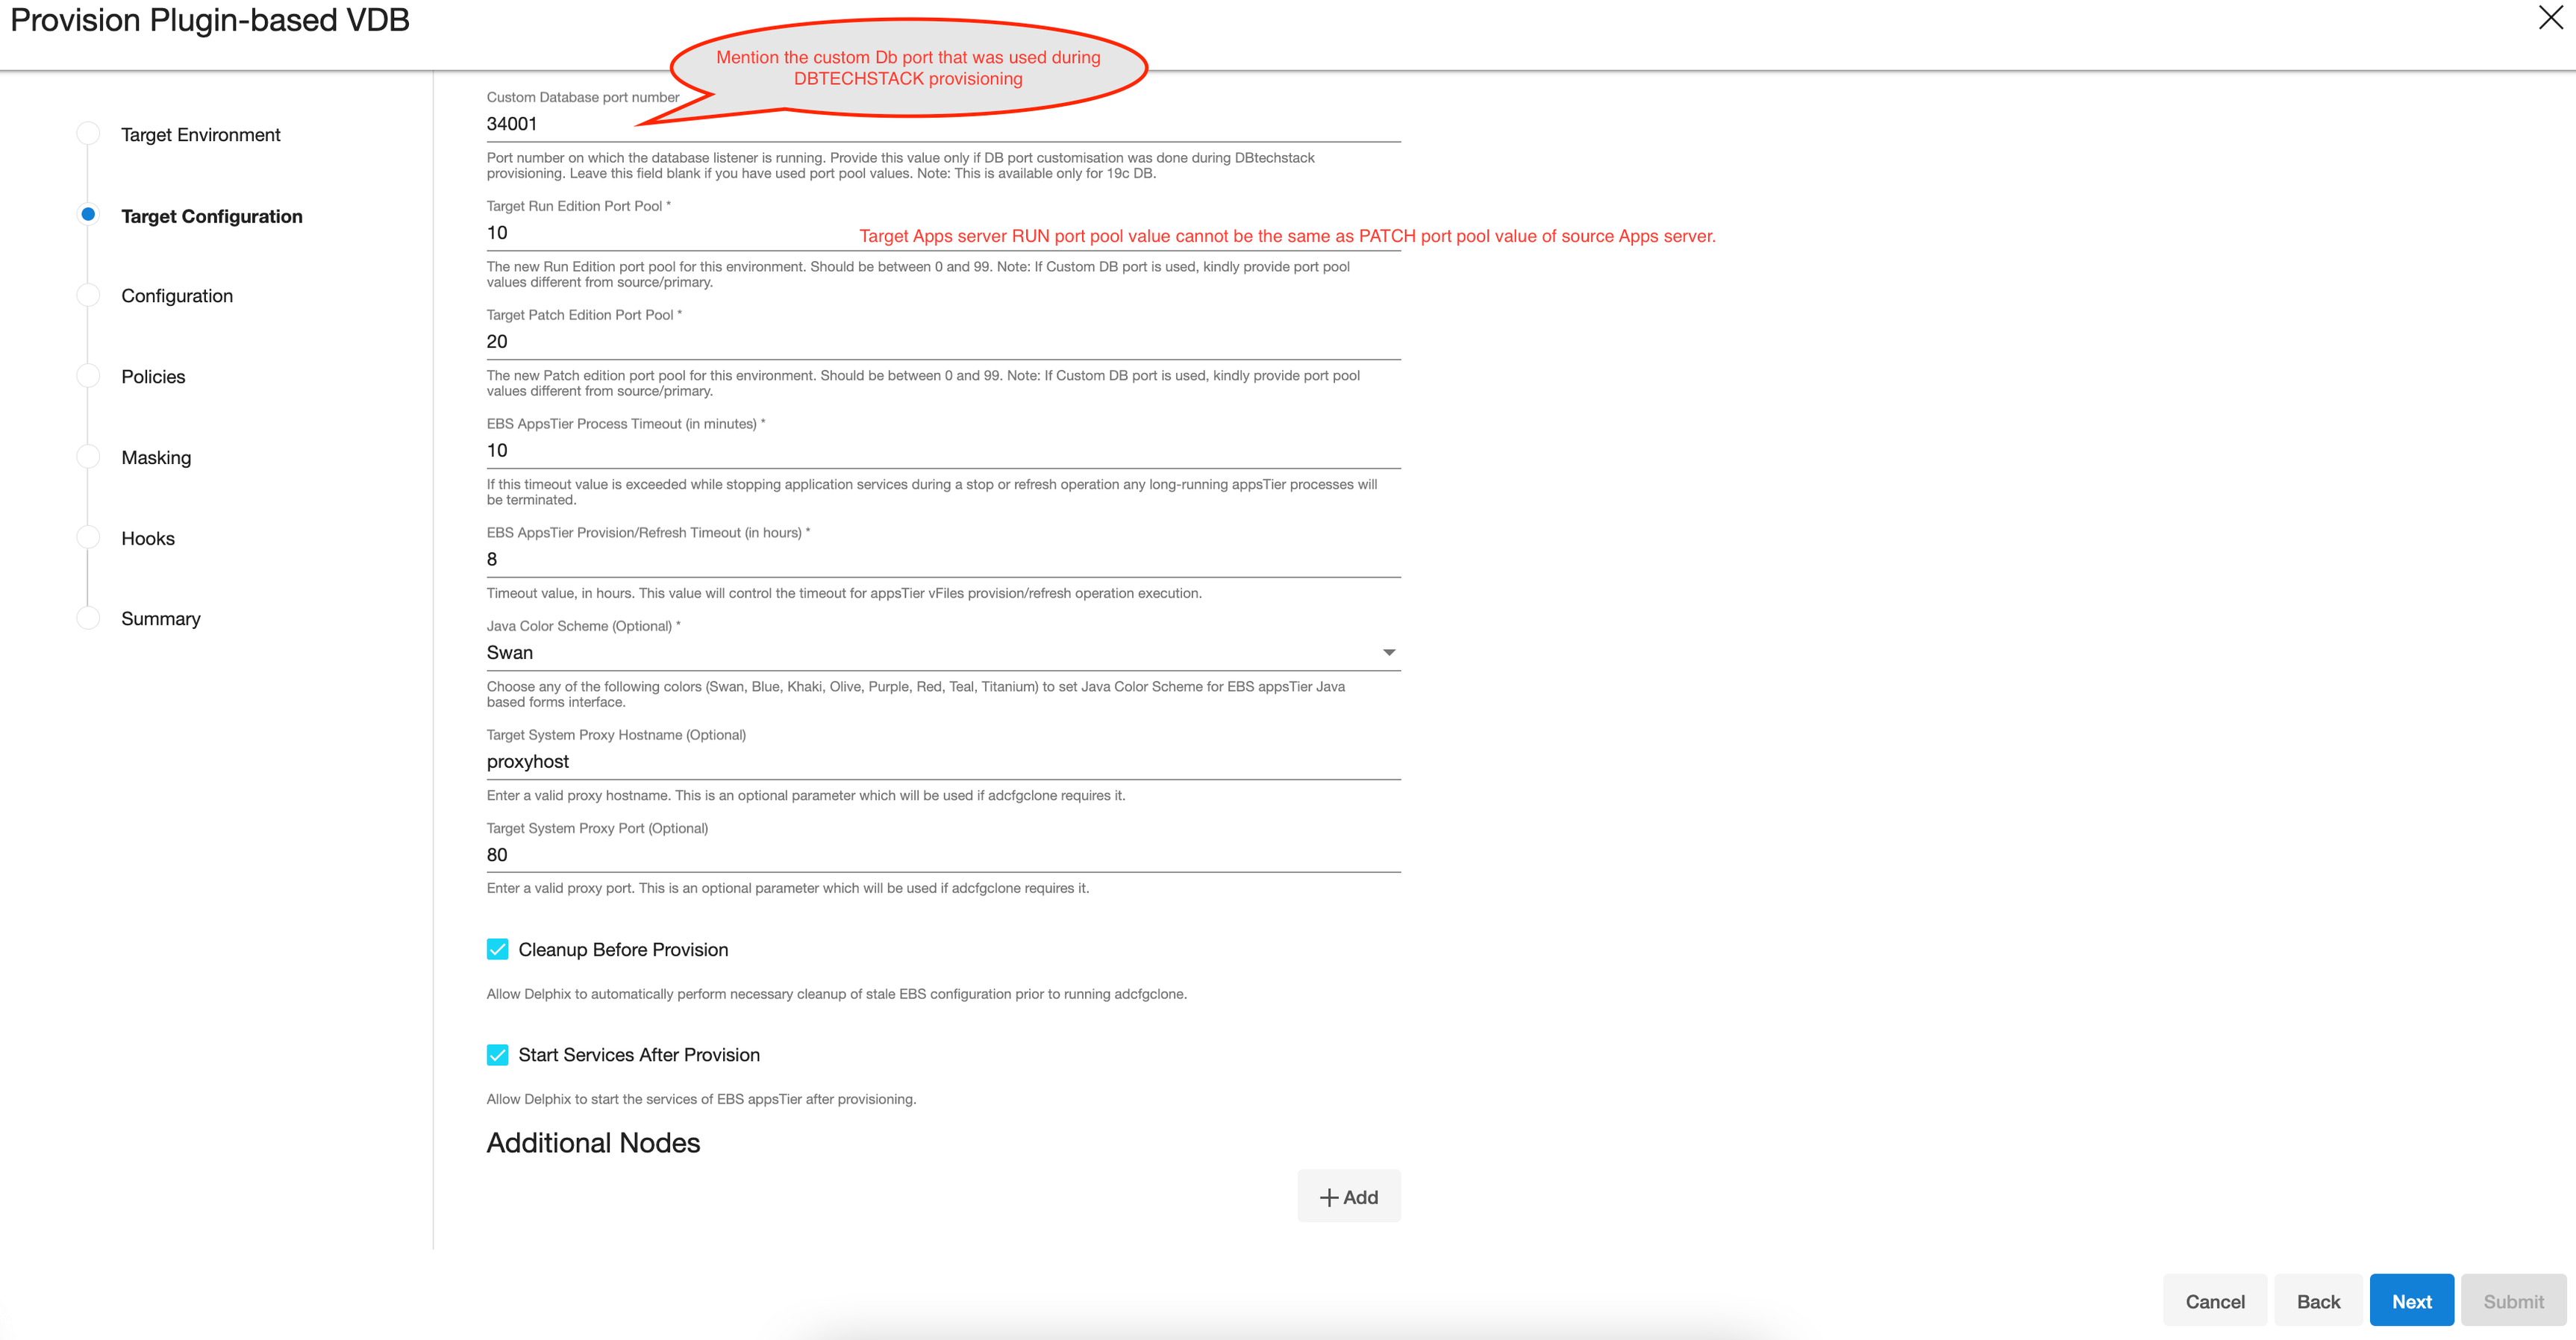
[Optional] Provide the Custom Database Port Number on which the database listener must run.
Note: Enter the numeric port value in this field only if you want to use DB port customization, and this value should match with the custom database port number given during the DBTechStack provisioning. Leaving this field blank automatically uses the default port based on the port pool. The custom database port number is applicable only for the Oracle 19c database. -
Provide Target Run Edition Port Pool, the value of this field should be 0 to 99. This should match with the port pool value given during the DBTechStack provisioning.
-
Provide Target Patch Edition Port Pool, the value of this field should be 0 to 99. This value should be Target Run Edition Port Pool plus 1. For example, if Run Edition Port Pool is 9 then the value should be 10. Note: The Target Apps server RUN Edition Port Pool value cannot be the same as the PATCH Edition Port Pool value of the source Apps server.
-
The EBS AppsTier Timeout is required to terminate all the long-running appsTier processes that have exceeded the timeout value when stopping the applications as part of a refresh. This timeout will be calculated in minutes. For example, if set to 30, then we run
adstpallat the start of the refresh, and if after 30 minutes the application has not stopped, then the processes will be terminated to allow the refresh to continue. -
The EBS AppsTier Provision/Refresh Timeout is required to terminate configuration and cloning via
adcfgcloneprocess which has exceeded the timeout as part of a provision/refresh. This timeout will be calculated in hours and the default value will be 8 hours. For example, if set to 9, then the plugin will detect a timeout after 9 hours instead of getting in a hung state and a UI error for the same will be prompted. -
The Java Color Scheme is an optional parameter and is used to change the JAVA color for the provisioned Oracle EBS JAVA-based form interface. Please choose any of the following colors (Swan, Blue, Khaki, Olive, Purple, Red, Teal, Titanium) to set the Java Color Scheme for EBS appsTier java-based forms interface.
-
Provide Target System Proxy Hostname (Optional), This is an optional parameter that will be used if
adcfgclonerequires it. -
Provide Target System Proxy Port (Optional), This is an optional parameter that will be used if
adcfgclonerequires it. -
Enable the Cleanup Before Provisionoption if you want to permit the Delphix Engine to automatically clean up stale EBS configuration during a refresh. This option is recommended, but only available if your Oracle Home is patched with Oracle Universal Installer (OUI) version 10.2 or above.
-
With this option enabled, the Delphix Engine will inspect the target environment's oraInventory prior to refreshing this virtual appsTier. If any Oracle Homes are already registered within the specified Mount Path, the Delphix Engine will detach them from the inventory prior to running
adcfgclone. These homes must be detached prior to running the post-clone configuration. If they are not detached,adcfgclonewill fail, citing conflicting oraInventory entries as an issue. The Delphix Engine will also remove any conflicting INST_TOP directories left on the environment. Non-conflicting INST_TOP directories will not be modified. -
Without this option enabled, Oracle Homes or INST_TOP directories that conflict with the specified Mount Path or desired INST_TOP location will be reported in errors instead of automatically cleaned up. For refresh to succeed, you must manually detach conflicting Oracle Homes and manually remove conflicting INST_TOP directories prior to refresh.
-
-
Enable the Start Services After Provision option if you want to permit the Delphix Engine to automatically start the services for EBS appsTier after provisioning.
-
With this option enabled, the Delphix Engine will start all the services of the EBS appsTier after provisioning.
-
Without this option enabled, the Delphix Engine will NOT start the services of EBS appsTier after provisioning. This will allow customers to prevent EBS services from being started at the conclusion of provisioning or refreshing. That way, customers can perform post-clone processing automation using a configure-clone hook without having to stop services first.
-
-
If you are provisioning a multi-node appsTier, enter additional appsTier nodes as Additional Nodes.
-
Select the Environment for the secondary node.
-
The Environment User for each node should be the
applmgruser outlined in Preparing Target EBS R12.2 Environments for Provisioning -
Ensure that the Hostname value for each node is the short hostname, not the fully qualified hostname.
-
Provide DISPLAY Variable, the default value is hostname:0.0.
-
The Mount Path is not configurable for each node individually. The Mount Path provided for the primary environment will be used for each additional node.
-
-
-
Click Next.
-
Enter a VDB Name.
-
Select a Target Group for the VDB.
If necessary, click the Plus icon to add a new group. -
Select a Snapshot Policy for the VDB.
If necessary, click the Plus icon to create a new policy.
Note:When Snapshot is running against the dbTechStack, database, or appsTier, the Delphix Engine also executes pre-clone logic to ensure the latest configuration is staged in the captured snapshots. Unfortunately, if multiple Snapshots are running against the same EBS instance concurrently, this pre-clone logic may fail and produce bad snapshots.
To avoid SnapSync conflicts, spread out your SnapSync policies for an EBS instance by one hour or more.
Click Next.
-
Enter any custom hook operations that are needed to help correctly manage the virtual appsTier.
The Configure Clone hook will be run after theadcfgclone.pltool has both mounted and configured the appsTier.
All hook operations run against the environment specified for provision. For a multi-node appsTier, hook operations never run against additional nodes specified. -
Click Next.
-
Click Submit.
Warning: dbTier must be accessible during appsTier provisioning
Info: Post-clone configuration will fail if the appsTier cannot connect to the database. Ensure the target dbTier is accessible to the appsTier during the provisioning process. Ensure both the virtual database and database listener are running.Note: If your source setup is EBS ISG enabled, then during virtual AppsTier creation on the target server, perform post-cloning steps as described in Installing Oracle E-Business Suite Integrated SOA Gateway, Release 12.2 (Doc ID 1311068.1).
When provisioning starts, you can review the progress of the job in the Datasets panel, or in the Job History panel of the Dashboard. When provisioning is complete, the appsTier VDB will be included in the group you designated and listed in the Datasets panel. If you select the appsTier VDB in the Datasets panel and click the Configuration tab, you can view information about the virtual files and their Data Management settings.
-
For tips on monitoring the progress of appsTier provisioning, see Monitoring EBS R12.2 appsTier Provisioning Progress
Once all three EBS virtual datasets have been provisioned successfully, your virtual EBS instance should be running and accessible.
Rewind operation on snapshot
Perform the rewind operation on the snapshot after Appstier provisioning in the following sequence.
-
Take a snapshot of the Database VDB after Appstier provision.
-
Stop the appsTier, DB, and dbTechStack one by one.
-
Rewind dbTechStack, DB, and appsTier one by one.
If the DB snapshot was taken before appsTier provisioning, rewinding the DB will cause loss of new data updated by appsTier during provisioning and the next operation of appsTier rewind will fail. So, to ensure that the Rewind operation of appsTier succeeds, take a snapshot of DB after Appstier provision.
Registering the EBS dbTechStack
Register the freshly-provisioned dbTechStack with the Delphix Engine.
-
Login to the Delphix Management application.
-
Click Manage.
-
Select Environments.
-
Select the target dbTier environment.
-
Click the Databases tab.
-
Click the Plus icon next to Add Dataset Home.
-
Select Oracle as your Dataset Home Type.
-
Enter an Installation Home.
This path should be the value of$ORACLE_HOMEon your target dbTier; this path will live under the mount path specified when you provisioned the virtual dbTechStack.
Commonly, this path looks like/u01/oracle/VIS/11.2.0. -
Click the checkmark to save your dataset home.
If necessary, scroll down the list of dataset homes to view and edit this dataset home. -
Refresh the dbTier environment.
Refreshing the environment will discover an EBS database listener and ensure it is available for selection when provisioning the EBS database.-
Click the Refresh button in the top right-hand corner of the environment card.
-