Creating a Couchbase dSource using XDCR
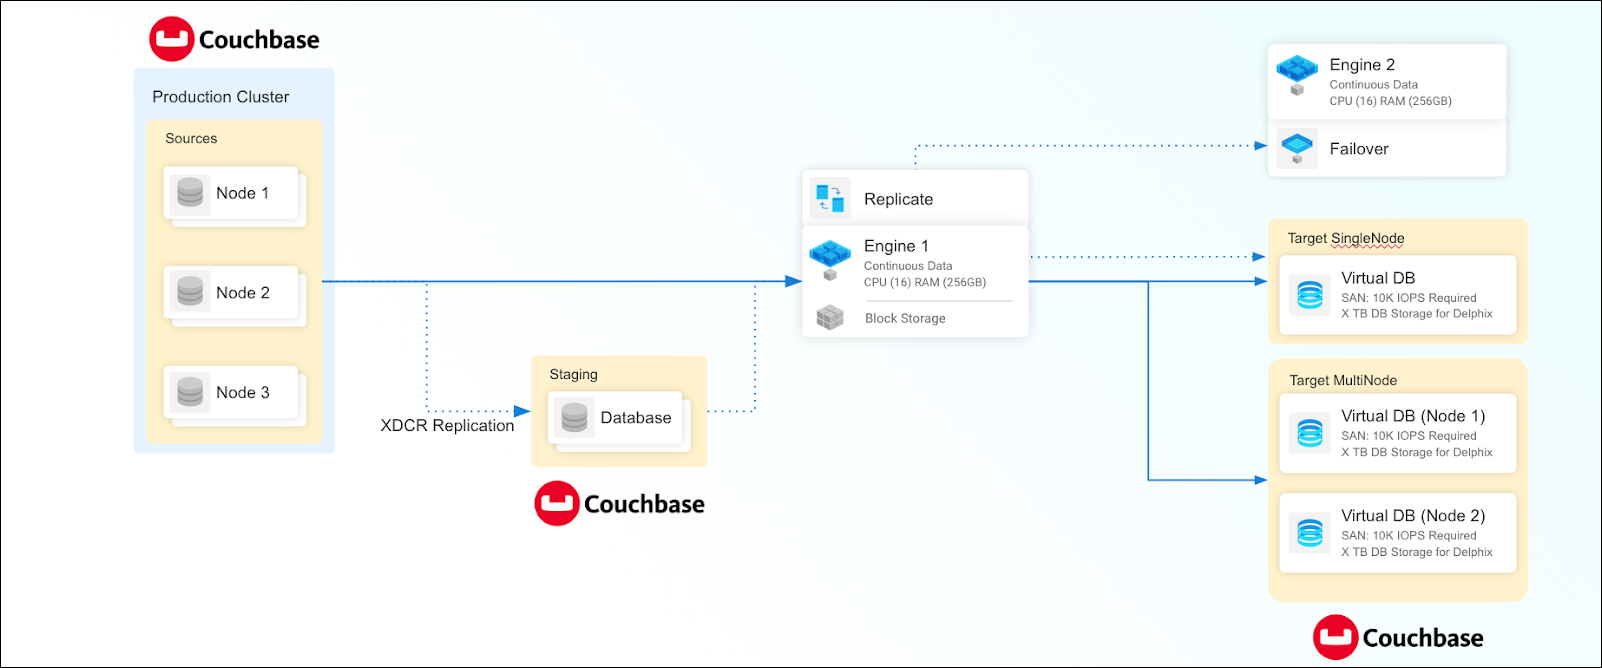
The image below is an illustrated representation of the architecture of Continuous Data Engine support for Couchbase databases using XDCR.

Steps to create the dSource
Login to Delphix Management application.
Click Manage → Datasets.
Select Add dSource.
In the Add dSource wizard, select the Couchbase source configuration which is created on the staging host.
Enter the Couchbase-specific parameters for your dSource configuration.
Select the dSource type XDCR from the drop-down available on dSource wizard.
Enter the details for Staging Couchbase host - FQDN or IP address recommended.
Enter the details for Staging Port Number available on the staging host. The default port for couchbase is 8091.
Enter the details for Mount Path available on the staging host. This empty folder acts as a base for NFS mounts.
Enter the details for Staging Cluster Name to setup new cluster on the staging host.
Enter the configuration details for your staging cluster as per resource availability on the staging host.
Cluster RAM Size
Cluster Index RAM Size
Cluster FTS RAM Size
Cluster Eventing RAM Size - this should be 0
Cluster Analysis RAM Size - this should be 0
Enter the details for Staging Cluster Admin User and Staging Cluster Admin Password
Enter the details for Source Cluster Admin User and Source Cluster Admin Password
Enter Bucket Size. A bucket size of zero means the connector will extract bucket size from the source database and apply the same in staging. Giving it any other value, would mean imposing that value on all buckets irrespective of the size in the source database.
If not all, buckets need to be replicated, click on + plus symbol to modify configuration settings. Mention bucket list for which cross datacenter replication (XDCR) only be enabled.
Enter the details of Bucket Name to be part of XDCR. Then click Next.
Provide the details for dSource Name and Target group on the dSource configuration page.
On the Data management page, select the following:
Staging Environment: This will be your staging host where source config was created.
User: Database OS user with required privileges for linking the dataset.
On the next screens, configure a policy, hooks, and review the configuration, then click on Next button to view the summary.
Click the Submit button which will initiate the linking process.
Once dSource is created successfully, you can review the datasets on Manage > Datasets > dSource Name.
