
Getting started
Data containers can be shared between multiple users. In this situation, users should coordinate with their co-owners when performing data operations that could disrupt other users' workflow such as stopping or refreshing the data container.
Activity One: how to start and stop a data container
Starting a data container does the following:
-
Starts the data sources
-
This means that each data source listed in the Source Details section of the Data Container page will start using CPU and network resources on the target system it is running on
-
-
Makes the data in the active branch available
-
Once the container has been started, the data represented by the active branch is available
-
Stopping a Data Container does the following:
-
Shuts down the data sources
-
This means each data source listed in the Source Details section of the Data Container page will stop using CPU and network resources on the target system.
-
To start a data container, click Start on the Self-Service Toolbar.
To stop a data container, click Stop on the Self-Service Toolbar.
Working with a branch, a branch timeline, and the self-service toolbar
Activity Two: using reset from a bookmark to facilitate destructive testing
Reset is a data user workflow that is optimized to enable destructive testing. Reset automatically restores the data to the last operation conducted in the data container, which can include creating a bookmark, resetting, or restoring data. As an example, you can do a refresh and then get your data into a state required for testing. Once you are satisfied with the state of your data, you can create a bookmark, which will preserve the data at this point in time.
Afterward, you can then run destructive tests on the data. When you are done, you can click the Reset icon, which will automatically restore the state of the container to the last operation – in this case, the bookmark. This workflow ensures that each test has a clean copy of the data and is not impacted by the results of other tests. You only need to create a bookmark and click Reset on the Self-Service Toolbar.
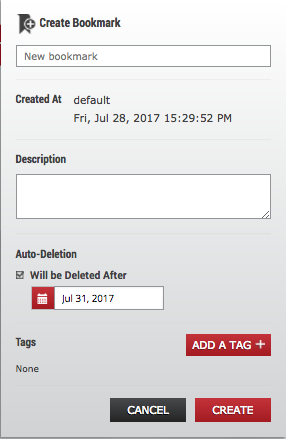
Create a bookmark
-
Select a Data Point on a branch's timeline.
-
On the Self-Service Toolbar, click the Bookmark icon.
-
In the Bookmark Window, enter a new name.
Name a Created Bookmark -
Optionally, fill in a description.
-
Optionally, set an expiration date. The bookmark will be automatically deleted at the end of this day.
-
Optionally, add one or more tags.
You can use these to help filter a set of bookmarks. -
Click Create.
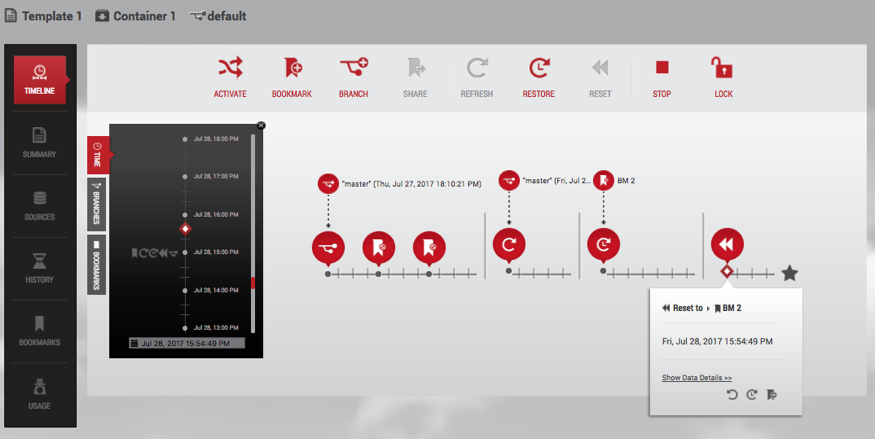
After the bookmark has been created, you will see the bookmark icon appear on the timeline. When you click the Reset button, all data will be reset to that point in time.
Reset to data from a bookmark
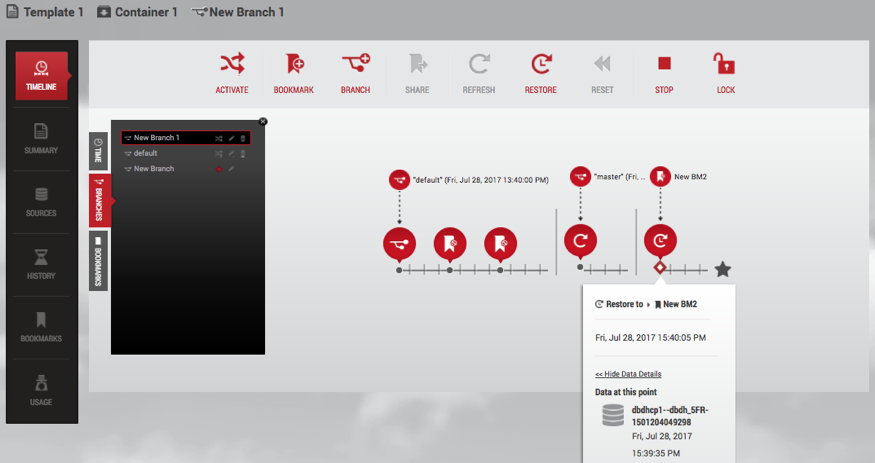
Click the Reset icon.
This action reflects the moment of data marked by the closest operation bubble (Refresh, Restore, Reset, or Bookmark) into a new timeline segment on the active branch. It also copies the moment of data into the data sources.
Update Data with Reset
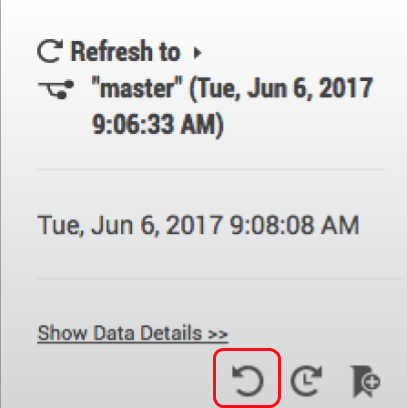
Undo data
Click the Undo Data icon for an operation.
Undo the given operation. This is only valid for RESET, RESTORE, UNDO, and REFRESH operations.
Activity Three: using refresh to get the latest data from a data template
-
Start a new timeline segment with the most recent point of data from the data container's data template.
-
Click the Refresh icon.
Refresh creates a new timeline segment on the active branch. This refreshes each source in the data container to the latest data in the corresponding source of the data template.
Update Data with Refresh
Activity Four: using restore to return data back to a point in time
This starts a new timeline segment on the active branch with the selected point of data.
-
Select one of the following:
-
A point of data on a timeline.
-
A bookmark on a timeline.
-
A bookmark under the Bookmarks tile in the Data Container Report Panel.
-
-
Click the Restore icon.
If you restore data back to a point in time on the data template master timeline, you will be asked which data container to restore into. It will then:
-
Reflect the selected point of data into a new timeline segment on the active branch
-
Copy the moment of data into the data sources
If the timeline segment on a branch timeline was created by a Restore operation, then the segment starts with the moment of data from the branch that was selected when the Restore operation was done. This is illustrated below.
Parent Branch
The parent branch for this segment can be the same branch of which this segment is a part. It is possible to restore the active branch from a point in time on the same branch.
Update Data with Restore
Source Branch
The source branch for this segment can be the same branch of which this segment is a part. It is possible to restore the active branch from a point in time on the same branch.
Activity Five: restoring to a point on the parent template
Data templates serve as the parent for a set of data containers, and as a data user, you have the flexibility to restore your container to any point on the template.
-
Choose the container tab and select the template by clicking on the template name located at the top of the screen.
-
Select one of the following:
-
A point of data on the timeline
-
A bookmark on the timeline
-
A bookmark under the Bookmarks tile in the Data Container Report Panel
-
3. Click the restore icon
4. A dialog will pop up. Use it to select the container you'd like to restore.
force option
forceOption is an API/CLI-only feature. Generally, if a source database is corrupted or otherwise prevents taking VDB snapshots, the Refresh, Reset, and Restore actions cannot be completed. With forceOption, you can bypass taking a pre-operation screenshot and proceed with the desired action.
Because forceOption does not take a snapshot of the VDB before refreshing/resetting/restoring, you cannot undo the operation afterward.
From the CLI:
-
Go to the Delphix Self-Service container endpoint.
-
Select the container.
-
Attempt the execute the operation.
-
Set forceOption parameter to true.
-
Commit the change.
The operation will now perform without taking a snapshot first.
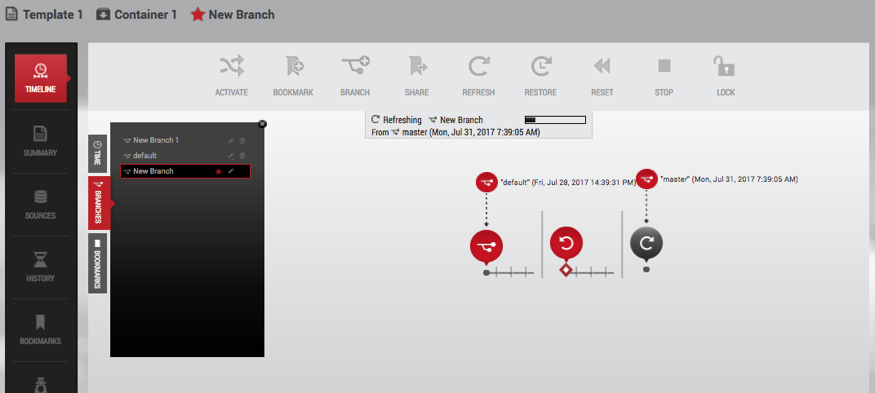
Activity Six: create a new branch and switch between branches
Developers and QA teams can have multiple branches that can represent data from different points in time or different sources. You have many options for how you create a new branch. These include:
-
A point of data time on a data timeline within the Delphix Self-Service data container, or
-
A bookmark bubble on the timeline, or
-
A bookmark in the Bookmarks tile in the Data Container Report Panel
-
Click the Branch

icon to create a new branch.
-
Enter a name for the new branch.
-
Click OK.
-
On the Self-Service Toolbar, click the Activate icon.

If the inactive branch is not showing in the data container workspace:
-
Find the branch in the Branch tab.
Selection of Branches in Branch Tab
-
Click the Activate

icon.
-
After a moment, the branch will become active.
Active branch
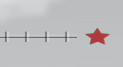
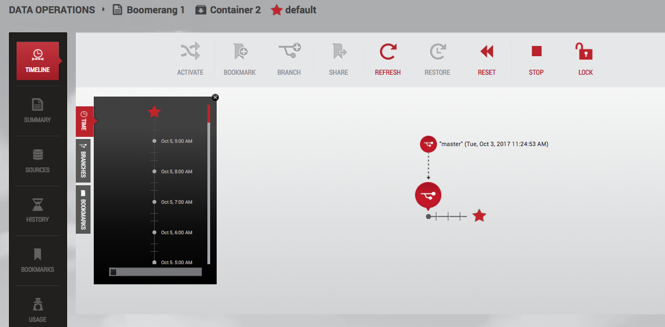
Within a single data container, only one branch is active at any given time. The data located at the red star of the active branch's timeline is the newest copy of the data from the data container's data sources.
The active branch is distinguished by a red star, which appears at the far right of the timeline, alongside its name in the Branch Name area, and in the Branch tab.
|

|
|
Active branch |
Inactive branch |
Activity Seven: rename and/or delete a branch
Rename the Default Branch
-
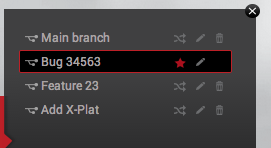
Select the Default Branch in the Branch tab.
-
Click the Pencil icon to the right of the name.
-
Enter the new name.
-
Click the Checkmark icon.
Delete a created branch
-
Select the branch in the Branch tab.
-
Click the Delete icon to the right of the name.

-
Click Delete in the confirmation window that appears.
Activity Eight: restoring a data container to a consistent state with the recovery operation
Data containers consistency
Delphix Self-Service allows you to group multiple datasets in the same data container. This makes it easy for you to access entire applications such as PeopleSoft, including binaries and code. If a data container represents an application, then there are likely to be dependencies between the application's datasets. For example, the vFiles data source containing the code will depend on a specific version of the database's schema. Therefore, it is important that all dataset sources are drawn from the same point in time. If they are, the data container is in a "consistent" state; if they are out of sync, or "inconsistent," errors will occur. For example, if the vFiles data source containing the code has been updated more recently than the database's schema, the dependency cannot work.
Delphix Self-Service currently has no way to determine whether the application is consistent. However, it attempts to minimize the chance that dataset sources are out of sync whenever it performs a data operation such as refresh, restore, or reset. When performing a data operation, Delphix Self-Service attempts to snapshot all dataset sources from a point in time as close as possible to the desired time. If at least one of the data sources fails to go to the desired point, then Delphix Self-Service considers the data container to be in an inconsistent state. The application as a whole may still be working, but Delphix Self-Service assumes that the failed dataset's data is not the correct version. To return to a consistent state, you must perform a recovery operation on the data container.
Data container recovery
Prior to performing any data operation, Delphix Self-Service takes snapshots of all datasets. Recovery is the process of rolling back a data container to a snapshot, thereby restoring it to a consistent state. When a failure occurs, you will see the following screen:
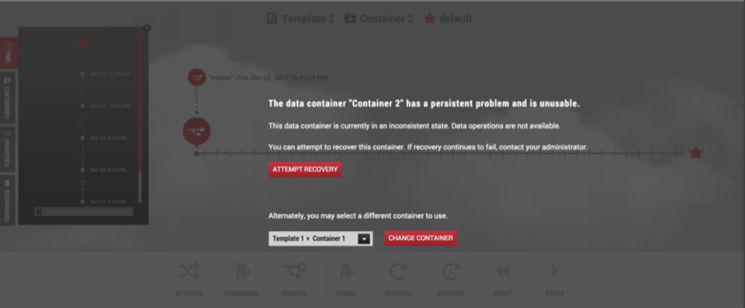
You can either perform recovery or use a different data container. Whether the recovery will fail or succeed depends on exactly why the data operation failed in the first place. If the problem was intermittent, such as a temporary network problem causing SSH failure, then performing recovery should work. If the problem is persistent – for example, the target host is out of space – then intervention is required; recovery will not succeed until you address the underlying root cause of the failure.
Admins can see the underlying failure in the Actions sidebar or the Job History dashboard. The Actions sidebar is the preferred place to view the failure; it has a hierarchical display that makes diagnosing the failure more straightforward.
Activity Nine: working with container locks
Container owners have the ability to lock/unlock containers. By default, a container is unlocked, which means that all the container’s owners can perform operations on it:
You can lock a container by clicking the Lock button in order to prevent other users from operating on it.
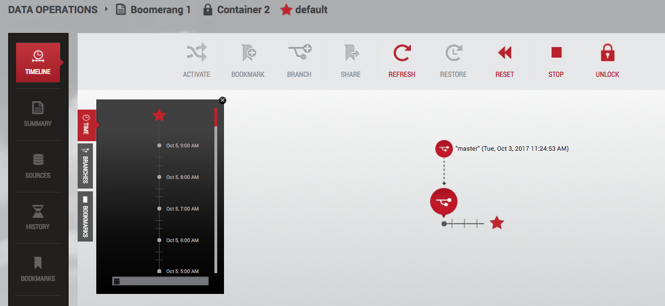
The information on who locked the container is available in three places:
-
In the history below the timeline
-
In the tooltip on the locked container’s name in the container selector
-
In the tooltip on the locked container’s name in the container label above the timeline
Errors
If an action such as refresh fails, a dialog box will give you further information. The Error Details field will
The copy button enables you to copy and paste error details, which you can then send to your Delphix administrator for further assistance.
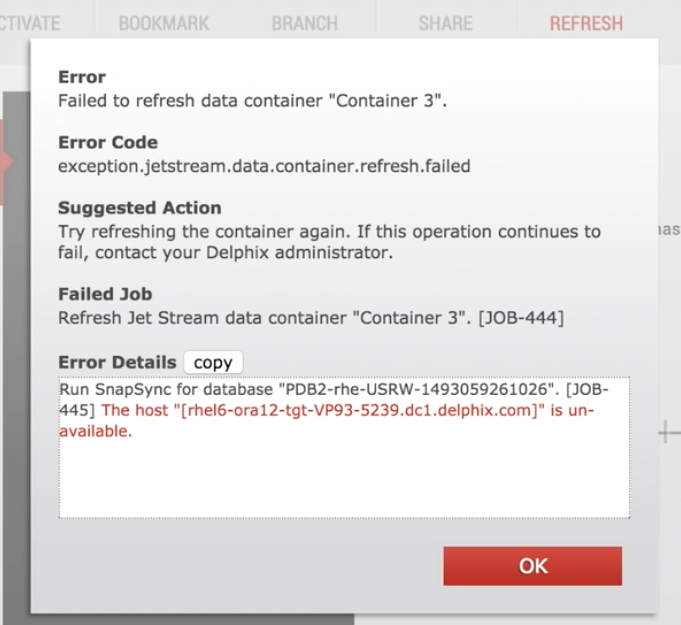
Error dialog