
This topic describes the process of provisioning VDBs in EBS dbTechStack & AppsTier plugin to run on a customized port.
Provisioning the EBS dbTechStack
-
Login to the Delphix Management application.
-
Click Manage.
-
Select Datasets.
-
Select the dbTechStack dSource.
-
Click the TimeFlow tab.
-
Select a dSource snapshot.
-
Click Provision. The Provision VDB wizard will open.
-
Select an Environment. This environment will host the virtual dbTechStack and be used to execute hook operations specified in step 15 in the s section.
-
Select E-Business Suite R12.2 dbTechStack from the Installation dropdown.
-
Select an Environment User.
-
This user should be the
oracleuser outlined in Preparing target EBS R12.2 environments for provisioning -
Enter a Mount Path for the virtual dbTechStack files.
-
Enter the EBS-specific parameters for the virtual dbTechStack. A subset of these parameters is discussed in more detail below.
-
The Privileged OS Account (Optional) field should contain the high privileged user when the low privileged user is being used for provisioning.
-
The Target APPS Password is the new apps password that is required to configure virtual dbTechStack. This password is encrypted when stored within the Delphix Engine and is available as an environment variable to the
adcfgcloneprocess. -
Provide source oracle home directory name relative to oracle base installation directory that was provided during linking of dbTechStack in Oracle Home input field.
-
Ensure that the Target DB Hostname value is the short hostname, not the fully-qualified hostname.
-
The Target DB/CDB SID is the new database SID (CDB SID in case of 19c) that is required to configure virtual dbTechStack.
-
The Target PDB Name field is added for the pluggable database to be configured for Oracle 19c database. Please leave this field empty when using Oracle 11g/12c database.
-
Provide Target utl_file_dir , the default value for this field will be “/var/tmp". The utl_file_dir initialization parameter is deprecated in Oracle Database 12c Release 2 (12.2.0.1), and maybe unsupported in a future release.
-
Provide DISPLAY Variable, the default value is hostname:0.0
-
[Optional] Custom Database Port Number - Provide the port number on which database listener must run. Note: Enter a numeric port value in this field only if you want to use DB port customisation. Leaving this field blank automatically uses the default port based on port pool. The custom database port number is applicable only for Oracle 19c database.
Note: If you want the dbTechStack and listener to run on custom DB port, it is recommended to provide Target Port Pool value either as default or 0; also the Target Port Pool value in dbTechStack is not related with Run/Patch Edition Port Pool value in Appstier. -
Provide Target Port Pool, please provide a port pool that is available. By default, the value is 1. The range for this value is 0 to 99.
-
Enable the Disable RAC option if you want to permit the Delphix Engine to automatically disable the RAC option for the binaries when applicable. This option is necessary if provisioning from a dSource with RAC dbTier because the binaries are relinked with the
rac_onoption even after runningadcfgclone. If the source binaries already have the RAC option disabled (also the case for SI dbTier), the Delphix Engine ignores this option. -
Enable the Cleanup Before Provisionoption if you want to permit the Delphix Engine to automatically clean up stale EBS configuration during a refresh. This option is recommended, but only available if your Oracle Home is patched with Oracle Universal Installer (OUI) version 10.2 or above.
-
With this option enabled, the Delphix Engine will inspect the target environment's oraInventory prior to refreshing this virtual dbTechStack. If any Oracle Homes are already registered within the specified Mount Path, the Delphix Engine will detach them from the inventory prior to running adcfgclone. These homes must be detached prior to running post-clone configuration. If they are not detached,
adcfgclonewill fail, citing conflicting oraInventory entries as an issue. -
Without this option enabled, Oracle Homes that conflict with the specified Mount Path will be reported in an error instead of automatically detached. For refresh to succeed, you must manually detach conflicting Oracle Homes prior to refresh.
-
-
Provide Oracle OS User and Group, it’s optional.
.png?cb=8bf50e175d74f74697b63782335fc147)
.png?cb=508c8398ccfa341f7353b8eafd125773)
-
-
Click Next.
-
Enter a VDB Name.
-
Select a Target Group for the VDB.
If necessary, click the green Plus icon to add a new group. -
Select a Snapshot Policy for the VDB. If necessary, click the Plus icon to create a new policy.
Note: Snapshot conflicts: when Snapshot is running against the dbTechStack, database, or appsTier, the Delphix Engine also executes pre-clone logic to ensure the latest configuration is staged in the captured snapshots. Unfortunately, if multiple Snapshots are running against the same EBS instance concurrently, this pre-clone logic may fail and produce bad snapshots.To avoid SnapSync conflicts, spread out your SnapSync policies for an EBS instance by one hour or more.
-
Click Next.
-
Enter any custom hook operations that are needed to help correctly manage the virtual dbTechStack files. For more information about these hooks, when they are run, and how operations are written. The Configure Clone hook will be run after the
adcfgclone.pltool has both mounted and configured the dbTechStack. -
Click Next.
-
Click Submit.
When provisioning starts, you can review the progress of the job in the Datasets panel, or in the Job History panel of the Dashboard. When provisioning is complete, the dbTechStack VDB will be included in the group you designated and listed in the Datasets panel. If you select the dbTechStack VDB in the Datasets panel and click the Configuration tab, you can view information about the virtual files and its Data Management settings.
For tips on monitoring the progress of dbTechStack provisioning, see Monitoring EBS R12.2 dbTechStack provisioning progress
Provisioning the EBS appsTier
-
Login to the Delphix Management application using Admin credentials.
-
Click Manage.
-
Select Datasets.
-
Select the appsTier dSource.
-
Select a dSource snapshot. All snapshots will have staged configuration prepared by
adpreclone.pland any hook operations placed on the dSource. -
Click Provision. The Provision VDB wizard will open.
-
Select an Environment. This environment will host the virtual appsTier and be used to execute hook operations specified in a few steps. This environment will also run the WebLogic Admin server (Web Administration service) for the virtual appsTier. If you are provisioning a multi-node appsTier, you will be able to specify additional environments to host the virtual appsTier in a few steps.
-
Select E-Business Suite R12.2 appsTier from the Installation dropdown.
-
Select an Environment User. This user should be the
applmgruser-outlined in Preparing target EBS R12.2 environments for provisioning -
Enter a Mount Path for the virtual appsTier VDB.If you are provisioning a multi-node appsTier, this mount path will be used across all target environments.
-
Enter the EBS-specific parameters for the virtual appsTier. A subset of these parameters are discussed in more detail below.
.png?cb=8e8de948b66e7b0c7961291bda6935de)
-
Privileged OS Account (Optional) field should contain high privileged user when low privileged user is being used for provisioning.
-
The Target APPS Password is the new apps password that is required to configure and manage the virtual appsTier. This password is encrypted when stored within the Delphix Engine and is available as an environment variable to the
adcfgclone,adstrtal, andadstpallprocesses. -
The Weblogic AdminServer Password is the new WebLogic password required to configure the virtual appsTier. A password change will be performed if this password does not match that of the source EBS instance. This password is encrypted when stored within the Delphix Engine and is available as an environment variable to the adcfgclone, adstrtal, and adstpall processes.
-
The SYSTEM Password is required to configure the virtual appsTier with the new apps password. This password is not required if the Target Apps Password is the same as the source.
-
Provide the Target Application hostname.
-
The Target DB/PDB SID is the new database SID (PDB SID in case of 19c) that is required to configure and manage the virtual appsTier.
-
Provide the Target DB server node hostname.
-
Provide Target DB Domain Name, this will be provided to the adcfgclone.
-
Delphix recommends specifying an Instance Home Directory under the Mount Path so that instance-specific EBS files live on Delphix-provided storage.
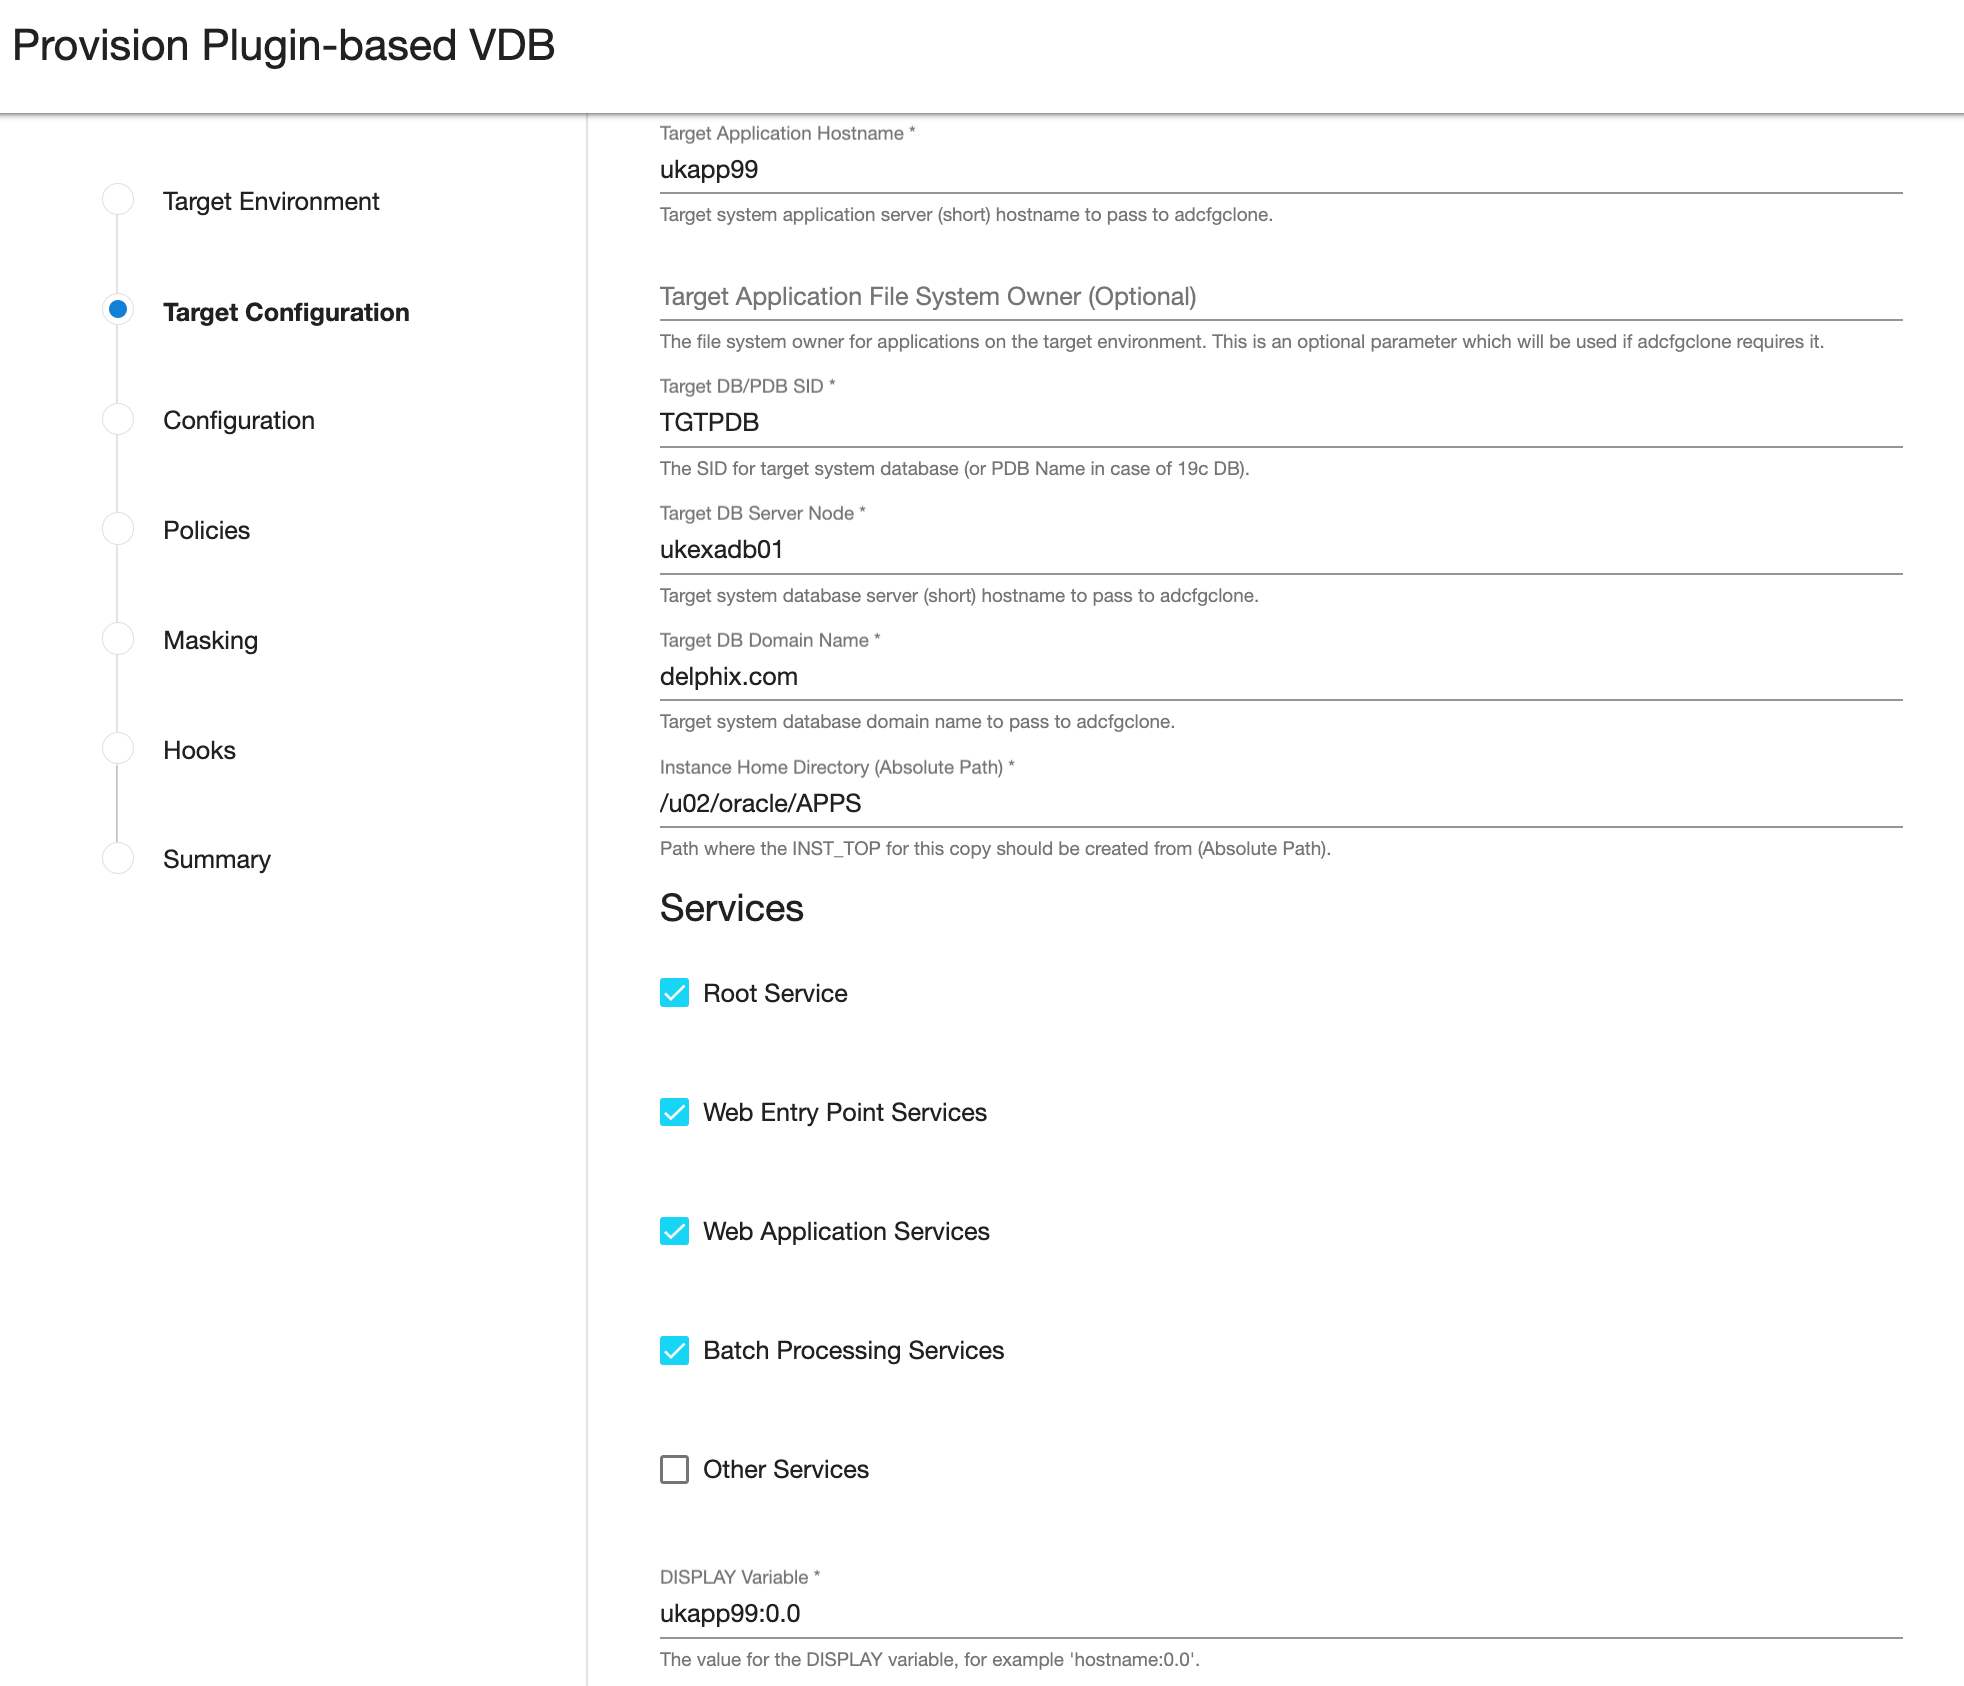
For example, if the provided Mount Path is
/u01/oracle/VIS, then providing an Instance Home Directory of/u01/oracle/VISwould allow EBS to generate virtual application INST_TOP in/u01/oracle/VIS/fs1/inst/apps/<CONTEXT_NAME>> and/u01/oracle/VIS/fs2/inst/apps/<CONTEXT_NAME>>.-
If you are provisioning a single-node appsTier, this recommendation is OPTIONAL; putting instance-specific EBS files on Delphix-provided storage merely eases the administration of the virtual EBS instance.
-
If you are provisioning a multi-node appsTier, this recommendation is REQUIRED; the Delphix Engine's automation requires that all nodes in the appsTier have access to instance-specific files via Delphix-provided storage.
-
-
Ensure that the Target Application Hostname and Target DB Server Node values are the short hostnames, not the fully-qualified hostnames.
-
Select Services, by default all the Root, Web Entry Point, Web Application and Batch Processing would be checked. In case you are using multinode environment and want to start a few services on a secondary node then this field is going to be very useful for you.
-
Provide DISPLAY Variable, the default value is hostname:0.0
-
[Optional] Custom Database Port Number - Provide the port number on which database listener must run. Note: Enter a numeric port value in this field only if you want to use DB port customisation, this value should match with the custom database port number given during the DBTechStack provisioning. Leaving this field blank automatically uses the default port based on port pool. The custom database port number is applicable only for Oracle 19c database.
-
Provide Target Run Edition Port Pool, the value of this field should be 0 to 99.
-
Provide Target Patch Edition Port Pool, the value of this field should be 0 to 99. This value should be Target Run Edition Port Pool plus 1. For example, if Run Edition Port Pool is 9 then the value should be 10.
Note: Target Apps server RUN Edition Port Pool value cannot be the same as PATCH Edition Port Pool value of source Apps server. -
.png?cb=222ffbad9007d7dddabf205ed6bedcac)
The EBS AppsTier Timeout is required to terminate all the long-running appsTier processes which have exceeded the timeout value when stopping the applications as part of a refresh. This timeout will be calculated in minutes. For example, if set to 30, then we run adstpall at the start of the refresh, and if after 30 minutes the application has not stopped, then the processes will be terminated to allow the refresh to continue.
-
The EBS AppsTier Provision/Refresh Timeout is required to terminate configure and cloning via
adcfgcloneprocess which have exceeded the timeout as part of a provision/refresh. This timeout will be calculated in hours and the default value will be 8 hours. For example, if set to 9, then plugin will detect a timeout after 9 hours instead of getting in a hung state and UI error for the same will be prompted. -
The Java Color Scheme is an optional parameter and is used to change the JAVA color for provisioned Oracle EBS JAVA based form interface. Please choose any of the following colors (Swan, Blue, Khaki, Olive, Purple, Red, Teal, Titanium) to set Java Color Scheme for EBS appsTier java-based forms interface.
-
Provide Target System Proxy Hostname (Optional), This is an optional parameter that will be used if adcfgclone requires it.
-
Provide Target System Proxy Port (Optional), This is an optional parameter that will be used if adcfgclone requires it.
-
Enable the Cleanup Before Provisionoption if you want to permit the Delphix Engine to automatically cleanup stale EBS configuration during a refresh. This option is recommended, but only available if your Oracle Home is patched with Oracle Universal Installer (OUI) version 10.2 or above.
-
With this option enabled, the Delphix Engine will inspect the target environment's oraInventory prior to refreshing this virtual appsTier. If any Oracle Homes are already registered within the specified Mount Path, the Delphix Engine will detach them from the inventory prior to running
adcfgclone. These homes must be detached prior to running post-clone configuration. If they are not detached,adcfgclonewill fail, citing conflicting oraInventory entries as an issue. The Delphix Engine will also remove any conflicting INST_TOP directories left on the environment. Non-conflicting INST_TOP directories will not be modified. -
Without this option enabled, Oracle Homes or INST_TOP directories that conflict with the specified Mount Path or desired INST_TOP location will be reported in errors instead of automatically cleaned up. For refresh to succeed, you must manually detach conflicting Oracle Homes and manually remove conflicting INST_TOP directories prior to refresh.
-
-
Enable the Start Services After Provision option if you want to permit the Delphix Engine to automatically start the services for EBS appsTier after provisioning.
-
With this option enabled, the Delphix Engine will start all the services of EBS appsTier after provisioning.
-
Without this option enabled, the Delphix Engine will NOT start the services of EBS appsTier after provisioning. This will allow customers to prevent EBS services from being started at the conclusion of provisioning or refreshing. That way, customers can perform post-clone processing automation using a configure-clone hook without having to stop services first.
-
-
If you are provisioning a multi-node appsTier, enter additional appsTier nodes as Additional Nodes.
-
Select the Environment for the secondary node.
-
The Environment User for each node should be the
applmgruser-outlined in Preparing target EBS R12.2 environments for provisioning. -
Ensure that the Hostname value for each node is the short hostname, not the fully-qualified hostname.
-
Provide DISPLAY Variable, the default value is hostname:0.0.
-
The Mount Path is not configurable for each node individually. The Mount Path provided for the primary environment will be used for each additional node.
-
-
-
Click Next.
-
Enter a VDB Name.
-
Select a Target Group for the VDB. If necessary, click the Plus icon to add a new group.
-
Select a Snapshot Policy for the VDB. If necessary, click the Plusicon to create a new policy.
Warning: When Snapshot is running against the dbTechStack, database, or appsTier, the Delphix Engine also executes pre-clone logic to ensure the latest configuration is staged in the captured snapshots. Unfortunately, if multiple Snapshots are running against the same EBS instance concurrently, this pre-clone logic may fail and produce bad snapshots.
To avoid SnapSync conflicts, spread out your SnapSync policies for an EBS instance by one hour or more.
Click Next.
-
Enter any custom hook operations that are needed to help correctly manage the virtual appsTier. The Configure Clone hook will be run after the
adcfgclone.pltool has both mounted and configured the appsTier. All hook operations run against the environment specified for provision. For a multi-node appsTier, hook operations never run against additional nodes specified. -
Click Next.
-
Click Submit.
Note: dbTier Must Be Accessible During appsTier ProvisioningPost-clone configuration will fail if the appsTier cannot connect to the database. Ensure the target dbTier is accessible to the appsTier during the provisioning process. Ensure both the virtual database and database listener are running.
Note:
If your source setup is EBS ISG enabled, then during virtual AppsTier creation on the target server, perform post cloning steps as described in Installing Oracle E-Business Suite Integrated SOA Gateway, Release 12.2 (Doc ID 1311068.1). -
For tips on monitoring the progress of appsTier provisioning, see Monitoring EBS R12.2 appsTier provisioning progress. Once all three EBS virtual datasets have been provisioned successfully, your virtual EBS instance should be running and accessible.
Rewind Operation on Snapshot
Perform the rewind operation on the snapshot after Appstier provisioning in the following sequence.
-
Take a snapshot of the Database VDB after Appstier provision.
-
Stop the appsTier, DB, and dbTechStack one by one.
-
Rewind dbTechStack, DB, and appsTier one by one.
If the DB snapshot was taken before appsTier provisioning, rewinding the DB will cause loss of new data updated by appsTier during provisioning and the next operation of appsTier rewind will fail. So, to ensure that the Rewind operation of appsTier succeeds, take a snapshot of DB after Appstier provision.