
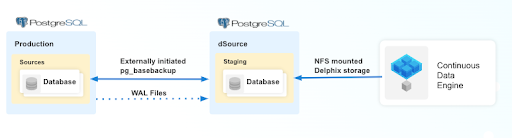
The following diagram demonstrates the architecture of the Delphix Continuous Data Engine support for the PostgreSQL database with external backup + WAL application ingestion between the source and staging database.
Perform the following steps to create a dSource with External Backup that uses WAL logs to stay in sync with the source.
Prerequisites
Ensure that you meet the following requirements before you begin creating a dSource.
-
The environment requirements are met by the source and staging environments as described in the Requirements for PostgreSQL Staging/Target environment.
-
The environment user or the privileged-user must have the following permissions:
-
access to the PostgreSQL commands
-
read+write+execute permissions on the `unix_socket_directories` configured in `postgresql.conf` file (The default directories are `/var/run/postgresql` & `/tmp`).
-
-
To use privilege elevation
-
You must meet the Privilege Elevation Requirements.
-
The high privilege user must have the following permissions:
-
read+execute permissions on the PostgreSQL Backup File Path
-
read permission on the backup file(s)
-
read+write+execute permissions on the PostgreSQL Backup WAL Log Files Path.
-
read permission on the WAL logs within WAL Log Files Path.
-
-
-
In connector versions 3.2.0 and greater, the pg_basebackup database full backup can be provided in three ways, ranked in the order of high-to-low precedence:
-
The backup files are placed within the organized folder(s) inside the PostgreSQL Backup File Path named PostgreSQL_T<YYYYMMDDhhmmss>. During the dSource creation/resync operation, backups from the folder with the latest timestamp in the name will be selected.
-
Run the following command to create a folder(s) on the staging server:
DLPXPGBACKUPDIR=PostgreSQL_T$(date "+%Y%m%d%H%M%S") mkdir -p <backup_path>/$DLPXPGBACKUPDIR -
Run the following command to take the source backup on the staging server using pg_basebackup:
# For PostgreSQL versions 9.4.x,9.5.x,9.6.x
<path_to_bin>/pg_basebackup -D <backup_path>/$DLPXPGBACKUPDIR -F t -v -w -P -x -h <source_ip_domain_name> -p <source_port> -U <source_user>
# For PostgreSQL versions 10.x and above
<path_to_bin>/pg_basebackup -D <backup_path>/$DLPXPGBACKUPDIR -F t -v -w -P -Xs -h <source_ip_domain_name> -p <source_port> -U <source_user>
-
-
The backup files are stored directly within the PostgreSQL Backup File Path.
-
Make sure to redirect the pg_basebackup output to an empty directory and then move it to <backup_path>.
# For PostgreSQL versions 9.4.x,9.5.x,9.6.x
<path_to_bin>/pg_basebackup -D <path_to_empty_directory> -F t -v -w -P -x -h <source_ip_domain_name> -p <source_port> -U <source_user>
# For PostgreSQL versions 10.x and above
<path_to_bin>/pg_basebackup -D <path_to_empty_directory> -F t -v -w -P -Xs -h <source_ip_domain_name> -p <source_port> -U <source_user>
# Move files
mv <path_to_empty_directory>/* <backup_path>
-
-
The backup files are compressed and stored within a ZIP file named PostgreSQL_T<YYYYMMDD>.zip and placed within PostgreSQL Backup File Path.
-
Run the following command to take the source backup on the source server using pg_basebackup:
# For PostgreSQL versions 9.4.x,9.5.x,9.6.x <path_to_bin>/pg_basebackup -D <destination_path> -F t -v -w -P -x # For PostgreSQL versions 10.x and above <path_to_bin>/pg_basebackup -D <destination_path> -F t -v -w -P -Xs -
Run the following command to create a ZIP file that can be moved to the staging server (ensure that the backup files are stored at the root of the ZIP file):
-
-
cd <destination_path>
# The back files should be at the root of the ZIP file
DLPXPGBACKUPZIP=PostgreSQL_T$(date +"%Y%m%d").zip
zip $DLPXPGBACKUPZIP *
-
For more information, refer to Requirements and Prerequisites.
Limitation
For PostgreSQL versions 9.4 and 9.5, the connector creates the staging instance as a warm standby. This instance is not accessible because it is always in recovery mode and does not allow any connection.
The limitation does not affect the provisioning of a VDB.
Procedure
Perform the following steps to create a dSource using the externally initiated backup ingestion with WAL log shipping method.
-
Login to the Delphix Management application.
-
Navigate to the Manage > Environments page.
-
On the Databases tab, choose a repository for your dSource and click the + icon.
-
In the Add Database dialog window, provide the name of your source configuration and click Add.
-
Select your source configuration and click the Add dSource link located on the right.
-
On the Source tab, do the following:
-
In the NFS Mount Location field, provide a mount location on the staging environment.
-
If you want to use Privilege Elevation, provide the username of the Privileged OS Account.
Note: Once the dSource is created, you will not be able to update the privileged OS account. Recreating the dSource account is the only way to make changes. -
Click on the +Add icon next to External Backup Parameter.
Note: You must click the “Add Button” for External Backup only once as the solution supports a single backup path. Providing multiple paths will result in an error during the linking process. -
Specify the PostgreSQL Backup File Path. This is the location of the backup file.
-
Specify the PostgreSQL Backup WAL Log Files Path. This is the location of the WAL log files.
Note: Once the dSource has been set up using a full external backup from the staging environment, it operates in recovery mode and patiently awaits the arrival of the next expected WAL (Write-Ahead Logging) file in the specified PostgreSQL Backup WAL Log Files Path. When the expected WAL files are placed in this path, the dSource proceeds to apply these WAL files and subsequently waits for the next expected files in sequential order. However, if an invalid or out-of-sequence WAL file is provided, the dSource will throw an error on the UI when the next dSource snapshot is taken. In the event of an error in the WAL chain, you have two options: resynchronize the dSource or provide the missing WAL file. After addressing the issue, it may be necessary to disable and then enable the dSource database.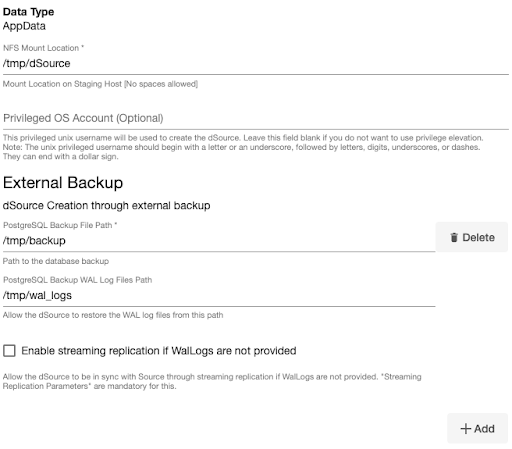
-
f. Specify the Staging Instance Port Number. This number must be unique for a given instance.
g. Optionally, you can define database configuration parameters during the linking operation in the “Config Settings" section if needed.
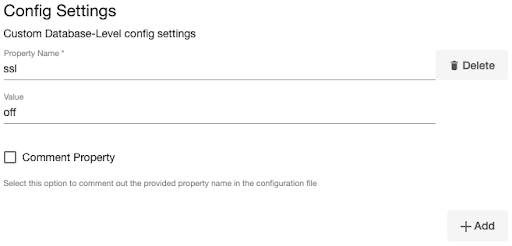
Note: During dSource creation, you now have the capability to configure the parameters and their values in the postgresql.conf file using the "Config Settings" section in the UI. For example, if you wish to disable SSL via UI, you can specify the "ssl" parameter and its value through the UI. This action will update the existing parameter value in the postgresql.conf file with the value provided.
Similarly, if you want to disable a parameter, specify the parameter name and select the Comment Property check box. This action will comment out the parameter in the postgresql.conf configuration file.
h. Click Next.
-
In the dSource Configuration tab, provide a dSource name and select a group for your dSource. Adding a dSource to a dataset group allows you to manage user permissions for that database and its objects, including snapshots. For more information, refer to the topics under Users and Groups.
-
In the Data Management tab, specify your staging environment, user, and snapshot parameters. Select the Resynchronize dSource checkbox if you want to resynchronize the dSource. This operation will force a non-incremental load of data from the source. This operation is similar to creating a new dSource, but prevents duplication of the storage requirements and maintains timeflow history. Click Next to proceed.
-
In the Policies tab, apply policy details to the dSource if needed, then click Next to continue.
-
In the Hooks tab, select a Hook Point and then click + to add a script that you want to run at that hook point. You have the flexibility to define scripts to run at multiple hook points in the process.
-
In the Summary tab, review the configuration profile for your dSource.
-
Click Submit. The Delphix Continuous Data Engine will initiate two jobs, namely DB_Link and DB_Sync to create the dSource. You can monitor the progress of these jobs by clicking Active Jobs from the top menu bar, or by navigating to System > Event Viewer. Upon successful completion of the DB_link job jobs, the database icon will change to a dSource icon on the Environments > Host > Databases screen. The dSource will also be listed under Datasets within its assigned group.
After you have successfully created a dSource, you can access the dSource Configuration tab to view details about it and make modifications to its policies and permissions. In the Datasets panel, select the specific dSource you want to inspect. Then, navigate to the Configuration tab to view details associated with it such as the source files, data management configuration, and hook operations.