
Please use the following documentation as a guide to identify and act on common Oracle liveSource User Workflows. The following table of contents includes steps for how to convert a dSource into a liveSource, a provision from a liveSource, sync a liveSource, convert a liveSource back to a dSource, and many other data procedures.
Converting to liveSource from a dSource
To get a live feed to the source database data through the Delphix Engine, you must first link the database to the Delphix Engine to create a dSource. You can then convert the dSource into a liveSource by following the steps outlined below:
-
In the left-hand panel, click the dSource.
-
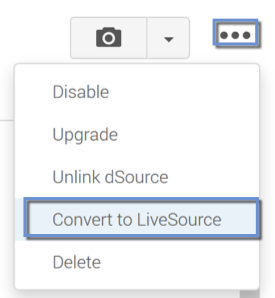
From the Actions menu (...) select Convert to liveSource, as highlighted below. This launches the Convert to liveSource wizard.
Convert to liveSource database wizard
-
In the Overview tab select Next.
-
Enter a DB Unique Name for the liveSource.
-
Enter a Database SID for the liveSource.
-
Click Next.
The liveSource database name must be the same as the database name of the primary database; therefore, this value is read-only.
Convert to liveSource, environment tab
Select the environment on which the liveSource will be created:
-
Select an Environment User for the liveSource instance.
-
Enter the Mount Point for the liveSource instance.
-
Select Listeners as needed. If you enable Auto Select Listeners, the Delphix Engine will pick the first available listener from the environment.
-
Click Next.
Convert to liveSource, configuration template tab
-
Select VDB configuration templates for the liveSource.
-
Enter additional DB configuration parameters for the liveSource.
-
Click Next.
Convert to liveSource, data management tab
-
Enter the data age warning threshold for the liveSource. If the data in liveSource lags behind the source database by more than this threshold, the Delphix Engine will raise a fault and notify you.
-
Click Next.
Convert to liveSource, hooks tab
-
Enter the operations to be performed on initial conversion. These operations are performed after the Delphix Engine has created the standby database for the liveSource.
-
Click Next.
These operations will also be performed when resyncing a liveSource.
Convert to liveSource, summary tab
-
Review the configuration summary.
-
Click Convert to begin the conversion.
Setting up log transport between a dSource or primary database and a liveSource or standby database
After adding a liveSource instance, you must configure the log transport between the dSource or primary database and the liveSource or standby database. For details on configuring a standby database, refer to the Oracle Data Guard Concepts and Administration guide.
At source/primary database
-
Configure the
LOG_ARCHIVE_CONFIGparameter to enable the sending of redo logs to remote destinations and the receipt of remote redo logs (the liveSource instance). For example:alter system set log_archive_config='DG_CONFIG=(sourcedb,liveSource)' scope=both; -
Configure the
LOG_ARCHIVE_DEST_nparameter to point the redo logs to the liveSource instance. For example:alter system set log_archive_dest_2='SERVICE="(DESCRIPTION=(ADDRESS=(PROTOCOL=tcp)(HOST= liveSource.dcenter.delphix.com)(PORT=1521))(CONNECT_DATA=(SERVICE_NAME=liveSource)(SERVER=DEDICATED)))" ASYNC VALID_FOR=(ONLINE_LOGFILE,PRIMARY_ROLE) DB_UNIQUE_NAME=liveSource' scope=both; -
Create a passwd file for the liveSource into the target site.
-
Configure the corresponding
LOG_ARCHIVE_DEST_STATE_nparameter to identify whether the log transport is enabled. For example:alter system set log_archive_dest_state_2='ENABLE' scope=both; -
Configure the STANDBY_FILE_MANAGEMENT parameter to enable automatic standby file management. For example:
alter system set standby_file_management='AUTO' scope=both;
RAC instance as standalone environment
For RAC instances that are discovered as Standalone type environments, please apply the following steps instead of the steps above.
-
alter system set log_archive_config='DG_CONFIG=(sourcedb,liveSource)' sid='' scope=both; -
alter system set log_archive_dest_2='SERVICE=liveSource ASYNC VALID_FOR=(ONLINE_LOGFILE,PRIMARY_ROLE) DB_UNIQUE_NAME=liveSource' sid='' scope=both; -
Set up tnsnames.ora in both source and target sites.
-
Make sure to have the same password file in all RAC instances and target site.
-
alter system set log_archive_dest_state_2='ENABLE' sid='' scope=both; -
alter system set standby_file_management='AUTO' sid='' scope=both;
The Delphix DB user must be updated to include grants for select on v$managed_standby and v$dataguard_stats in order to access MRP information and DataGuard statistics:
grant select on v_$managed_standby to <delphix DB username>;
create synonym <delphix DB username>.v$managed_standby for v_$managed_standby;
grant select on v_$dataguard_stats to <delphix DB username>;
create synonym <delphix DB username>.v$dataguard_stats for v_$dataguard_stats;
At the staging environment where the liveSource standby database environment is running
-
Configure the
FAL_SERVERparameter to point to the primary database for proper fetch archive log function. For example:ALTER system SET fal_server='service="(DESCRIPTION=(ADDRESS=(PROTOCOL=tcp)(HOST=sourcedb.dcenter.delphix.com)(PORT=1521))(CONNECT_DATA=(SERVICE_NAME=sourcedb)(SERVER=DEDICATED)))"'; -
If not already created, configure a password for Data Guard.
Removing a liveSource
-
In the Datasets panel, click the liveSource.
-
Click the Configuration tab.
-
From the Actions menu (...) select Convert to dSource.
-
Click Convert to dSource .
Taking a snapshot on a liveSource
To take a snapshot of a liveSource:
-
In the Datasets panel, select the liveSource.
-
In the upper right-hand corner, click the camera icon.
liveSource snapshots are instantaneous, Quick Provision snapshots. They do not require an RMAN backup of the source database
Provisioning from a liveSource TimeFlow
Provisioning from a liveSource Timeflow is the same process as provisioning from a snapshot for dSource Timeflow. The only difference is that you will select a liveSource and a liveSource snapshot.
Enabling, disabling, and detaching a liveSource
A liveSource is enabled the same way as a regular dSource.
-
Login to the Delphix Management application as admin or another user with administrative privileges.
-
Click Manage.
-
Select Datasets.
-
Click the liveSource you want to enable.
-
From the Actions menu (...) select Enable.
-
Click Enable to confirm.
When you enable the liveSource, the Delphix Engine will recreate the standby database on the staging environment.
A liveSource is disabled the same way as a regular dSource. Disabling a liveSource will stop further operations on the Delphix Engine related to the liveSource.
-
Login to the Delphix Management application as admin or another user with administrative privileges.
-
Click Manage.
-
Select Datasets.
-
Select the liveSource you want to disable.
-
In the upper right-hand corner, from the Actions menu (...) select Disable.
-
In the Disable dialog select Disable.
When you are ready to enable the liveSource again, from the Actions menu (...) select Enable, and the liveSource will continue to function as it did previously.
Disabling a liveSource shuts down the standby database that Delphix manages on the staging environment.
You can detach a liveSource in the same way as detaching a regular dSource. Detaching a liveSource will implicitly convert the liveSource into a regular dSource. After a dSource is re-attached, you can convert it back to a liveSource.
Resyncing a liveSource and applying the resync
Resync is a way to refresh the liveSource to the current point in the linked source. Resync is a multi-phase operation comprised of the following:
Perform resync
-
Click Manage.
-
Select Datasets.
-
Select your liveSource.
-
From the Actions menu (...) select Start liveSource Resync. The liveSource can stay up while the Resync is in progress.
Discarding resync data
Prerequisites
-
Resync is started and ready to apply
After Resync has finished, you can choose to not apply but rather discard the data that was brought over from the source database as part of Resync.
Procedure
To discard the data:
-
Click Manage.
-
Select Datasets.
-
Select your liveSource.
-
From the Actions menu (...) select Discard liveSource Resync.
Applying resync data
Prerequisites
-
Resync started and ready to apply
Procedure
-
Click Manage.
-
Select Datasets.
-
Select your liveSource..
-
From the Actions menu (...) select Apply liveSource Resync.
-
If the apply resync data process fails, first investigate and resolve the cause of failure, such as a full disk. Then follow the procedure to start resync.
Migrating a liveSource
-
Click Manage.
-
Select Datasets.
-
Select your liveSource.
-
From the Actions menu (...) select Disable.
-
From the Actions menu (...) select Migrate.
-
Update the environment, user, and repository. From the Configuration tab select the Source sub-tab and click the Pencil (edit) icon next to the Database.
-
Enable the dSource.
After the liveSource is migrated to a different staging environment, you must ensure that the log transport between the source database and the liveSource instance on the new staging environment is set up correctly.