
(l14.0.0.0) Host DSP configuration
In Delphix Engine to remote host DSP (Delphix Session Protocol) communication, the Server is the engine and the Client is the host. The Add Environment wizard allows you to tell the Delphix Engine how the KeyStores and TrustStores have been set up on the remote hosts.
When the Server or Client authenticates each incoming DSP connection (if enabled), it will validate that each certificate of the incoming connection's identity chain has a "Valid From (or Not Before)" date that is after its own time.
Thus, if your Delphix Engine or host environments are running off of an incorrect (slow) time configuration, then your DSP connections will not work until the offending engine or host's time advances past all incoming certificate's "Valid From (or Not Before)" time.
If correcting the Delphix Engine's or host environment's time configuration may cause issues, then you can workaround this issue by creating and using certificates with a "Valid From (or Not Before)" date which is before your slowest Engine or host.
Adding a new single instance environment after DSP configuration changes
If server authentication for remote host communication or engine to host throughput tests is desired, make sure the appropriate config is set. For more details refer to Configuring Network Security Settings. You will need to create a JKS or PKCS#12 keystore on the remote host with the full CA chain of the DSP key in the keystore. By default, the key will just the signed by the Delphix CA, but you can replace the DSP key if you wish. Refer to KeyStore Settings for more details.
If client authentication for remote host communication or engine to host throughput tests is also desired, make sure the appropriate config is set. For more details refer to Configuring Network Security Settings You will need to create another JKS or PKCS#12 keystore on the remote host with the desired key pair. Make sure the created keystore has permissions such that it is readable by all environment users. Then, add the full CA chain of the remote host’s key pair to the TrustStore on the engine. For more details, refer to TrustStore Settings
Once the appropriate toggles are enabled, and the remote host is all set up, you can now add the environment as shown below. If only server authentication was desired, only the TrustStore fields need to be filled in. If client authentication was also desired, then the KeyStore fields will also need to be filled in
Login to the Delphix Management application.
Click Manage.
Select Environments.
Click the Actions (...) menu next to Environments and select Add Environment.
In the Host and Server tab, select Unix/Linux.
Select Standalone Host or Oracle Cluster, depending on the type of environment you are adding.
Click Next.
In the Environment Settings tab enter your DSP configurations.
Select Submit.
Modifying an existing single instance environment after DSP configuration changes
If an environment already exists after enabling server/client DSP authentication, you will need to modify its attributes for host communication to continue working. As detailed in the above section Adding a new single instance environment after DSP configuration changes, you will need to set up the appropriate stores on the remote host.
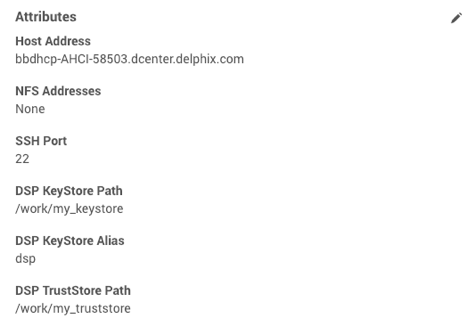
Once this is done, the Details page of your environment will show the existing DSP attributes.
Click the pencil icon in the top right corner to edit the DSP KeyStore and TrustStore fields accordingly.
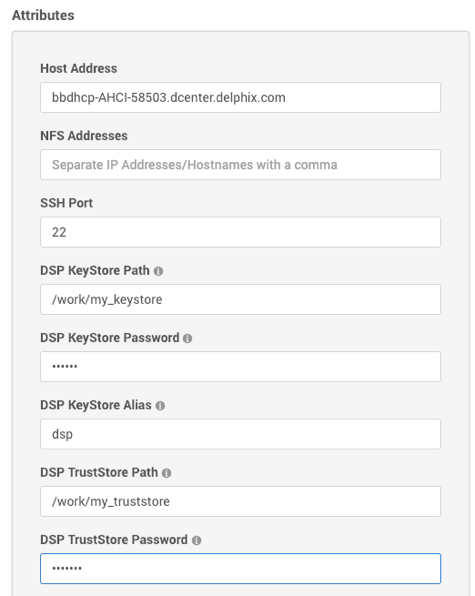
Edit the DSP fields as required.
Once you are done select the checkmark.
This will need to be done for all existing environments after DSP server/client authentication is enabled otherwise many host communication features will not work.
Adding a new Unix/Linux cluster environment after DSP configuration changes
Adding a new cluster environment is similar to adding a single instance environment, see Adding a new single instance environment after DSP configuration changes. The steps for setting up the TrustStore and/or KeyStore will need to be done on ALL nodes of the cluster. For a new cluster, each node must also be set up to have the exact same path, password, an alias, because the Delphix Engine will use the same configuration for every auto discovered node. If desired, the path, password, and alias configuration can be changed for each node, but only AFTER the cluster has been added. See Modifying an existing Unix/Linux cluster environment after DSP configuration changes for more details.
Modifying an existing Unix/Linux cluster environment after DSP configuration changes
Similar to single instance environments, an existing cluster can be modified if DSP server/client authentication is enabled. In the cluster environment’s Details page, each node can be selected and modified individually. You can also use this to change the path, password, and/or alias to be different across nodes for a cluster that was just added.
DSP for windows clusters
This will need to be done for all existing environments after DSP server/client authentication is enabled otherwise many host communication features will not work.
Before adding a Windows cluster, each node must have already been added as a single instance. See Adding a new single instance environment after DSP configuration changes if adding a new Windows cluster. If modifying a Windows cluster after a DSP configuration change, you can modify each Windows node on its environment details page See Modifying an existing single instance for more details, or just use the cluster environment details which will allow you to select which node to modify. See Modifying an existing Unix/Linux cluster environment after DSP configuration changes.