
Linking a PostgreSQL dSource
Overview of the linking process
The PostgreSQL plugin version 2.0.0 and above provides the following ways to create a dSource:
dSource created with Delphix Initiated Backup - there are two ways to do this:
Cluster level backup via pg_basebackup and keep in sync through PostgreSQL Streaming Replication. See, Creating a dSource with Delphix initiated backup using streaming replication section in this article.
Single database backup via pg_dump and pg_restore. See, Creating a dSource with Delphix initiated backup using single database ingestion section in this article.
dSource created with External Backup - there are two ways to do this:
keep in sync with the source through WAL files. See, Creating a dSource with external backups using WAL Logs section in this article.
keep in sync with the source through PostgreSQL Streaming Replication. See, Creating a dSource with external backups using streaming replication section in this article.
If both options are used - keep in sync with the source through WAL files and keep in sync with the source through PostgreSQL Streaming Replication, then PostgreSQL Streaming Replication will take precedence, and syncing through WAL files will not be considered.
With PostgreSQL plugin version 2.1.0 and above, the end-user can use the Privilege Elevation feature:
Initially, the discovery operation will be executed by the Environment OS user that was provided while adding the environment.
If you are using the two environment users, make sure both the user can access [read+write+execute] the toolkit path & the scratch path:
<toolkit_path>/Delphix_COMMON_<id>/plugin/postgres-vsdk_<id>/.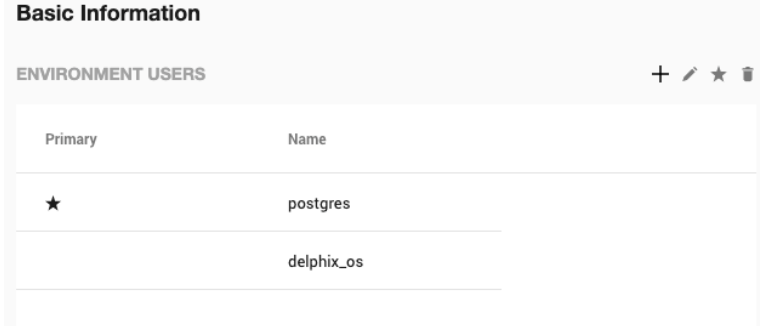
Either create all the directories/files required by the dSource ingestion mechanisms using the high-privileged user or they should be accessible to the high-privileged user.
External Backup Mechanism:
PostgreSQL Backup File Path (Directory), with a minimum of read and execute permissions for the high-privileged user.
The provided backups (either the zip or full-backup tarballs) should be readable by the high-privileged user.
PostgreSQL Backup WAL Log Files Path (Directory), with read, write and execute permissions for the high-privileged user.
The WAL logs within the WAL Log Files Path should be readable by the high-privileged user.
Single DB Backup:
Postgres Backup Dump Directory, with a minimum of write and execute permissions for the high-privileged user.
The
Staging postgresql.confconfig file should be readable by the high-privileged user.
With PostgreSQL plugin version 3.2.0, an enhancement has been made to the External Backup mechanism. Previously the only way to provide source backup was via a compressed ZIP file(s) (in the format PostgreSQL_T<YYYYMMDD>.zip). Now we can provide backups in the following ways:
Method 1: Using structured folders [highest precedence]
Place the pg_basebackup tar output inside the folder(s) named
PostgreSQL_T<YYYYMMDDhhmmss>; created within the backup path.CODE# As an example $ ls -l <backup_path>/PostgreSQL_T20230224033939 -rw-------. 1 postgres postgres 9093632 Feb 24 03:39 24578.tar -rw-------. 1 postgres postgres 9093632 Feb 24 03:39 24579.tar -rw-------. 1 postgres postgres 9093632 Feb 24 03:39 24580.tar -rw-------. 1 postgres postgres 294300 Feb 24 03:39 backup_manifest -rw-------. 1 postgres postgres 26959360 Feb 24 03:39 base.tar -rw-------. 1 postgres postgres 16778752 Feb 24 03:39 pg_wal.tar
Method 2: Using the backup path directly [preference given over ZIP files placed within the same backup path]
Place the
pg_basebackup tar output inside the backup path directly
CODE# As an example $ ls -l <backup_path> -rw-------. 1 postgres postgres 9093632 Feb 24 02:12 24578.tar -rw-------. 1 postgres postgres 9093632 Feb 24 02:12 24579.tar -rw-------. 1 postgres postgres 9093632 Feb 24 02:12 24580.tar -rw-------. 1 postgres postgres 26959360 Feb 24 02:12 base.tar -rw-------. 1 postgres postgres 16778752 Feb 24 02:12 pg_wal.tar -rw-r--r--. 1 postgres postgres 6883130 Feb 24 02:28 PostgreSQL_T20230224.zip
Method 3: Using the ZIP files [existing method]
Place the ZIP file which contains the pg_basebackup output inside the backup path. Make sure that the backup files are available directly at the root level of the ZIP. The following sections provide step by steps instructions on how to do this.
CODE# As an example # The backup files are available at the root of the ZIP file $ zipinfo PostgreSQL_T20230224.zip Archive: PostgreSQL_T20230224.zip Zip file size: 6883130 bytes, number of entries: 5 -rw------- 3.0 unx 9093632 bx defN 23-Feb-24 02:12 24578.tar -rw------- 3.0 unx 9093632 bx defN 23-Feb-24 02:12 24579.tar -rw------- 3.0 unx 9093632 bx defN 23-Feb-24 02:12 24580.tar -rw------- 3.0 unx 26959360 bx defN 23-Feb-24 02:12 base.tar -rw------- 3.0 unx 16778752 bx defN 23-Feb-24 02:12 pg_wal.tar 5 files, 71019008 bytes uncompressed, 6882378 bytes compressed: 90.3%
With PostgreSQL plugin version 4.0.0, support for pg_dumpall has been added with Single Database Ingestion to get the global objects like roles and tablespaces.
Creating a dSource with external backups using WAL Logs
The following procedure provides details on creating a dSource with External Backup which uses WAL logs to keep in sync with the source.
Prerequisites
The source and staging instances must meet the host requirements.
Databases must meet container requirements.
If Privilege Elevation is to be used:
The
PostgreSQL Backup File Pathshould have read+execute permissions for the high-privileged user.The backup file(s) should have read permission for the high-privileged user.
The
PostgreSQL Backup WAL Log Files Pathshould have read+write+execute permissions for the high-privilege user.The WAL logs within
WAL Log Files Pathshould have read permission for the high-privilege user.
Else,
PostgreSQL Backup File Path&PostgreSQL Backup WAL Log Files Pathmust be available and accessible by the Environment OS user.From plugin versions greater than 3.2.0, the pg_basebackup database full backup can be provided in three ways, in the order of high-to-low precedence:
The backup files are placed within the organized folder(s) inside the
PostgreSQL Backup File PathnamedPostgreSQL_T<YYYYMMDDhhmmss>;. Backups from the folder with the latest timestamp in the name will be chosen when dSource creation/resync takes place.Creation of folder(s) on the staging server:
CODEDLPXPGBACKUPDIR=PostgreSQL_T$(date "+%Y%m%d%H%M%S") mkdir -p <backup_path>/$DLPXPGBACKUPDIRTaking the source backup on the staging server using pg_basebackup:
CODE# For PostgreSQL versions 9.4.x,9.5.x,9.6.x <path_to_bin>/pg_basebackup -D <backup_path>/$DLPXPGBACKUPDIR -F t -v -w -P -x -h <source_ip_domain_name> -p <source_port> -U <source_user> # For PostgreSQL versions 10.x and above <path_to_bin>/pg_basebackup -D <backup_path>/$DLPXPGBACKUPDIR -F t -v -w -P -Xs -h <source_ip_domain_name> -p <source_port> -U <source_user>
The backup files are placed directly within the
PostgreSQL Backup File Path.Make sure to redirect the pg_basebackup output to an empty directory and then move it to
<backup_path>.CODE# For PostgreSQL versions 9.4.x,9.5.x,9.6.x <path_to_bin>/pg_basebackup -D <path_to_empty_directory> -F t -v -w -P -x -h <source_ip_domain_name> -p <source_port> -U <source_user> # For PostgreSQL versions 10.x and above <path_to_bin>/pg_basebackup -D <path_to_empty_directory> -F t -v -w -P -Xs -h <source_ip_domain_name> -p <source_port> -U <source_user> # Move files mv <path_to_empty_directory>/* <backup_path>
The backup files are encapsulated in a ZIP file named
PostgreSQL_T<YYYYMMDD>.zipand placed withinPostgreSQL Backup File Path.Taking the source backup on the source server using pg_basebackup:
CODE# For PostgreSQL versions 9.4.x,9.5.x,9.6.x <path_to_bin>/pg_basebackup -D <destination_path> -F t -v -w -P -x # For PostgreSQL versions 10.x and above <path_to_bin>/pg_basebackup -D <destination_path> -F t -v -w -P -XsCreating a ZIP file that can be moved to the staging server (please make sure the backup files are at the root of the ZIP file):
CODEcd <destination_path> # The back files should be at the root of the ZIP file DLPXPGBACKUPZIP=PostgreSQL_T$(date +"%Y%m%d").zip zip $DLPXPGBACKUPZIP *
For more information refer to Requirements for PostgreSQL source hosts and databases and Prerequisites for privilege elevation using DLPX_DB_EXEC Script section.
Limitation
It is not possible to access the staging server with PostgreSQL 9.4 and PostgreSQL 9.5 versions.
Procedure
Login to the Delphix Management application.
Select Manage > Environments.
From the Databases tab, select a repository from which you want to create your dSource and click the

icon.
In the Add Database dialog window enter the Name for your source config and click Add.
Select your source config and click the Add dSource link located to the right.
In the Source tab, do the following:
In the NFS Mount Location field, enter a mount location on the staging host.
If you want to use Privilege Elevation, provide the Privileged OS Account username. Make sure you meet all the requirements described in the Prerequisites for Privilege Elevation using DLPX_DB_EXEC Script section.
Note:
You will currently not be able to update the Privileged OS account after dSource creation. The only way to achieve the change is to recreate the dSource.If the Environment OS user will be used to create the dSource, make sure you have the following privileges:
access to the Postgres commands
read+write+execute permissions on the `unix_socket_directories` configured in `postgresql.conf` [Default directories: `/var/run/postgresql` & `/tmp`]
Click on the +Add icon located next to External Backup Parameter.
Note:The Add Button provided for External Backup is clickable multiple times but should be used ONLY once since the solution is built only to support a single backup path. Providing Multiple Paths will error out the linking process.
PostgreSQL Backup File Path - the location of the backup file
PostgreSQL Backup WAL Log Files Path - the location of the WAL log files
.png?inst-v=59d9d052-b7b3-4a4a-bc01-08f681df7a2d)
Note:
Once the dSource is up using the Full External Backup provided on the staging environment, the dSource will continue to run in recovery mode and will wait for the next expected WAL file under the specified PostgreSQL backup WAL log Files path. When the expected WAL files are placed on this path, the dSource applies this WAL file and starts waiting for the next expected WAL files in series. If the WAL file provided is invalid or not in the sequence, then the dSource will throw an error on UI with the information of the expected WAL filename when the next dSource snapshot is taken. In the case of a WAL chain break, users need to either resynchronize the dSource or provide the missing WAL file, then disable and enable the dSource databaseStaging Instance Port Number - must be unique for a given instance.
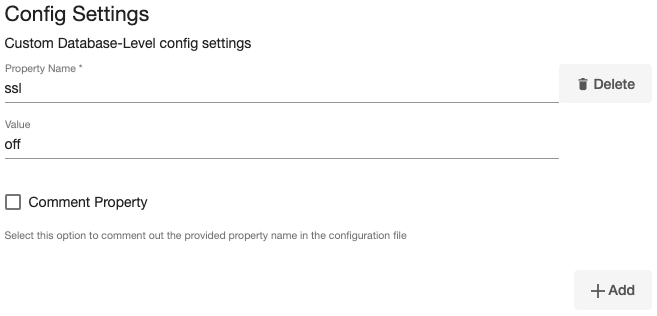
Optionally, database configuration parameters can be defined during the linking operation in the Config Settings section.
Click Next.
In the dSource Configuration tab, enter a dSource name and select a group for your dSource. Adding a dSource to a dataset group lets you set Delphix Domain user permissions for that database and its objects, such as snapshots. See the topics under Users and Groups for more information.
In the Data Management tab, specify your Staging Environment, User, and Snapshot Parameters. Select the Resynchronize dSource checkbox if you want to resynchronize the dSource. Resynchronizing the dSource will force a non-incremental load of data from the source. This operation is similar to creating a new dSource, but avoids duplicating storage requirements and maintains timeflow history. Click Next.
In the Policies tab, apply policy details to the dSource if required, and then click Next.
In the Hooks tab, select a Hook Point and then click + to add a script to run at that point. You can define scripts to run at multiple hook points in the process.
In the Summary tab, review the configuration profile for the dSource.
Click Submit. The Delphix Engine initiates two jobs to create the dSource: DB_Link and DB_Sync. You can monitor these jobs by clicking Active Jobs from the top menu bar, or by selecting System > Event Viewer. When the jobs have successfully been completed, the database icon will change to a dSource icon on the Environments > Host > Databases screen, and the dSource will also appear in the list of Datasets under its assigned group.
The dSource Configuration Screen
After you have created a dSource, the dSource Configuration tab allows you to view information about it and make modifications to its policies and permissions. In the Datasets panel, select the dSource you wish to examine. You can now choose the configuration tab to see information such as the Source files, Data Management configuration, and Hook Operations
Creating a dSource with external backups using streaming replication
The following procedure provides details on creating a dSource with External Backup which uses streaming replication to keep in sync with the source.
Prerequisites
The source and staging instances must meet the host requirements
Databases must meet container requirements.
If Privilege Elevation is being used:
The
PostgreSQL Backup File Pathshould have read+execute permissions for the high-privileged user.The backup file
>>should have read permission for the high-privileged user.
Else, PostgreSQL Backup Files Path must be available and accessible by the Environment OS user.
For plugin versions greater than 3.2.0, the pg_basebackup database full backup can be provided in three ways, in the order of high-to-low precedence:
The backup files are placed within the organized folder(s) inside the
PostgreSQL Backup File Path, namedPostgreSQL_T<YYYYMMDDhhmmss>. Backups from the folder with the latest timestamp in the name will be chosen when dSource creation/resync takes place.Creation of the folder(s) on the staging server:
CODEDLPXPGBACKUPDIR=PostgreSQL_T$(date "+%Y%m%d%H%M%S") mkdir -p <backup_path>/$DLPXPGBACKUPDIRTaking the source backup on the staging server using pg_basebackup:
CODE# For PostgreSQL versions 9.4.x,9.5.x,9.6.x <path_to_bin>/pg_basebackup -D <backup_path>/$DLPXPGBACKUPDIR -F t -v -w -P -x -h <source_ip_domain_name> -p <source_port> -U <source_user> # For PostgreSQL versions 10.x and above <path_to_bin>/pg_basebackup -D <backup_path>/$DLPXPGBACKUPDIR -F t -v -w -P -Xs -h <source_ip_domain_name> -p <source_port> -U <source_user>
The backup files are placed directly within the
PostgreSQL Backup File Path.Make sure to redirect the pg_basebackup output to an empty directory and then move it to <backup_path>.
CODE# For PostgreSQL versions 9.4.x,9.5.x,9.6.x <path_to_bin>/pg_basebackup -D <path_to_empty_directory> -F t -v -w -P -x -h <source_ip_domain_name> -p <source_port> -U <source_user> # For PostgreSQL versions 10.x and above <path_to_bin>/pg_basebackup -D <path_to_empty_directory> -F t -v -w -P -Xs -h <source_ip_domain_name> -p <source_port> -U <source_user> # Move files mv <path_to_empty_directory>/* <backup_path>
The backup files are encapsulated in a ZIP file named
PostgreSQL_T<YYYYMMDD>.zipand placed withinPostgreSQL Backup File Path.Taking the source backup on the source server using pg_basebackup:
CODE# For PostgreSQL versions 9.4.x,9.5.x,9.6.x <path_to_bin>/pg_basebackup -D <destination_path> -F t -v -w -P -x # For PostgreSQL versions 10.x and above <path_to_bin>/pg_basebackup -D <destination_path> -F t -v -w -P -XsCreating a ZIP file that can be moved to the staging server (please make sure the backup files are at the root of the ZIP file):
CODEcd <destination_path> # The back files should be at the root of the ZIP file DLPXPGBACKUPZIP=PostgreSQL_T$(date +"%Y%m%d").zip zip $DLPXPGBACKUPZIP *
For more information refer to Requirements for PostgreSQL hosts and databases and Prerequisites for privilege elevation using DLPX_DB_EXEC script section.
Limitation
It is not possible to access the staging server with PostgreSQL 9.4 and PostgreSQL 9.5 versions.
Procedure
Login to the Delphix Management application.
Select Manage > Environments.
From the Databases tab, select a repository from which you want to create your dSource and click the
icon.
In the Add Database dialog window enter the Name for your source config and click Add.
Select your source config and click the Add dSource link located to the right.
In the Source tab, do the following:
In the NFS Mount Location field, enter a mount location on the staging host.
If you want to use Privilege Elevation, provide the Privileged OS Account username. Make sure you meet all the requirements described in the Prerequisites for Privilege Elevation using DLPX_DB_EXEC Script section.
Note:You will currently not be able to update the Privileged OS account after dSource creation. The only way to achieve the change is to recreate the dSource.
If the Environment OS user will be used to create the dSource, make sure you have the following privileges:
access to the Postgres commands
read+write+execute permissions on the `unix_socket_directories` configured in `postgresql.conf` [Default directories: `/var/run/postgresql` & `/tmp`]
Click on the +Add icon located next to External Backup Parameter.
PostgreSQL Backup File Path - the location of the backup file
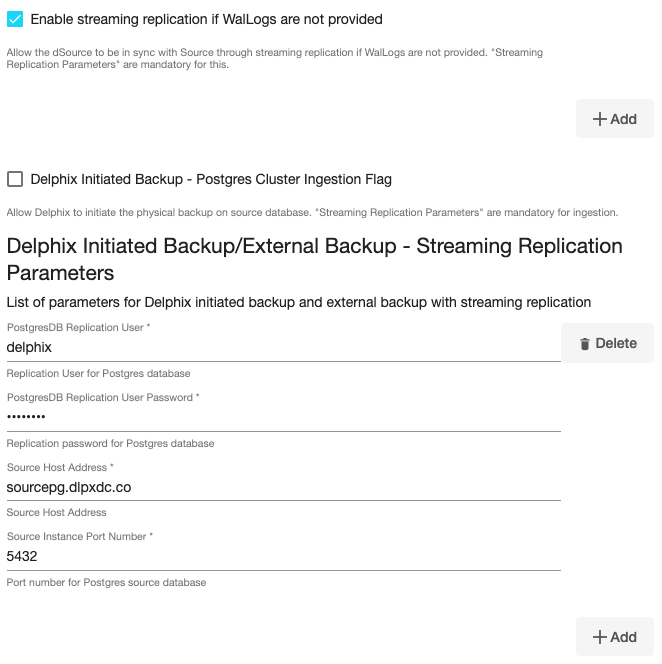
Select the checkbox 'Enable streaming replication if WalLogs are not provided'
.png?inst-v=59d9d052-b7b3-4a4a-bc01-08f681df7a2d)
Click on the +Add icon located next to the Delphix Initiated Backup/External Backup - Streaming Replication Parameters option.
Note:
The Add Button provided for Delphix Initiated Backup/External Backup - Streaming Replication is clickable multiple times but should be used ONLY once since the solution is built only to support a single backup path. Providing Multiple Paths will error out the linking process.The following fields are mandatory for this process :
PostgresDB Replication User
PostgresDB Replication User Password
Source Host Address
Source Instance Port Number
Staging Instance Port Number - must be unique for a given instance.
Optionally, database configuration parameters can be defined during the linking operation in the Config Settings section.
.png?inst-v=59d9d052-b7b3-4a4a-bc01-08f681df7a2d)
Note:
After dSource creation, users can now configure the parameters and their values in thepostgresql.conffile through the "Config Settings" section on the Delphix Engine UI. For example, to support Replication Slots through UI, users can now provide the "primary_slot_name" parameter and its value through the UI. This will update the already existing parameter value in thepostgresql.conffile with the value provided by the user.
Similarly, if a user wants to disable a parameter then they can provide the parameter name and select the checkbox Comment Property. This will comment out the parameter in thepostgresql.confconfiguration file.Click Next.
In the dSource Configuration tab, enter a dSource name and select a group for your dSource. Adding a dSource to a dataset group lets you set Delphix Domain user permissions for that database and its objects, such as snapshots. See the topics under Users and Groups for more information.
In the Data Management tab, specify your Staging Environment, User, and Snapshot Parameters. Select the Resynchronize dSource checkbox if you want to resynchronize the dSource. Resynchronizing the dSource will force a non-incremental load of data from the source. This operation is similar to creating a new dSource, but avoids duplicating storage requirements and maintains timeflow history. Click Next.
In the Policies tab, apply policy details to the dSource if required, and then click Next.
In the Hooks tab, select a Hook Point and then click + to add a script to run at that point. You can define scripts to run at multiple hook points in the process.
In the Summary tab, review the configuration profile for the dSource.
Click Submit. The Delphix Engine initiates two jobs to create the dSource: DB_Link and DB_Sync. You can monitor these jobs by clicking Active Jobs from the top menu bar, or by selecting System > Event Viewer. When the jobs have successfully been completed, the database icon will change to a dSource icon on the Environments > Host > Databases screen, and the dSource will also appear in the list of Datasets under its assigned group.
The dSource Configuration Screen
After you have created a dSource, the dSource Configuration tab allows you to view information about it and make modifications to its policies and permissions. In the Datasets panel, select the dSource you wish to examine. You can now choose the configuration tab to see information such as the Source files, Data Management configuration, and Hook Operations.
Creating a dSource with Delphix initiated backup using streaming replication
Prerequisites
The source and staging instances must meet the host requirements
Databases must meet container requirements. For more information refer to Requirements for PostgreSQL source hosts and databases
Limitation
It is not possible to access the staging server with PostgreSQL 9.4 and PostgreSQL 9.5 versions.
Procedure
Login to the Delphix Management application.
Select Manage > Environments.
From the Databases tab, select a repository from which you want to create your dSource and click the
icon.
In the Add Database dialog window enter the Name for your source config and click Add.
Select your source config and click the Add dSource link located to the right.
In the Source tab, do the following:
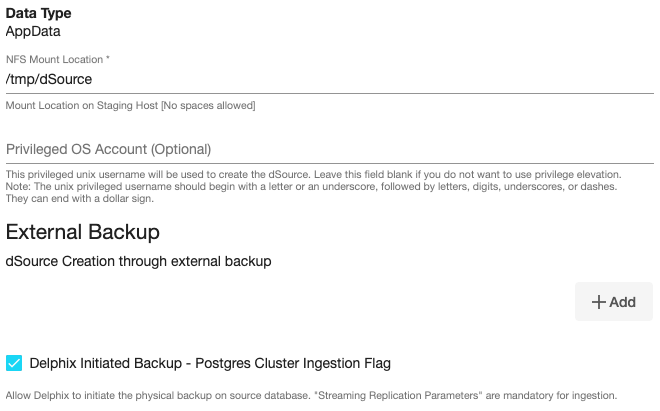
In the NFS Mount Location field, enter a mount location on the staging host.
If you want to use Privilege Elevation, provide the Privileged OS Account username. Make sure you meet all the requirements described in the Prerequisites for privilege elevation using DLPX_DB_EXEC script section.
Note:You will currently not be able to update the Privileged OS account after dSource creation. The only way to achieve the change is to recreate the dSource.
If the Environment OS user will be used to create the dSource, make sure you have the following privileges:
access to the Postgres commands
read+write+execute permissions on the `unix_socket_directories` configured in `postgresql.conf` [Default directories: `/var/run/postgresql` & `/tmp`]
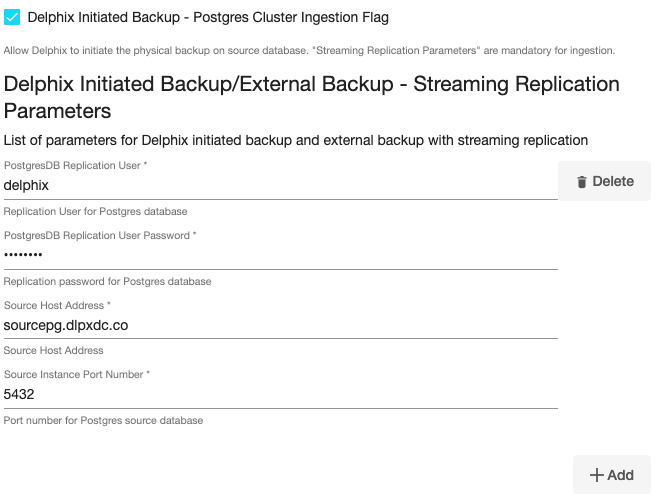
Select the checkbox next to the Delphix Initiated Backup - Postgres Cluster Ingestion Flag option. Selecting this checkbox allows Delphix to initiate the physical backup on the source database.
Click on the +Add icon located next to the Delphix Initiated Backup/External Backup - Streaming Replication Parameters option.
Note :The Add Button provided for Delphix Initiated Backup - Single Database Ingestion is clickable multiple times but should be used ONLY once since the solution is built only to support a single backup path. Providing Multiple Paths will error out the linking process.The following fields are mandatory for this process :
Delphix Initiated Backup - Postgres Cluster Ingestion Flag - Checkbox should be selected.
PostgresDB Replication User
PostgresDB Replication User Password
Source Host Address
Source Instance Port Number
Staging Instance Port Number - must be unique for a given instance.
Optionally, database configuration parameters can be defined during the linking operation in the Config Settings section.
.png?inst-v=59d9d052-b7b3-4a4a-bc01-08f681df7a2d)
Note:
After dSource creation, users can now configure the parameters and their values in thepostgresql.conffile through the "Config Settings" section on the Delphix Engine UI. For example, to support Replication Slots through UI, users can now provide the "primary_slot_name" parameter and its value through the UI. This will update the already existing parameter value in thepostgresql.conffile with the value provided by the user.
Similarly, if a user wants to disable a parameter then they can provide the parameter name and select the check box Comment Property. This will comment out the parameter in thepostgresql.confconfiguration file.Click Next.
In the dSource Configuration tab, enter a dSource name and select a group for your dSource.
Adding a dSource to a dataset group lets you set Delphix Domain user permissions for that database and its objects, such as snapshots. See the topics under Users and Groups for more information.In the Data Management tab, specify your Staging Environment, User, and Snapshot Parameters. Select the Resynchronize dSource checkbox if you want to resynchronize the dSource. Resynchronizing the dSource will force a non-incremental load of data from the source. This operation is similar to creating a new dSource, but avoids duplicating storage requirements and maintains timeflow history. Click Next.
In the Policies tab, apply policy details to the dSource if required, and then click Next.
In the Hooks tab, select a Hook Point and then click + to add a script to run at that point. You can define scripts to run at multiple hook points in the process.
In the Summary tab, review the configuration profile for the dSource.
Click Submit. The Delphix Engine initiates two jobs to create the dSource: DB_Link and DB_Sync. You can monitor these jobs by clicking Active Jobs from the top menu bar, or by selecting System > Event Viewer. When the jobs have successfully been completed, the database icon will change to a dSource icon on the Environments > Host > Databases screen, and the dSource will also appear in the list of Datasets under its assigned group.
The dSource Configuration Screen
After you have created a dSource, the dSource Configuration tab allows you to view information about it and make modifications to its policies and permissions. In the Datasets panel, select the dSource you wish to examine. You can now choose the configuration tab to see information such as the Source files, Data Management configuration, and Hook Operations.
Creating a dSource with Delphix initiated backup using single database ingestion
Prerequisites
The source and staging instances must meet the host requirements
Databases must meet container requirements
If Privilege Elevation is being used:
The
Postgres Backup Dump Directoryshould have write+execute permissions for the high-privileged user.The
Staging postgresql.conf config fileshould be accessible to the high-privileged user.
Else,
Postgres Backup Dump Directory&Staging postgresql.confconfig file must be available and accessible by the Environment OS user.
For more information refer to Requirements for PostgreSQL source hosts and databases and Prerequisites for privilege elevation using DLPX_DB_EXEC script section.
Procedure
With PostgreSQL plugin version 4.0.0, support for pg_dumpall has been added with Single Database Ingestion to get the global objects like roles and tablespaces.
Login to the Delphix Management application.
Select Manage > Environments.
From the Databases tab, select a repository from which you want to create your dSource and click the
icon.
In the Add Database dialog window, enter the Name for your source config and click Add.
Scroll down to the source config that you added and click the Add dSource option located to the right.
In the Source tab, do the following:
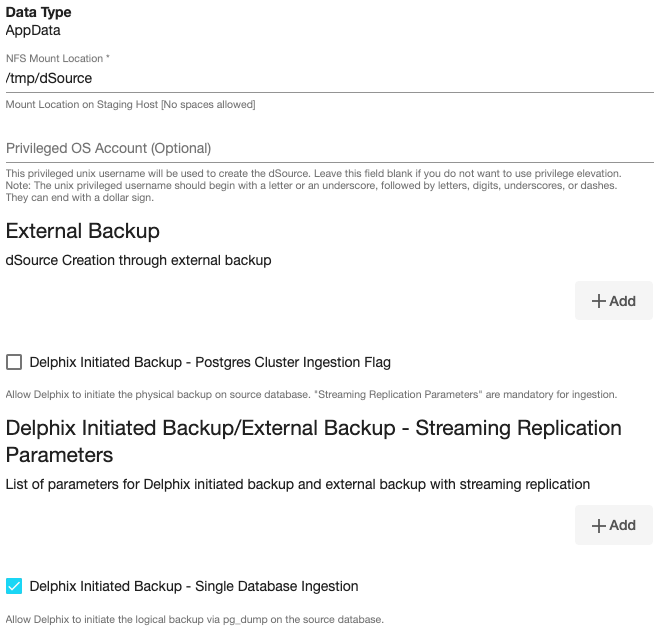
In the NFS Mount Location field, enter a mount location on the staging host.
If you want to use Privilege Elevation, provide the Privileged OS Account username. Make sure you meet all the requirements described in the Prerequisites for privilege elevation using DLPX_DB_EXEC script section.
Note:You will currently not be able to update the Privileged OS account after dSource creation. The only way to achieve the change is to recreate the dSource.
If the Environment OS user will be used to create the dSource, make sure you have the following privileges:
access to the the postgres commands
read+write+execute permissions on the `unix_socket_directories` configured in `postgresql.conf` [Default directories: `/var/run/postgresql` & `/tmp`]
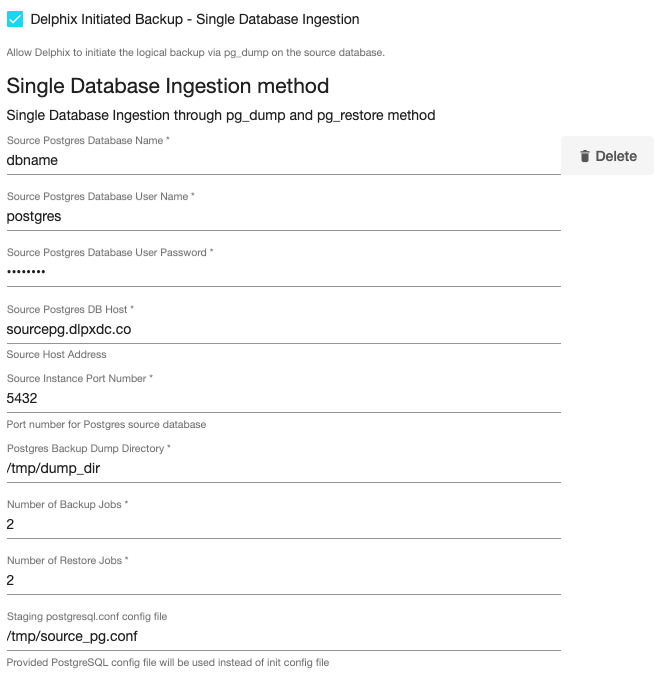
Select the checkbox next to the Delphix Initiated Backup - Single Database Ingestion option. Selecting this checkbox allows Delphix to initiate the logical backup on the source database.
Click on the +Add icon located next to the Single Database Ingestion method option.
Note :The Add Button provided for Delphix Initiated Backup - Single Database Ingestion is clickable multiple times but should be used ONLY once since the solution is built only to support a single backup path. Providing Multiple Paths will error out the linking process.
The following fields are mandatory for this process.
Source Postgres Database Name: Provide the source Postgres database name that needs to be ingested.
Source Postgres Database User Name: Provide the user name of the source Postgres database. The default value is postgres.
Source Postgres Database User Password: Provide the password of the source Postgres database.
Source Postgres DB Host: Provide the source database host address.
Source Instance Port Number: Enter the port number for Source Database. The default value is 5432.
Postgres Backup Dump Directory: Provide the directory on the staging host on which backup will be created. This path should exist in the host environment with read and write access to the OS user.
Number of Backup Jobs: Provide the number of parallel jobs to be executed to take backup. The default value is 2.
Number of Restore Jobs: Provide the number of parallel jobs to be executed to restore backup. The default value is 2.
(Optional) Staging postgresql.conf config file: Provide the path to a template Postgres config file that will be used when starting the dSource.
Staging Instance Port Number - must be unique for a given instance.
Optionally, database configuration parameters can be defined during the linking operation in the Config Settings section.
%20(1).png?inst-v=59d9d052-b7b3-4a4a-bc01-08f681df7a2d)
Click Next.
In the dSource Configuration tab, enter a dSource name and select a group for your dSource. Adding a dSource to a dataset group lets you set Delphix Domain user permissions for that database and its objects, such as snapshots. See the topics under Users and Groups for more information.
In the Data Management tab, specify your Staging Environment, User, and Snapshot Parameters. Select the Resynchronize dSource checkbox if you want to resynchronize the dSource. Resynchronizing the dSource will force a non-incremental load of data from the source. This operation is similar to creating a new dSource, but avoids duplicating storage requirements and maintains timeflow history. Click Next.
In the Policies tab, apply policy details to the dSource if required, and then click Next.
In the Hooks tab, select a Hook Point and then click + to add a script to run at that point. You can define scripts to run at multiple hook points in the process.
In the Summary tab, review the configuration profile for the dSource.
Click Submit.
The dSource Configuration Screen
After you have created a dSource, the dSource Configuration tab allows you to view information about it and make modifications to its policies and permissions. In the Datasets panel, select the dSource you wish to examine. You can now choose the configuration tab to see information such as the Source files, Data Management configuration, and Hook Operations.
Creating a dSource with Staging Push
For staging push implementation details, see Staging Push Implementation.
Procedure
Login to the Delphix Management application.
Select Manage > Environments.
From the Databases tab, select a repository from which you want to create your dSource and click the
icon.
In the Add Database dialog window, enter the Name for your source config and click Add.
Select your source config and click the Add dSource option located to the right.
In the Source tab, do the following:
In the NFS Mount Location field, enter a mount location on the staging host.
.png?inst-v=59d9d052-b7b3-4a4a-bc01-08f681df7a2d)
If you want to use Privilege Elevation, provide the Privileged OS Account username. Make sure you meet all the requirements described in the Prerequisites for Privilege Elevation using DLPX_DB_EXEC Scriptsection.
Note:You will currently not be able to update the Privileged OS account after dSource creation. The only way to achieve the change is to recreate the dSource.
If the Environment OS user will be used to create the dSource, make sure you have the following privileges:
access to the postgres commands
read+write+execute permissions on the `unix_socket_directories` configured in `postgresql.conf` [Default directories: `/var/run/postgresql` & `/tmp`]
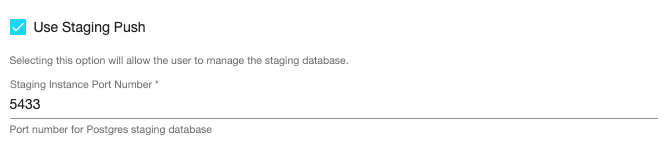
Select the checkbox next to the Use Staging Push option. Selecting this checkbox allows you to use the Staging Push Flow.
Provide Staging Instance Port Number. It must be unique for a given instance. Make sure the port number you have provided on the UI must match the port number in the postgresql.conf file.
Note:The staging push flow database configuration parameters defined in the Config Settings section will be ignored by the Plugin. You will have to take care of these configurations on your own from the backend.
Click Next.
In the dSource Configuration tab, enter a dSource name and select a group for your dSource.
Adding a dSource to a dataset group lets you set Delphix Domain user permissions for that database and its objects, such as snapshots. See the topics under Users and Groups for more information.In the Data Management tab, specify your Staging Environment, User, and Snapshot Parameters. Select the Resynchronize dSource checkbox if you want to resynchronize the dSource. Resynchronizing the dSource will force a non-incremental load of data from the source. This operation is similar to creating a new dSource, but avoids duplicating storage requirements and maintains timeflow history. Click Next.
In the Policies tab, apply policy details to the dSource if required, and then click Next.
In the Hooks tab, select a Hook Point and then click + to add a script to run at that point. You can define scripts to run at multiple hook points in the process.
In the Summary tab, review the configuration profile for the dSource.
Click Submit.
The dSource configuration screen
After you have created a dSource, the dSource Configuration tab allows you to view information about it and make modifications to its policies and permissions. In the Datasets panel, select the dSource you wish to examine. You can now choose the configuration tab to see information such as the Source files, Data Management configuration, and Hook Operations.