
HADR
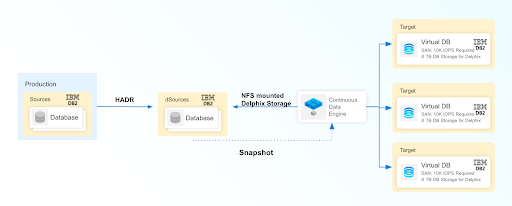
The following diagram demonstrates the architecture of the Delphix Continuous Data Engine support for the IBM Db2 database with HADR between the source and staging database. HADR ingestion type is supported only with non-partitioned databases and the terms staging and standby can be used interchangeably in this context.
Prerequisites
Be sure that the source and staging instances meet the host requirements and the databases meet the container requirements described in the requirements section.
The environment user or the privileged user must be able to run mount, unmount, mkdir and rmdir.
The Instance owner/user must have
dbadmandsecadmpermission.The instance owner/user must have a common group with the primary/os user.
HADR single standby database
The following database configuration settings must be set at the source:
db2 update db cfg for <DB_NAME> using HADR_LOCAL_HOST <PRIMARY_IP> HADR_LOCAL_SVC <PRIMARY_PORT > immediatedb2 update db cfg for <DB_NAME> using HADR_REMOTE_HOST <STANDBY_IP> HADR_REMOTE_SVC <STANDBY_PORT> immediatedb2 update db cfg for <DB_NAME> using HADR_REMOTE_INST <STANDBY_INSTANCE_NAME> immediatedb2 update db cfg for <DB_NAME> using HADR_SYNCMODE SUPERASYNC immediate
If the database configuration parameter LOGINDEXBUILD is set to OFF, do the following:
db2 update db cfg for <DB_NAME> using LOGINDEXBUILD ONTurn off all connections to the database and reactivate the database
If the database configuration parameter LOGARCHMETH1 is set to OFF, do the following:
db2 update db cfg for <DB_NAME> using LOGARCHMETH1 XXXX (must be a valid log archiving method)Take an offline backup
If LOGARCHMETH1 points to a third-party backup server (i.e. TSM or Netbackup) define LOGARCHMETH2 to disk
db2 update db cfg for <DB_NAME> using LOGARCHMETH2 DISK:<full path to archive log directory>Log files in the directory must be available from the time of the backup until the restore has successfully completed on the dSource.
db2 start hadr on db <DB_NAME> as primary by forceTake a full online backup as defined in the "How to take a full online backup of a db2 database" section.
Record the following information, as it must be entered on the Delphix Continuous Data Engine while creating the dSource.
HADR Primary hostname
HADR Standby SVC (auxiliary standby port)
HADR multiple standby databases
This assumes a single standby database HADR setup already exists. The existing standby will be referred to as the main standby. The new standby will be referred to as the auxiliary standby.
The following database configuration settings must be set on the primary database:
db2 update db cfg for <DB_NAME> using HADR_SYNCMODE <SYNC MODE> immediate -- set whichever sync mode you wish to use on your main standby.db2 update db cfg for <DB_NAME> using HADR_TARGET_LIST "<MAIN_STANDBY_IP:MAIN_STANDBY_PORT|AUXILIARY_STANDBY_IP:AUXILIARY_STANDBY_PORT>" immediateYou may have up to two auxiliary standbys defined and separated by a '|'. One of the auxiliary standbys must be the dSource.
db2 stop hadr on db <DB_NAME>.db2 start hadr on db <DB_NAME> as primary by force.Take a full online backup as defined in the "Backup Source Database" section below. While this backup is running, you may continue with the next step.
The following database configuration settings must be set on the existing main standby database:
db2 update db cfg for <DB_NAME> using HADR_SYNCMODE <same mode as defined in 1.a above.> -- It must be the same value used for the primary database.db2 update db cfg for <DB_NAME> using HADR_TARGET_LIST "<PRIMARY_IP:PRIMARY_PORT|MAIN_STANDBY_IP:MAIN_STANDBY_PORT>".
db2 stop hadr on db <DB_NAME>.db2 start hadr on db <DB_NAME> as standby.Record the following information, as it must be entered on the Delphix Continuous Data Engine while creating the dSource (the auxiliary standby database):
HADR Primary hostname
HADR Primary SVC
HADR Standby SVC (auxiliary standby port)
HADR_TARGET_LIST <PRIMARY_IP:PRIMARY_PORT|MAIN_STANDBY_IP:MAIN_STANDBY_PORT>
Enable SSL for HADR
Create a local keystore in a dedicated directory with suitable permissions on both the primary and standby instances, using the provided command. Ensure that the Db2 instance user grants 700 permissions to the directory, while for privileged elevation or low-privileged users, 750 permissions should be assigned to the directory.
gsk8capicmd_64 -keydb -create -db <KEYSTORE_NAME> -pw <PASSWORD> -type pkcs12
Note:Use an extension like ".ps12," ".p12," or ".pfx" for the keystore file name.
Use
-stashoption to create a stash file at the same path as the keystore, with a file extension of.sth. At instance start-up, GSKit uses the stash file to obtain the password to the keystore.
Update the database manager configuration for
SSL_SVR_KEYDBandSSL_SVR_STASH(if the stash file is created) on both the primary and standby instances:db2 update dbm cfg using SSL_SVR_KEYDB <KEYSTORE_FILE_PATH>db2 update dbm cfg using SSL_SVR_STASH <STASH_FILE_PATH>
Note:You must restart the instance to apply the configuration changes on both the primary and standby instances.
While it's possible to configure HADR with SSL without specifying the stash file, it's generally recommended to use the stash file to enhance security and automation. If you decide not to use a stash file and do not specify the
SSL_SVR_STASHparameter in the dbm cfg, you would be prompted to enter the password manually each time you start the Db2 instance. This can be done using the db2start command, and you will be prompted to enter the password.
You must restart the instance to apply the configuration changes on both the primary and standby instances.
You must add certificates on both the primary and standby instances. You can create a self-signed digital certificate or use a CA-signed certificate.
Create a self-signed digital certificate:
gsk8capicmd_64 -cert -create -db <KEYSTORE_NAME> -pw <PASSWORD> -label <CERT_LABEL_NAME> -dn "CN=<COMMON_NAME>"
CA-signed certificate:
gsk8capicmd_64 -cert -import -db <CA_SIGN_CERT> -pw <CA_SIGN_CERT_PWD> -target <KEYSTORE_NAME> -target_pw <PASSWORD>
Note: On the standby instance, use the label naming convention asDB_NAME>_*_STANDBY. If using CA signed certificate, rename the label based on a naming convention for the standby instance.
Extract the respective certificate’s public key to a certificate file on both the primary and standby instances:
gsk8capicmd_64 -cert -extract -db <KEYSTORE_NAME> -pw <PASSWORD> -label <CERT_LABEL_NAME> -target <CERT_NAME>.crt
Share the extracted certificates between the primary and standby instances.
Add the shared certificates to the Keystore on both the primary and standby instances:
gsk8capicmd_64 -cert -add -db <KEYSTORE_NAME> -pw <PASSWORD> -label <CERT_LABEL_NAME> -file <CERT_NAME>
Check and confirm that the labels used for the certificates are present in both the primary and standby instance's keystore:
gsk8capicmd_64 -cert -list -db <KEYSTORE_NAME> -pw <PASSWORD>
Limitation
All source, staging, and target environments must be on the same fix pack version.
For HADR SSL/TLS, a local keystore of type “PKCS12” with either a password provided by the user or a stashed password is supported.
Procedure
Login to the Delphix Management application.
On the Databases tab of the Environment Management screen, add a source config against the discovered staging instance.
Then, click Manage and select Datasets.
Click the Plus (+) icon and select Add dSource, you’ll get a list of available source configs using which you can go for dSource creation.
In the Add dSource wizard, select the required source configuration.
Provide the Database Name.
Optionally, provide a custom mount base using the Mount Base parameter.
Enter the complete Backup Path where the database backup file resides. If no value is entered, the default value used is the instance home directory. If there are multiple backup files for a non-DPF database on the backup path, the most current one will be used.
Optionally, provide multi-part backup using Additional Backup Path parameter.
Optionally, you can add the Parallelism factor for Database restore parameter.
Check the Link against the source using HADR checkbox. Selecting this checkbox reveals a collapsible group where the HADR-related details such as Primary hostname, service ports, target list and SSL/TLS related options that the end user wishes to configure HADR using SSL/TLS protocol.
If the dSource is set up to use HADR please enter the following fields. For more information about HADR please view High Availability Disaster Recovery under IBM Db2 glossary.
Enter a fully qualified HADR Primary Hostname. This is a required field for HADR and must match the value set for
HADR_LOCAL_HOSTon the master.Enter the port or
/etc/servicesname for the HADR Primary SVC. This is a required field for HADR and uses the value set forHADR_LOCAL_SVCon the master.Enter the port or
/etc/servicesname for the HADR Standby SVC. This is a required field for HADR and uses the value set forHADR_REMOTE_SVCon the master.
If the dSource is to use HADR with SSL, check the Configure SSL checkbox under HADR DETAILS. If a stash file is not available, provide the password for Key Store.
Optionally, you can set the database configuration parameters using Staging Database Configuration Settings.
Optionally, you can provide a bash script using the Use Plugin Hooks parameter.
Click Next.
Enter a name and select a group for your dSource. Adding a dSource to a dataset group lets you set Delphix Domain user permissions for that database and its objects, such as snapshots. See the topics under Users and Groups for more information.
Click Next and set the Staging Environment to be the same as the dSource host. Select the Staging Environment User to be the same as the instance owner of the dSource instance.
Info: If you need to change or add an environment user for the dSource instance, follow the instructions here.Ensure that the Staging environment must be the environment that you have chosen to create the source config.
Select the User from the drop-down and set the SNAPSHOT PARAMETERS for the dSource snapshot.Select Resynchronize dSource to resynchronize the dSource. This will force a non-incremental load of data from the source similar to when the dSource was created. This action avoids duplicating storage requirements and maintains a Timeflow history.
In the Policies tab, apply policy details to the dSource if needed, and then click Next to continue.
In the Hooks tab, select a Hook Point and then click + to add a script that you want to run at that hook point. You have the flexibility to define scripts to run at multiple hook points in the process.
In the Summary tab, review the configuration profile for your dSource.
Click Submit. The Continuous Data Engine will initiate two jobs, namely DB_Link and DB_Sync to create the dSource. You can monitor the progress of these jobs on the Running Actions section on the top right panel, or by navigating to System > Jobs. Upon successful completion of the jobs, the database icon will change to a dSource icon on the Environments > Host > Databases screen. The dSource will also be listed under Datasets within its assigned group.