
The PostgreSQL connector is managed through the Delphix Continuous Data Engine’s plugin framework. Plugins are distributed separately from the engine. The plugin must be installed before PostgreSQL Environments can be added, and before attempting any PostgreSQL virtualization operations.
Downloading the connector
Perform the following steps to download the PostgreSQL connector to your Desktop system.
-
Log in to the Delphix Download Portal using your credentials from the Delphix Support Portal.
-
Find the PostgreSQL plugin folder by navigating to the “Delphix Product Releases / Continuous Data Connectors / PostgreSQL” path and selecting the desired version’s folder.
-
Download the .zip plugin file by clicking "Plugin_postgreSQL_<version>.zip”.
-
After the download is complete, extract the contents of the downloaded .zip file to obtain a JSON file. For example, postgres.json.
Installing the connector
Perform the following steps to upload and install a new connector.
-
Log in to the Delphix Management application.
-
Navigate to the Manage > Plugins page.
-
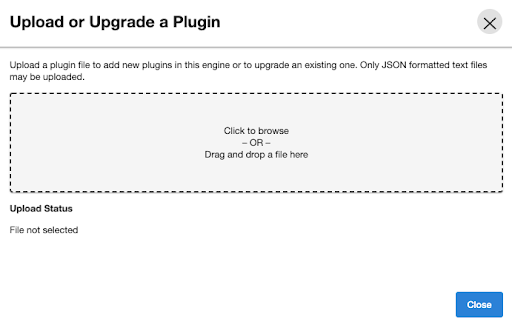
To upload a plugin, click the plus icon. This action displays a "Upload or Upgrade a Plugin" dialog window.
-
Browse to the JSON file on your desktop which you downloaded and extracted in the previous step
-
Upload the downloaded JSON (for example, postgres.json) file.
For more information, refer to the Delphix Continuous Data Engine connector management section.
Upgrading the connector
The connector must be upgraded to a specific version in order to accommodate new features and bug fixes that can affect its configuration. If the existing connector version is particularly old, connector upgrades may also require Delphix Continuous Data Engine upgrades.
Skipping a recommended version upgrade path may lead to configuration issues.
Perform the following steps alongside the upgrade path to ensure your configuration remains compatible with minimal disruption.
Standard upgrade process
Perform the following steps when you are upgrading to connector versions 2.0.0 and later.
-
Upload the connector with the higher version. For more information, refer to the Installing the PostgreSQL connector documentation.
-
Refresh all relevant environments associated with this connector.
-
Verify that the connector discovery process has been completed successfully.
-
Create fresh snapshots of both the dSource and VDB.
-
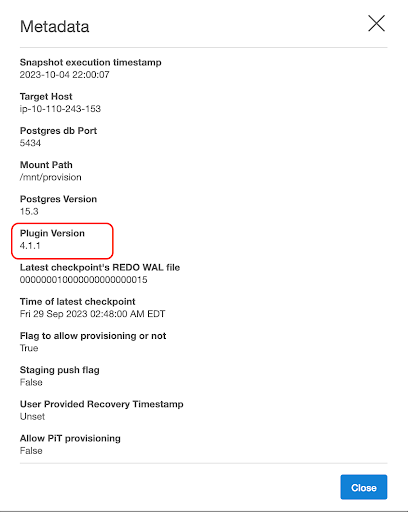
To confirm the new snapshots were taken successfully with the new connector versions, review the snapshot metadata on the new snapshot.
-
Starting with version 2.0.0, datasets, including dSources and VDBs, do not require a disable and re-enabled as part of the upgrade process.
Upgrade process for connector version before 2.0.0
Perform the following steps when you are upgrading to connector versions before 2.0.0.
-
Disable all the datasets, including both dSources and VDBs.
-
Upload the connector with the higher version. For more information, refer to the Installing the PostgreSQL connector documentation.
-
Refresh all the environments associated with it and verify that the connector discovery is completed successfully.
-
Re-enable all the datasets.
-
Create fresh snapshots of both the dSource and VDB.
Upgrade path
|
Currently Installed Version |
Recommend Upgrade Path |
|---|---|
|
4.0.0, 4.1.0, 4.1.1 |
Upgrade directly to the latest version to 4.2.0, 4.2.1, or 4.2.2. |
|
3.0.0, 3.1.0, 3.2.0 |
Upgrade to 4.1.1 using the standard upgrade directions. |
|
2.0.0, 2.1.0 |
Upgrade to 3.2.0 using the Standard Upgrade Directions. |
|
1.5.0, 1.5.1 |
Upgrade to 2.0.0 using the old upgrade directions. |
|
1.4.1, 1.4.2, 1.4.3, 1.4.4 |
Upgrade to 1.5.1 using the old upgrade directions. |
|
1.3.0 |
Upgrade to 1.4.4 using the old upgrade directions. |
|
1.2.0 |
Upgrade to 1.3.0 using the old upgrade directions. |
|
1.1.0 |
Upgrade to 1.2.0 using the old upgrade directions. |
|
1.0.1, 1.0.2 |
Upgrade to 1.1.0 using the old upgrade directions. After the upload, it is imperative to update two crucial parameters for the dSource using the Custom Configuration option in the user interface:
Note: A critical fault may appear on the dSource due to the engine's inability to locate the source configuration from which the dSource was originally created. Since manual discovery is now in use, mark this fault as resolved on the dSource's status tab. |