
Discovering SAP HANA installations
Discovery is a process that allows the SAP HANA connector to gather information about the SAP HANA installation details in an environment. The database’s discovery typically occurs as part of the initial environment setup process.
During the discovery process, the SAP HANA connector identifies the installations from the running SAP HANA instances on the host.
A staging environment must be added to the Delphix Continuous Data Engine before linking. Similarly, a compatible target environment, with equivalent SAP HANA binaries, must be added to the Delphix Continuous Data Engine to provide a provisioning location.
Installation of the SAP HANA connector, uploaded via a plugin, is required before the discovery of an SAP HANA environment can occur.
Once an environment is added to the Delphix Continuous Data Engine, environment discovery takes place automatically. Environment discovery is a process that enables the SAP HANA connector to determine SAP HANA installation details on a host. The same Environment Discovery process can be repeated during an Environment Refresh to detect new SAP HANA installations.
Prerequisites
Please note that the SAP connector must be installed before adding an environment and discovering its installations.
Adding an environment
This topic describes adding an SAP HANA staging and target environment. On completion, the SAP HANA installation will be automatically discovered.
Prerequisites
To set up an SAP HANA staging environment, ensure all the essential requirements, as described in Requirements and Prerequisites are met.
Procedure
Perform the following steps to add an environment to the Delphix Continuous Data Engine:
Login to the Delphix Management application.
Navigate to the Manage > Environments page.
Click the Actions ... menu and select Add Environment.
From the Add Environment dialog window, select Unix/Linux.
Select Standalone Host.
Click Next.
Provide the name of the environment.
Provide the Host IP address or host FQDN.
Provide the SSH port. The default value is 22.
Provide an Environment Username for the environment.
Choose the Login Type that fits your setup.
Username and Password – provide the environment username and password
Username and Public Key – provide the environment username
Password Vault – select from an existing Enterprise Password Vault
Note: Using Public Key Authentication
If you want to use public-key authentication for logging into your Unix-based environment, you have two options:
Use the Delphix Continuous Data Engine's key pair. For more information on how to use the Delphix Continuous Data Engine's key pair, refer to the How to use the Continuous Data Engine’s key-pair section.
Provide a key pair for this environment. As an alternative, a key pair specific for this environment can be provided via the API or CLI. For instructions, refer to CLI Cookbook: Setting up SSH key authentication for UNIX environment users.
For Password, enter the password associated with the user in step 11.
If you want to use Public Key Encryption for logging into your environment:
Select Public Key for the Login Type
Click View Public Key
Copy the public key that is displayed, and append it to the end of your
~/.ssh/authorized_keysfile. If this file does not exist, it must be created.
Note: The addition of the public key is a one-time requirement per user and per environment. Additionally, you have the option to add public key authentication to an environment user's profile via CLI (for details, refer to the CLI Cookbook: Setting up SSH key authentication for UNIX environment users topic).
For Password Login, click Verify Credentials to test the username and password.
Enter Toolkit Path (ensure that the toolkit path does not have any spaces).
To provide your own Oracle Java Development Kit, select the Provide my own JDK checkbox and click Next.
On the Java Development Kit page, provide an absolute path to your Oracle JDK and click Next.
Click Submit.
After successfully adding and discovering the environment, you should be able to view the newly added environment listed under the Environments tab. In case it does not appear, click the refresh icon in your browser.
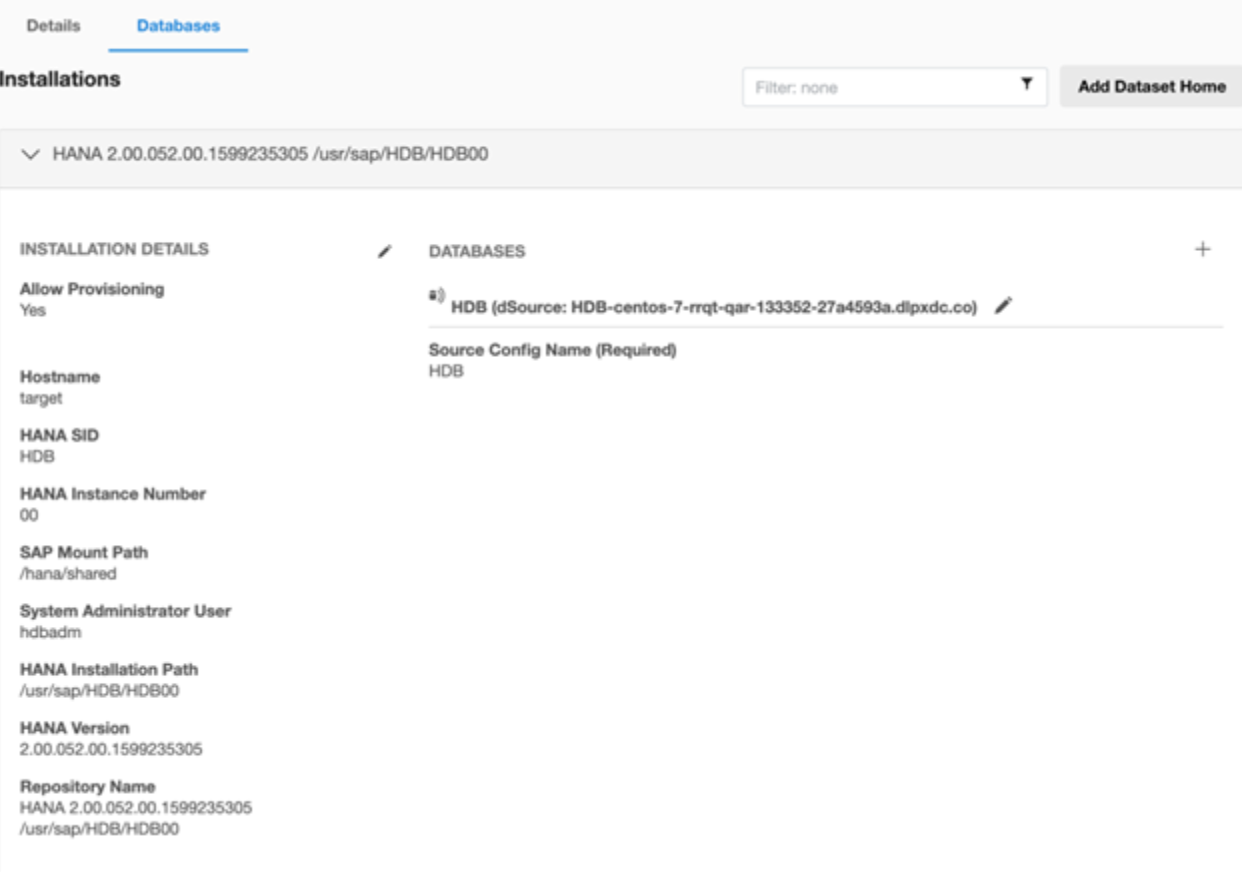
Perform the following steps to access environment information.
Navigate to Manage > Environments.
Select the environment name.
Review the Details and Databases tabs.
In case it does not appear, click the refresh icon in your browse
Once you have successfully added a staging environment, you can configure source database links by adding a Source Configuration to the discovered Installation. This is typically performed during the following linking data source process. Target environments do not have source database links.
Installation discovery
Unlike Oracle or Microsoft SQL Server connectors, installations are managed automatically with SAP HANA. If you have added a new SAP HANA Installation to your staging or target environment and want it to be reflected in the Delphix Continuous Data Engine UI, you must refresh the environment. For more information, refer to the "Environment Refresh" section on the Managing environments and environments page.