
Overview
More and more organizations use Enterprise Password Vaults (EPV) such as CyberArk and HashiCorp Vault to store securely and centrally manage identities and credentials. Delphix has added CyberArk, HashiCorp and Azure Key Vault support to the Delphix Virtualization Engine as a new authentication option for environments and databases. This minimizes the number of places where credentials need to be stored and, therefore the risk of insecure storage.
The Delphix Engine uses various authentication methods such as username/password, username/ssh key, and Kerberos credentials when connecting to hosts and databases from the Engine. These credentials are stored on the Delphix Engine in an encrypted format and can be retrieved later to perform various operations. Delphix provides an additional authentication method by integrating Virtualization with the most common vault types (CyberArk, HashiCorp. Azure Key Vault). At runtime, Delphix retrieves the credentials (passwords, ssh keys) from the customer's vault servers via API calls and avoids managing customer passwords.
Configuring password vaults
In the Setup app, system administrators can manage (add, delete, modify, and validate) vault configurations during and after the initial setup. Each engine can have multiple vaults configured of any type.
The authentication method supported for CyberArk is Certificate-based. Configuring a CyberArk vault requires providing a host address, port number, application ID, and a client certificate (certificate chain and private key).
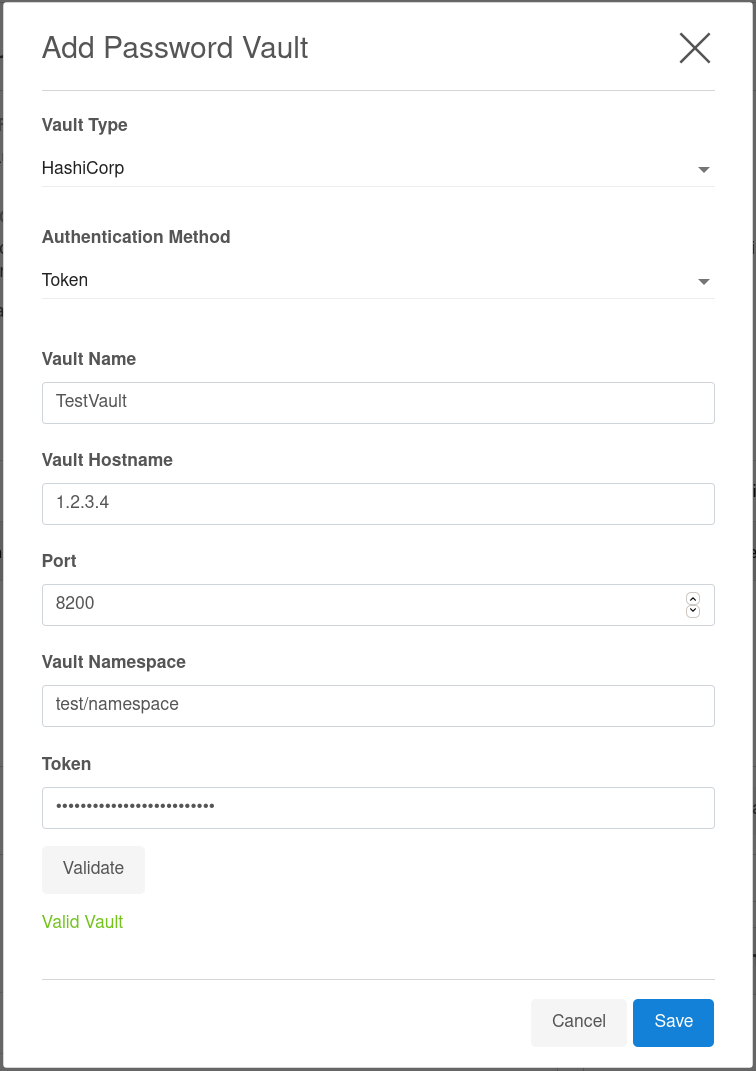
The authentication methods supported for HashiCorp vaults are Token-based, AppRole-based, and Certificate-based. Configuring a HashiCorp vault requires providing a token ID or a role ID and secret ID or a client certificate along with the host address and port number. For HashiCorp Enterprise vaults, a namespace can also be provided.
The authentication method supported for Azure Key Vault is Client-Secret-based. Configuring an Azure Key Vault requires providing the Azure tenant ID, client ID, and client secret.
Using password vaults
The Virtualization engine retrieves credentials at runtime from a vault using a unique identifier that locates a set of credentials in a configured vault. This occurs for any activity that requires Environment access (SnapSync, Validated Sync, LogSync, as well as Environment monitoring). This may result in a significant number of requests, so any existing connection rate limits should be evaluated and adjusted accordingly. For CyberArk, the unique identifier consists of a query string. For HashiCorp Vault, it consists of four parameters: engine, path, and a pair of keys that locate the username and secret (password or SSH key) in the key-value store at that engine and path. For Azure Key Vault, it consists of the Azure Vault Name (also known as the Resource Name within Azure Vault, not to be confused with the vault name that identifies the vault in the engine), username key, and secret key.
To set up an environment or database user to use a vault, use the credential type VaultCredential when adding/modifying such users and specify the vault and the unique identifier of the credentials.
Roles and privileges for CyberArk and HashiCorp users
|
Role |
Privileges |
|---|---|
|
System Administrator |
Can add, modify, delete, and list vault configurations. |
|
Delphix Administrator |
Can list existing vault configurations and link environment and database users to vault credentials. |
Supported environments and databases
All environment users can use vault credentials. For Windows, the initial link via the Delphix Connector does not support vaults, but environment users can be subsequently updated to use vaults.
Vault integration is currently supported for SAP ASE database users, Oracle database users, and MSSQL domain users using 6.0.4 and later.
Setting up a vault via GUI
Complete setup via the GUI is available for CyberArk as of 6.0.3.0, for HashiCorp as of 6.0.4.0 and for Azure Key Vault as of 10.0.0.0.
-
Connect to the Delphix Engine http://
-
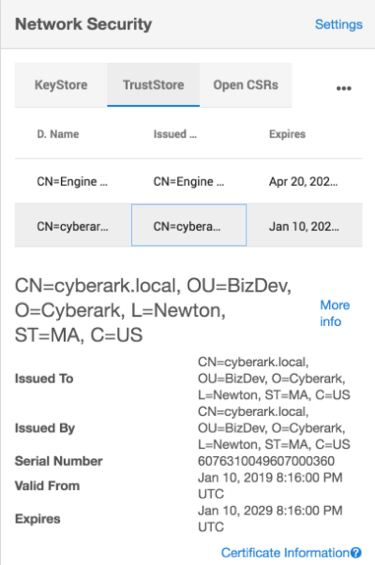
Add a CyberArk or HashiCorp CA certificate to the TrustStore as part of the initial configuration. Refer TrustStore Settings for steps to add a CA certificate.
-
Click on the Modify link in the top right of the Network Authorization panel.
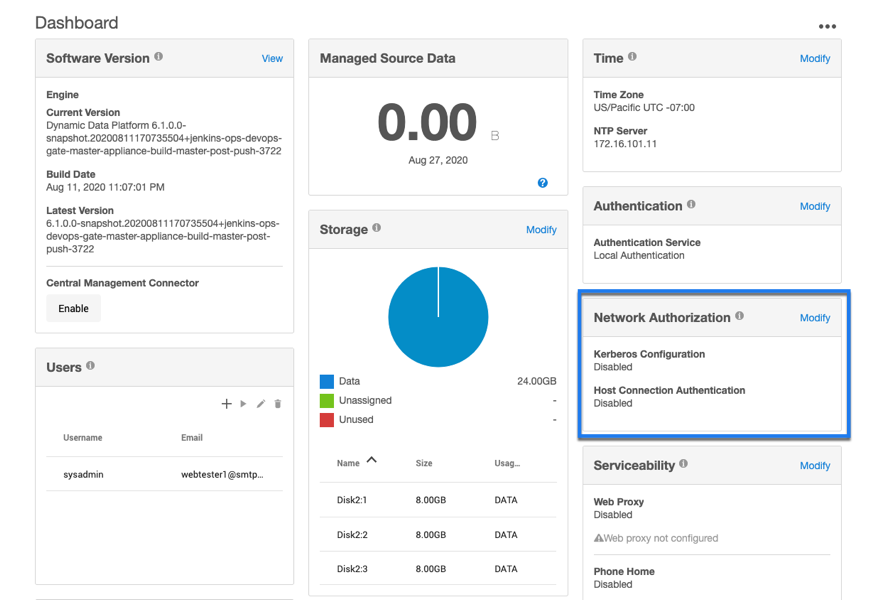
-
On the Network Authorization window, click "+" to add a new vault.
-
Enter the following information: Depending upon your requirements, you can set the configurations for CyberArk, HashiCorp, or Azure Key vault.
|
Field |
Possible value and Data Type |
Description |
|---|---|---|
|
Vault Type - CyberArk |
||
|
Vault Name |
<user-specified> Accepts a string value |
Specifies the user-specified vault name |
|
Vault Hostname |
Accepts a URL string value |
Specifies the location of the user's vault server |
|
Port |
443 Accepts an integer value |
Specifies the port number through which the communication will happen |
|
App ID |
MyAppID Accepts a string value |
Specifies an application ID registered with and provided by CyberArk |
|
Authentication Certificate |
——-BEGIN CERTIFICATE—-— <certificate> ——-END CERTIFICATE—-— Accepts a string value |
Specifies the authentication certificate provided by CyberArk |
|
Private Key |
<CyberArk-provided> Accepts a string value |
Specifies the private key provided by CyberArk for TLS based authentication |
|
Vault-Type - HashiCorp |
||
|
Authentication method |
Token |
|
|
Vault Name |
<user-specified> Accepts a string value |
Specifies the user-specified vault name |
|
Vault Hostname |
12.345.678.90 Accepts a URL string value |
Specifies the location of the customer vault server |
|
Port |
8100 Accepts an integer value |
Specifies the port number through which the communication will happen |
|
Vault Namespace |
purple Accepts a string value |
Specifies the namespace configuration specific to the user environment that is provided by the HashiCorp Enterprise Platform |
|
Token |
s.abcdefghijklmnopqrstuvwxyz123.waR7a Accepts a string value |
Specifies the token specific to the user environment that is provided by the HashiCorp Enterprise Platform |
|
Authentication method |
AppRole |
|
|
Vault Name |
<user-specified> Accepts a string value |
Specifies the user-specified vault name |
|
Vault Hostname |
12.345.678.90 Accepts a URL string value |
Specifies the location of the customer vault server |
|
Port |
8100 Accepts an integer value |
Specifies the port number through which the communication will happen |
|
Vault Namespace |
purple Accepts a string value |
Specifies the namespace configuration specific to the user environment. This feature is provided with the HashiCorp Enterprise Platform |
|
RoleID |
abcdefg123-4a56-7890-a2bc-34567def8901 Accepts a string value |
Specifies the RoleID specific to the user environment |
|
SecretID |
ab1cde0f-123g-4h56-i789-1234jk567890 Accepts a string value |
Specifies the SecretID specific to the user environment |
|
Authentication method |
Certificate |
|
|
Vault Name |
<user-specified> Accepts a string value |
Specifies the user-specified vault name |
|
Vault Hostname |
12.345.678.90 Accepts a URL string value |
Specifies the location of the customer vault server |
|
Port |
8100 Accepts an integer value |
Specifies the port number through which the communication will happen |
|
Vault Namespace |
purple Accepts a string value |
Specifies the namespace configuration specific to the user environment. This feature is provided with the HashiCorp Enterprise Platform |
|
Authentication Certificate |
——-BEGIN CERTIFICATE—-— <certificate> ——-END CERTIFICATE—-— Accepts a string value |
Specifies the authentication certificate provided by HashiCorp for TLS based authentication |
|
Private Key |
abcdefg123-4a56-7890-a2bc-34567def8901 Accepts a string value |
Specifies the private key specific to the user environment that is provided by HashiCorp for TLS based authentication |
|
Role Name
|
purple-admin-role Accepts a string value |
Specifies the certificate role name for TLS based authentication |
-
Click
Validate to check the configurations before saving the vault details. The below screenshot shows an example of the HashiCorp Vault configuration.
-
Click
Save.
The added configurations can be viewed in the Network Authorization window.
Editing a vault via the GUI
-
Connect to the Delphix Engine http:// <Delphix Engine>/login/index.html#serverSetup.
-
Click on the Modify link in the top right of the Network Authorization panel.
-
In the Network Authorization window, select a vault, then the pencil icon.
-
Edit your configuration.
-
Select Edit.
Deleting a vault via the GUI
-
Connect to the Delphix Engine http:// <Delphix Engine>/login/index.html#serverSetup.
-
Click on the Modify link in the top right of the Network Authorization panel.
-
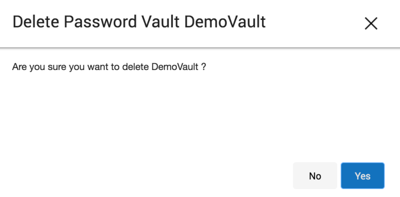
In the Network Authorization window, select a vault, then select the trashcan icon.
-
Select Yes to delete the vault.
Adding a host user for HashiCorp
-
Login to the Delphix Management Application and select Manage > Environments.
-
Select Add Environment.
-
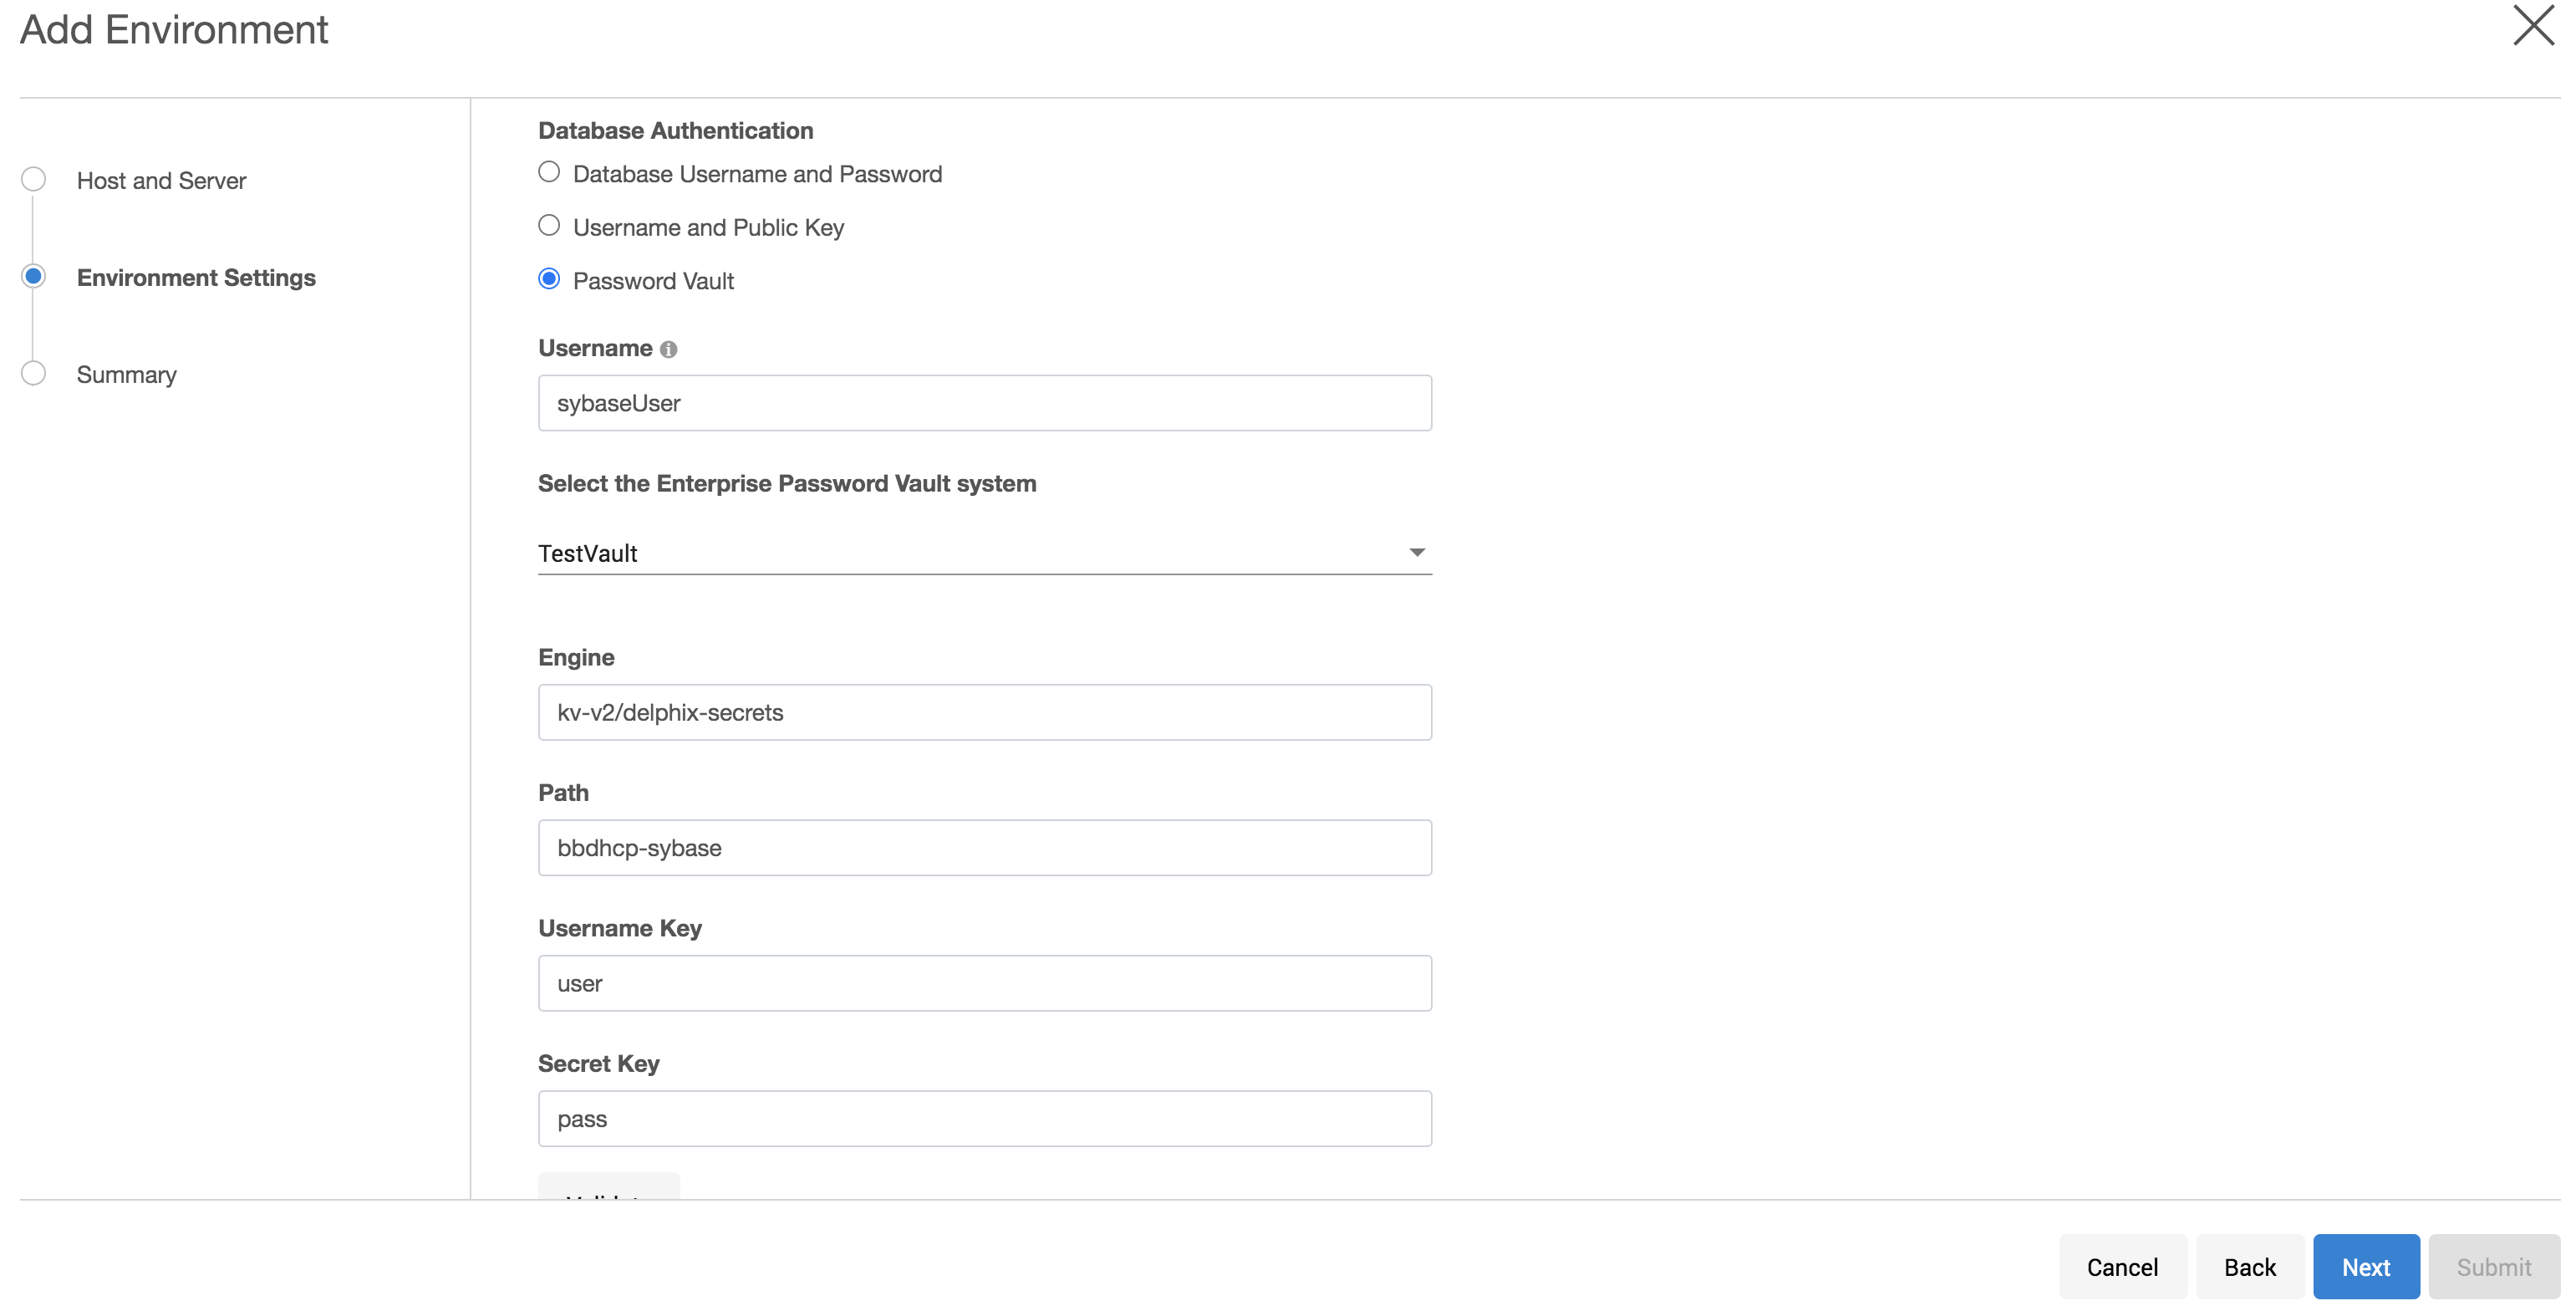
In the Environment Setting tab, select Password Vault as the Login Type.
-
Select the vault configuration and provide the secret engine name, path, and keys for the username secret and complete your environment configuration.
-
The environment will be created with the primary user using vault credentials.
Adding a database user for HashiCorp
-
Login to the Delphix Management Application.
-
Add dSource using database credentials from HashiCorp vault by selecting Password Vault as the Login Type.
-
Provide the appropriate secret engine name, path, and keys for the username secret and complete configuration.
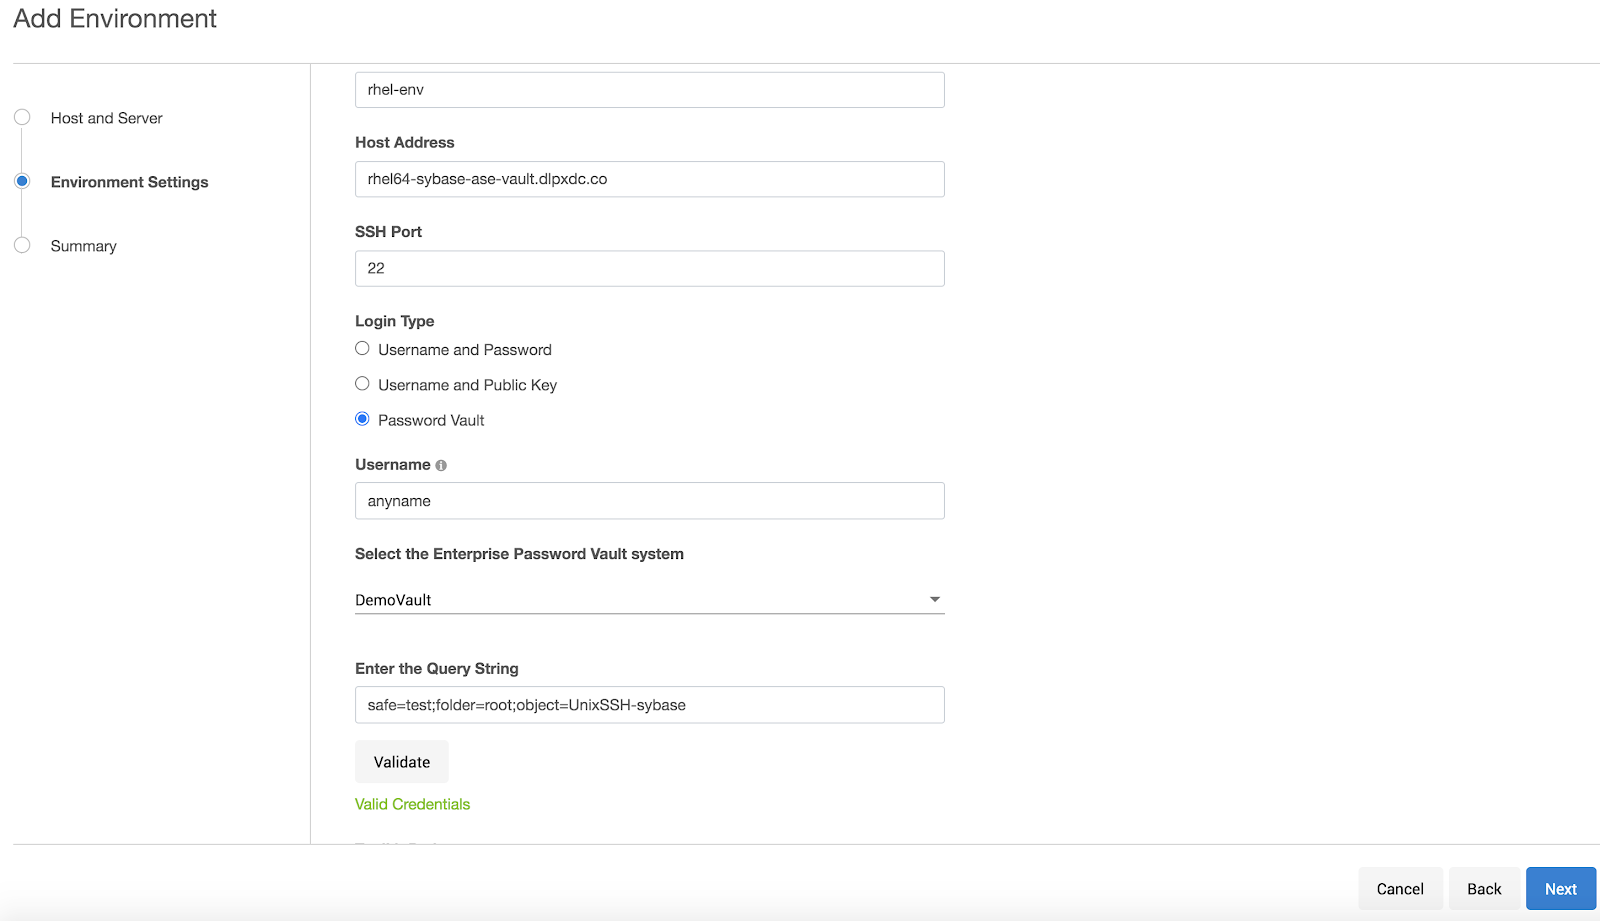
Adding a host user for CyberArk
-
Login to the Delphix Management Application and select Manage > Environments.
-
Select Add Environment.
-
In the Environment Setting tab, select Password Vault as the Login Type.
-
Select the vault configuration and provide the username, select the enterprise password vault system, and enter a query string that is a unique identifier pointing to the credentials to be retrieved and complete your environment configuration.
-
The environment will be created with the primary user using vault credentials.
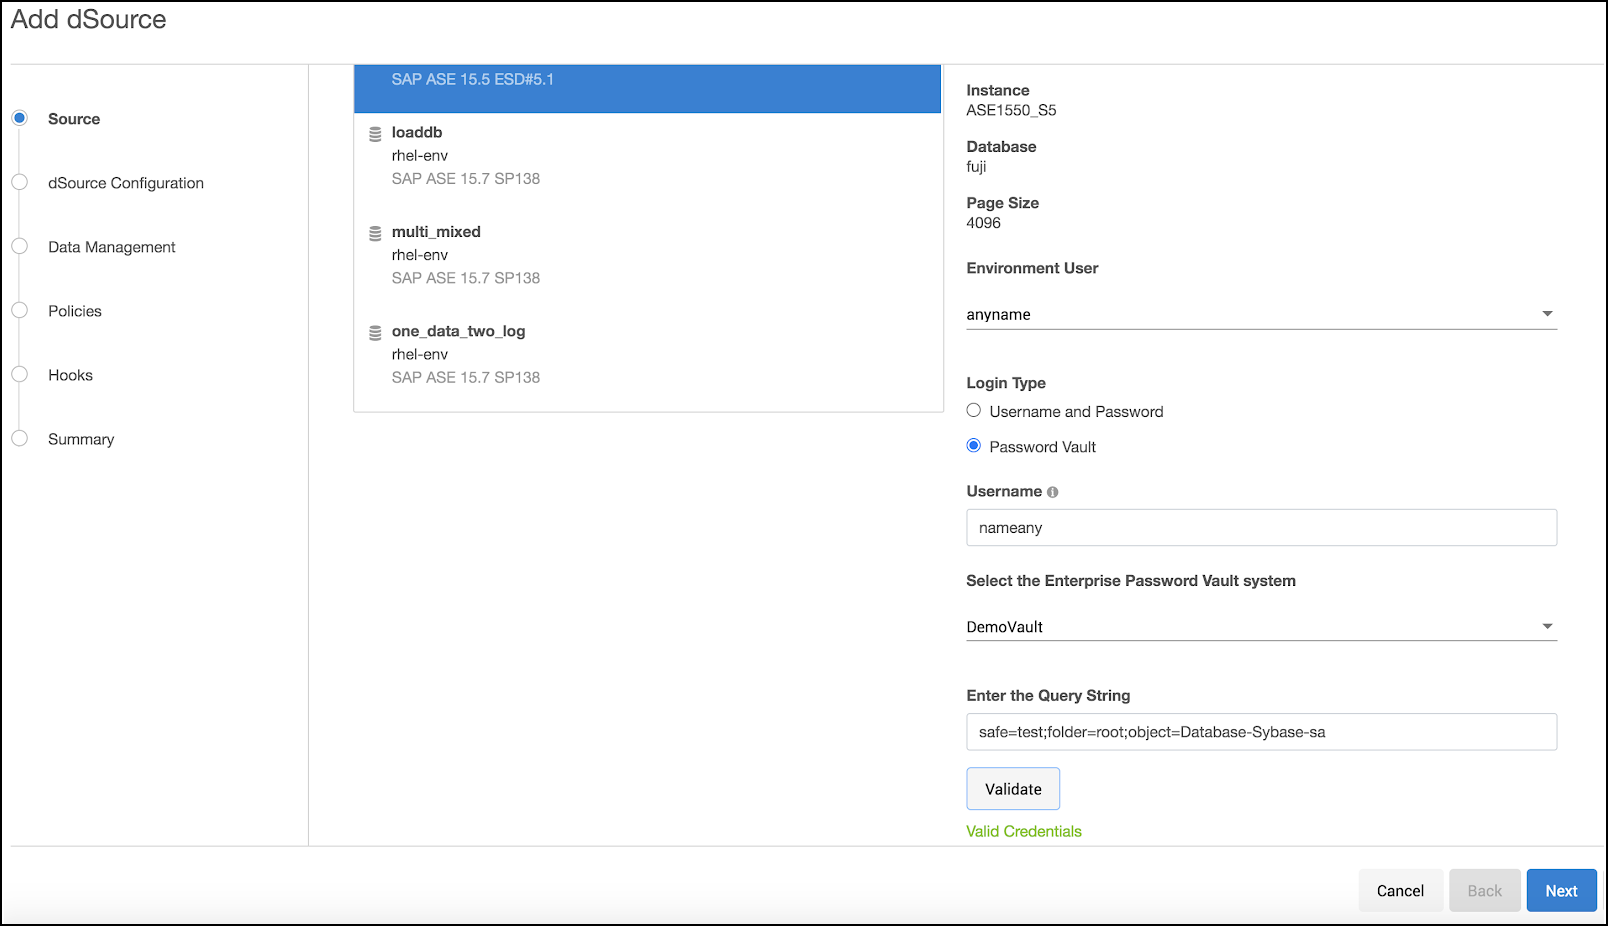
Adding a database user for CyberArk
-
Login to the Delphix Management Application.
-
Add dSource using database credentials from CyberArk vault by selecting Password Vault as the Login Type.
-
Provide the appropriate query string and complete configuration.
Setting up a vault via CLI
-
Login as a system administrator and add a CyberArk or HashiCorp CA certificate to the TrustStore as part of the initial configuration.
-
SSH to <Delphix Engine IP>service passwordVault and enter create.
ip-10-110-230-197 service passwordVault>create -
Add a new vault configuration by entering a name, host, port, applicationId, client certificate, and private key.
ip-10-110-230-197 service passwordVault create Properties type: CyberArkPasswordVault name: DemoVault (*) applications: Delphix (*) clientCertificate: type: PemClientCertificate (*) clientCertificateChain: (required) privateKey:(required) host: services-uscentral.sktyop.com (*) port: 17993 (*) -
Add a new HashiCorp vault configuration by entering a name, host, port, and other authentication information based on the authentication method (Token/AppRole/Certificate) selected.
HashiCorp - Token Based Authentication
ip-10-110-230-197 service passwordVault create
Properties
    type: HashiCorpVault (*)
    name: HashiCorpDemoVault (*)
    authentication:
        type: HashiCorpTokenAuthentication (*)
        token: ******** (*)
    host: 10.119.132.40 (*)
    port: 8200 (*)
HashiCorp - AppRole Based Authentication
ip-10-110-230-197 service passwordVault create
Properties
    type: HashiCorpVault (*)
    name: HashiCorpDemoVault (*)
    authentication:
        type: HashiCorpAppRoleAuthentication (*)
        roleId: 20d19a46-6fd9-c78b-b7e3-e43be4c8d5c2 (*)
        secretId: ******** (*)
    host: 10.119.132.40 (*)
    port: 8200 (*)
HashiCorp - Certificate Based Authentication
ip-10-110-230-197 service passwordVault create
Properties
    type: HashiCorpVault (*)
    name: HashiCorpDemoVault (*)
    authentication:
        type: HashiCorpCertificateAuthentication (*)
        clientCertificate:
            type: PemClientCertificate (*)
            clientCertificateChain: (required)
            privateKey: (required)
        roleName: (unset)
    host: 10.119.132.40 (*)
    port: 8200 (*)
Updating an existing vault configuration
ip-10-110-230-197 service passwordVault> select DemoVault
ip-10-110-230-197 service passwordVault 'DemoVault'>update
ip-10-110-230-197 service passwordVault 'DemoVault'update *> set name=TestVault
ip-10-110-230-197 service passwordVault 'DemoVault'update *> commit
ip-10-110-230-197 service passwordVault 'TestVault'>
Deleting an existing vault configuration
ip-10-110-230-197 service passwordVault 'TestVault'> delete
ip-10-110-230-197 service passwordVault 'TestVault' delete *> commit
ip-10-110-230-197 service passwordVault>
Adding/Modifying host users
Add an environment with user credentials from CyberArk vault. When adding a host/database user with a vault credential, the name field would be a user identifier and not the actual username. In case this field is empty, a unique identifier is generated with a hash of vault credentials.
ip-10-110-230-197 environment create *> set hostEnvironment.name=bbh-env
ip-10-110-230-197 environment create *> set hostParameters.host.address=bbdhcp-vault-demo.dlpx.co
ip-10-110-230-197 environment create *> set hostParameters.host.toolkitPath="/work"
ip-10-110-230-197 environment create *> set primaryUser.name=oracleUser
ip-10-110-230-197 environment create *> set primaryUser.credential.type=VaultCredential
ip-10-110-230-197 environment create *> set primaryUser.credential.vault=DemoVault
ip-10-110-230-197 environment create *> set primaryUser.credential.vaultCredentialId="safe-test;folder=root;object=UnixSSH-sybase"
ip-10-110-230-197 environment create *> commit
    `UNIX_HOST_ENVIRONMENT -6
    Dispatched job JOB-33
    ENVIRONMENT_CREATE_AND_DISCOVER job started for "bbh-env".
    ENVIRONMENT_CREATE_AND_DISCOVER job for "bbh-env" completed successfully.
Adding/Modifying database users
Add dSource using database credentials from CyberArk vault.
ip-10-110-230-197 database link *> set name=fuji
ip-10-110-230-197 database link *> set group=Untitled
ip-10-110-230-197 database link *> set linkData.config=ASE_SI_CONF-70
ip-10-110-230-197 database link *> set linkData.dbUser=sybaseUser
ip-10-110-230-197 database link *> set linkData.dbCredentials.type=VaultCredential
ip-10-110-230-197 database link *> set linkData.dbCredentials.vault=DemoVault
ip-10-110-230-197 database link *> set linkData.dbCredentials.vaultCredentialOd="safe-test;folder=root;object=Database-Sybase-sa"
ip-10-110-230-197 database link *> set linkData.loadBackupPath='/opt/sybase/dumps"
ip-10-110-230-197 database link *> set linkData.sourceHostUser=HOST_USER-7
ip-10-110-230-197 database link *> set linkData.stagingHostUser=HOST_USER-7
ip-10-110-230-197 database link *> set linkData.stagingRepository=ASE_INSTANCE-6
ip-10-110-230-197 database link *> set linkData.syncParameters.type=ASENewBackupSyncParameters
ip-10-110-230-197 database link *> commit
    `ASE_DB_CONTAINER-1
    Dispatched job JOB-39
    DB_LINK job started for "Untitled/fuji".
    DB_LINK job for "Untitled/fuji" completed successfully.
Update Existing Database Users
Convert an existing database to use vault credentials for the existing database user.
ip-10-110-230-197 > sourceconfig
ip-10-110-230-197 sourceconfig > select MyOraDB
ip-10-110-230-197 sourceconfig "MyOraDB" > update
ip-10-110-230-197 sourceconfig "MyOraDB" *> set credentials.type=CyberarkVaultCredential
ip-10-110-230-197 sourceconfig "MyOraDB" *> set credentials.vault=MyVault
ip-10-110-230-197 sourceconfig "MyOraDB" *> set credentials.queryString="safe-test;folder=root;object=UnixSSH-delphix_db"
ip-10-110-230-197 sourceconfig "MyOraDB" *> set db_user="Vault-User"
ip-10-110-230-197 sourceconfig "MyOraDB" *> commit
The set db_user="Vault-User" is an optional step. If the db_user field is not changed, then it will continue to hold the old value. This value may no longer be correct, or the change to Vault credentials may represent an increase in the customer's security stance, and they may not want their Delphix Admins to know the username.
Password Vault Cache
If it becomes necessary to reduce the number of vault access requests by the engine, you can enable caching in the vault configuration. To do this, enable the feature flag PASSWORD_VAULT_CACHE and set each vault's cacheEnabled to true, along with the desired cacheExpiryTimeMinutes value.
ip-10-110-230-197 service passwordVault create *> ls
Properties
    type: AzureVault
    name: (required)
    azureAuthentication:
        type: AzureCertificateAuthentication
        clientCertificate:
            type: KeystoreClientCertificate
            token: (required)
        clientId: (required)
        tenantId: (required)
    cacheEnabled: false
    cacheExpiryTimeMinutes: (unset)
ip-10-110-230-197 service passwordVault> select DemoVault
ip-10-110-230-197 service passwordVault 'DemoVault'>update
ip-10-110-230-197 service passwordVault 'DemoVault'update *> set cacheEnabled=true
ip-10-110-230-197 service passwordVault 'DemoVault'update *> set cacheExpiryTimeMinutes=5
ip-10-110-230-197 service passwordVault 'DemoVault'update *> commit
ip-10-110-230-197 service passwordVault 'DemoVault'>
Setting up Vault via API
The vault API allows users to add, modify, delete, and list vault configurations and retrieving user credentials on a Delphix Engine.
Endpoint - https://<Delphix Engine IP>/resources/json/delphix/service/passwordVault
Sample API Request
{
    "type": "CyberArkPasswordVault",
    "name": "DemoVault",
    "host": "services-uscentral.skytap.com",
    "port": 17993,
    "applicationId": "Delphix",
    "clientCertificate": {
        "type": "PemClientCertificate",
        "privateKey": "-----BEGIN PRIVATE KEY-----<>-----END PRIVATE KEY-----",
        "clientCertificateChain": {
            "type": "PemCertificateChain",
            "chain": [
                {
                    "type": "PemCertificate",
                    "contents": "-----BEGIN CERTIFICATE-----<>-----END CERTIFICATE-----"
                }
            ]
        }
    }
}
Deleting an existing vault configuration
{
    "type": "CyberArkPasswordVault",
    "name": "DemoVault",
    "host": "services-uscentral.skytap.com",
    "port": 17993,
    "applicationId": "Delphix",
    "clientCertificate": {
        "type": "PemClientCertificate",
        "privateKey": "-----BEGIN PRIVATE KEY-----<>-----END PRIVATE KEY-----",
        "clientCertificateChain": {
            "type": "PemCertificateChain",
            "chain": [
                {
                    "type": "PemCertificate",
                    "contents": "-----BEGIN CERTIFICATE-----<>-----END CERTIFICATE-----"
                }
            ]
        }
    }
}
Adding/Modifying host users
Add an environment with user credentials from CyberArk vault. When adding a host/database user with a vault credential, the name field would be a user identifier and not the actual username. In case this field is empty, a unique identifier is generated with a hash of vault credentials.
{
"type": "HostEnvironmentCreateParameters",
"primaryUser": {
"type": "EnvironmentUser",
"credential": {
"type": "VaultCredential",
"vault": "CYBERARK_PASSWORD_VAULT-1",
"vaultCredentialId": "safe=test;folder=root;object=UnixSSH-sybase"
}
},
"hostEnvironment": {
"type": "UnixHostEnvironment",
"name": "bbh-env"
},
"hostParameters": {
"type": "UnixHostCreateParameters",
"host": {
"type": "UnixHost",
"address": "bbdhcp-vault-demo.dlpxdc.co",
"toolkitPath": "/work"
}
}
}
Adding/Modifying database users
Add dSource using database credentials from CyberArk vault.
The following a sample API link request for MSSQL Domain User.
{

    "type": "LinkParameters",

    "name": "ReportServer",

    "group": "GROUP-1",

    "linkData": {

        "type": "MSSqlLinkData",

        "config": "MSSQL_SINGLE_CONFIG-5",

        "sharedBackupLocations": [],

        "encryptionKey": "",

        "sourceHostUser": "HOST_USER-3",

        "mssqlUser":{

         "password": {

         "type": "VaultCredential",

         "vault": "CYBERARK_PASSWORD_VAULT-2",

         "vaultCredentialId": "safe=test;folder=root;object=Database-MSSql-addtully"

         },

         "type": "MSSqlDomainUser"

        },

        "pptRepository": "MSSQL_INSTANCE-4",

        "pptHostUser": "HOST_USER-3",

        "ingestionStrategy": {

         "validatedSyncMode": "TRANSACTION_LOG",

         "type": "ExternalBackupIngestionStrategy"

        },

        "sourcingPolicy": {

         "logsyncEnabled": false,

         "type": "SourcingPolicy"

        },

        "syncParameters": {

         "compressionEnabled": false,

         "backupPolicy": "PRIMARY",

            "type": "MSSqlNewCopyOnlyFullBackupSyncParameters"

        }

    }

}