
Overview
This article outlines the procedure for deploying the Delphix Engine on AWS, using the Delphix Marketplace Image or Amazon Machine Image (AMI).
Procedure to install an AMI
Use the Delphix-supplied AMI file to install the Delphix Engine.
-
On the Delphix download site, select the AMI to be shared and accept the Delphix License agreement. Alternatively, use a link provided by the organization's Delphix solutions architect.
-
On the Amazon Web Services Account Details form presented:
-
Enter the AWS Account Identifier. To use the GovCloud AWS Region, be sure to enter the ID for the AWS Account which has GovCloud enabled.
-
Select which AWS Region that the AMI will be shared in. For an AMI shared in a different region, contact the organization's Delphix account representative to make the proper arrangements.
-
-
Click Share. The Delphix Engine will appear in the list of AMIs in AWS momentarily.
Subscribe to the Delphix virtualization engine marketplace image
-
Login to the AWS Console at https://aws.amazon.com/console.
-
Navigate to the AWS Marketplace.
-
In the Search field, enter Delphix.
-
Select the Delphix DevOps Data Platform for AWS. Select the appropriate offer based on the data you will ingest into the Delphix platform.
-
Review the information on the initial Marketplace page.
-
Click Continue to Subscribe.
-
Review the software subscription information and select the Manual Launch tab.
-
Select Accept Software Terms. Your subscription will take a few minutes to become enabled.
-
From the Subscription page, click Return to Product Page. There you will see Launch with EC2 Console enabled in all of the available regions.
Launching the Delphix engine
-
In the desired region, select Launch with EC2 Console. Launching will redirect to the standard EC2 instance launch process.
-
Select the size of the virtual machine to deploy. For supported instance types and capabilities, see Virtual machine requirements for AWS platform.
-
Click Next: Configure Instance Details.
-
Configure instance details as follows:
-
Set the number of instances to 1.
-
Purchasing option – Leave Request Spot Instances unchecked.
-
Network – Select the VPC into which the instance will be deployed.
-
Subnet – Select the Subnet into which the instance will be deployed.
-
Auto-assign Public IP – Select Disable.
-
Placement group – Optional. The default is No placement group.
-
IAM Role – None
-
Shutdown behavior – Stop
-
Enable termination protection – Yes (select checkbox). This ensures that the Delphix Engine is not accidentally terminated.
-
Monitoring – Optional
-
EBS-optimized instance – Yes (select checkbox)
-
Tenancy – Shared – Run a shared hardware instance
-
Network Interfaces– Eth0
Note : This option will not appear if a default subnet is chosen. In this case, the first option below will apply.
-
Auto-assign (default if using DHCP)
-
Enter static IP in Primary IP field (recommended for consistency)
-
-
-
Click Next: Add Storage.
-
By default, the Delphix Virtualization instance includes a 150GB OS volume. Ensure that this volume is set as a General Purpose SSD (GP2) type.
-
For traditional Block storage based engines
-
Using the Delphix Virtualization Engine Storage Calculator for AWS.xlsx, enter information from the predetermined inventory into the worksheet. This will automatically calculate the number, size, and IOPS required for the EBS volumes.
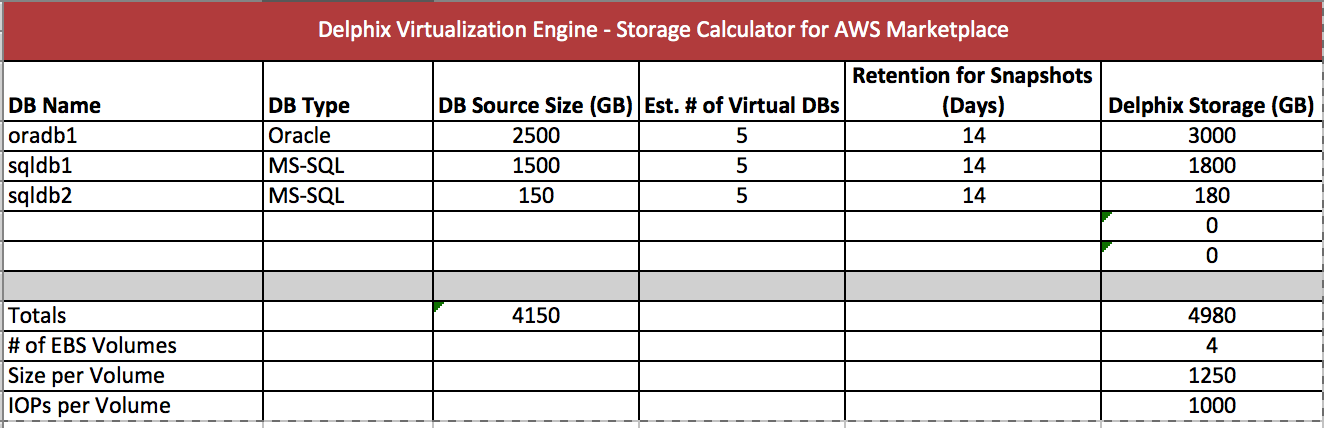
In the above example, there are three (3) source databases listed with their current sizes. Each is estimated to have 5 virtual copies as well as a 14-day retention period for snapshots/backups. The calculator indicates to add four (4) EBS-provisioned IOPS volumes, each being 1250GB with 1000 IOPS.
Note
This calculator is only for estimating the anticipated storage size and IOPS needs. A manual adjustment may be required prior to or after launch depending on storage and performance needs.
-
For Elastic Data Engines (Refer to Initial setup for additional details) s3 bucket acts as the storage and EBS disks as cache are used to reduce latencies for frequently read data and as temporary storage for synchronous writes before the writes are sent to object storage. Make sure the disks satisfy the I/O needs of the engine. You can always add disks later if the cache is insufficient. You can only reduce the cache by removing disks, so if you think you are over provisioning the cache, increase the number of disks used and reduce the size of each disk so that removal is possible at a later point in time. When selecting disks for Elastic Data Engines:
-
gp3 disks are recommended as they offer good performance at a lower cost. At 500 IOPS per 1GiB ratio, a 32 GiB volume can be configured to have the gp3 volume 16K IOPS limit and 1000 MB/s throughput. For reference, r5n.8xlarge instance has a 30K IOPS and 850 MB/s throughput limits so two gp3 devices would be sufficient for the instance.
-
io2 disks have lower latency at a higher cost. However, the lower latency is not beneficial once the instance IOPS or throughput limit is reached.
-
-
-
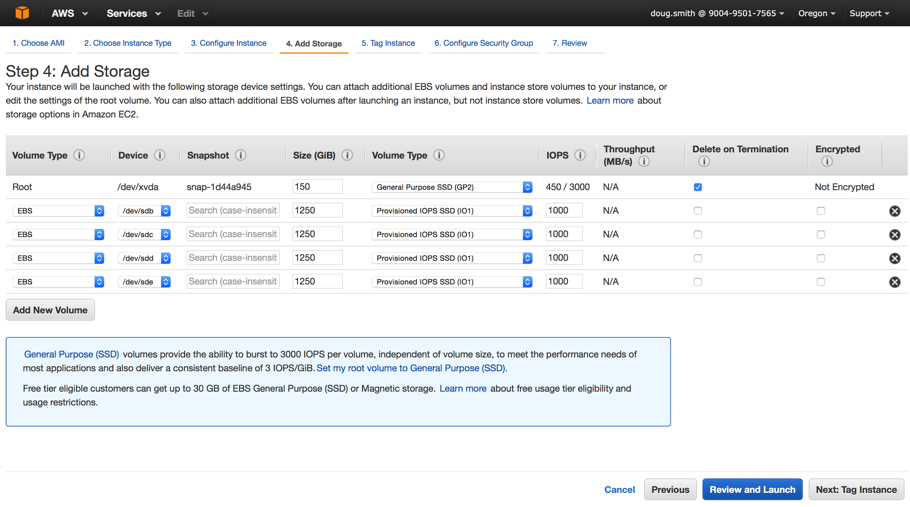
Click Add New Volume. The new volume will be created using the specifications in the estimation provided. The below values are sample values set for a Volume Type. See EBS configuration for related information.
-
Volume Type – EBS
-
Device – Use default provided
-
Size (GiB) – 1250
-
Volume Type – Provisioned IOPS SSD (IO1) Delphix deploys as an EC2 instance on AWS using EBS volumes for storage. AWS provides the following options for Elastic Block Storage (EBS) storage volumes, namely
-
Standard
-
General Purpose SSD (GP2)
-
General Purpose SSD (GP3)
-
Provisioned IOPS SSD (IO1)
-
-
IOPS – 1000
-
Delete on Termination – Optional. If this option is not set and the Delphix Engine is terminated, the EBS volumes will persist, and they will need to be removed manually.
-
Encrypted – Optional
-
-
Follow the above procedure for adding as many EBS volumes as specified in the calculator. Based on the example above, the storage configuration would look as follows:
-
Verify the storage configuration matches the output from the calculator.
-
Click Next: Tag Instance.
-
To provide a name for the Delphix Virtualization Instance, enter it in the Value field corresponding to the Key Name.
-
Click Next: Configure Security Group.
-
Assign a security group. Do one of the following:
-
Create a new security group.
-
If an existing security group meets Delphix requirements, it can be selected. For more details on required and recommended ports for general Delphix usage, see General network and connectivity requirements.
-
-
Click Review and Launch.
-
Verify the Delphix Virtualization Instance details and click Launch.
-
Proceed without a key pair.
-
Select the I acknowledge checkbox.
-
Click Launch Instances.
-
Click View Instances.
-
To complete the initial Delphix Virtualization Engine configuration, wait for the instance to be up and running. The status is available on the Instances page. Note that it can take up to 15 minutes for the first launch of Delphix, and even if the status of the server is “running” it may not yet be ready.
Configuring the Delphix engine
-
Connect to the running Delphix instance with a web browser. Use the IP address or DNS name noted in the Instance Description.
-
Upon successful connection, the browser will automatically redirect to the Delphix Setup Page.
-
Refer to the standard product deployment instructions to complete the Delphix deployment.
Logging in for the first time
On the first time login to the Delphix Engine, follow these steps:
-
Enter the default Administration User: sysadmin.
-
Enter sysadmin for the password (when installing a new engine via AWS AMI, the initial sysadmin password is the AWS Instance ID).
Note
Find the <Instance ID> in the Instances section of the AWS EC2 Management Console. -
Once redirected, enter the following as prompted:
-
Email address for the admin account.
-
A new password. This password will be used for the Engine Administrator with the username "admin".
-
Confirm the new password.
Note:From now on, this is the password used to log in to the Delphix Engine Administrator interface to manage Datasets.
-
-
Click Continue.
Next steps
Congratulations! The Delphix Virtualization Engine should be successfully deployed in AWS.
Use Delphix documentation to learn how to:
-
configure a database source
-
configure target environments
-
create virtual databases (VDBs)