Provisioning the Oracle EBS DBTechstack
Prerequisites
Meet the following requirements to create a VDB:
Identify an originating dataset and snapshot.
Link a dSource by following the instructions in Requirements for Oracle EBS databases for linking.
Select a VDB that has been previously provisioned.
Set up an EBS target environment as described in Requirements for target databases.
To use privilege elevation, you must meet the Privilege Elevation Requirements.
Maintain the integrity in names(CDB name, PDB name, DB hostname, /etc/hosts file format nomenclature). During DBTechstack, vPDB or vDB provisioning, maintain the same lower case and use the same name vPDB during virtual AppsTier provision as well. There is no restriction on using UPPER or LOWER case characters. However, it is recommended to maintain consistency.
Snapshot coordination: Changes applied to EBS and picked up only in certain dSource snapshots may make certain combinations of snapshots across the AppsTier and dbTier incompatible. When provisioning, refreshing or rewinding a virtual EBS instance, be sure the points in time you select for each dataset are compatible with each other.
The source DB host may have multiple DATA_TOPs but the target DB host will be provisioned with a single DATA_TOP that resides on the target Mount Base path provided during the database provisioning.
Procedure
Perform the following steps to provision a DBTechstack VDB.
Login to the Delphix Management application.
Click Manage.
Select Datasets.
Select the DBTechstack dSource.
Click the TimeFlow tab.
Select a dSource snapshot.
Click Provision.
The Provision VDB wizard will open.Select an Environment.
This environment will host the virtual DBTechstack and be used to execute hook operations specified in step 15 in the section.Select E-Business Suite R12.2 DBTechstack from the Installation dropdown.
Select an Environment User.
This user should be the Oracle user-outlined in the Requirements for Oracle EBS target databases for provisioning
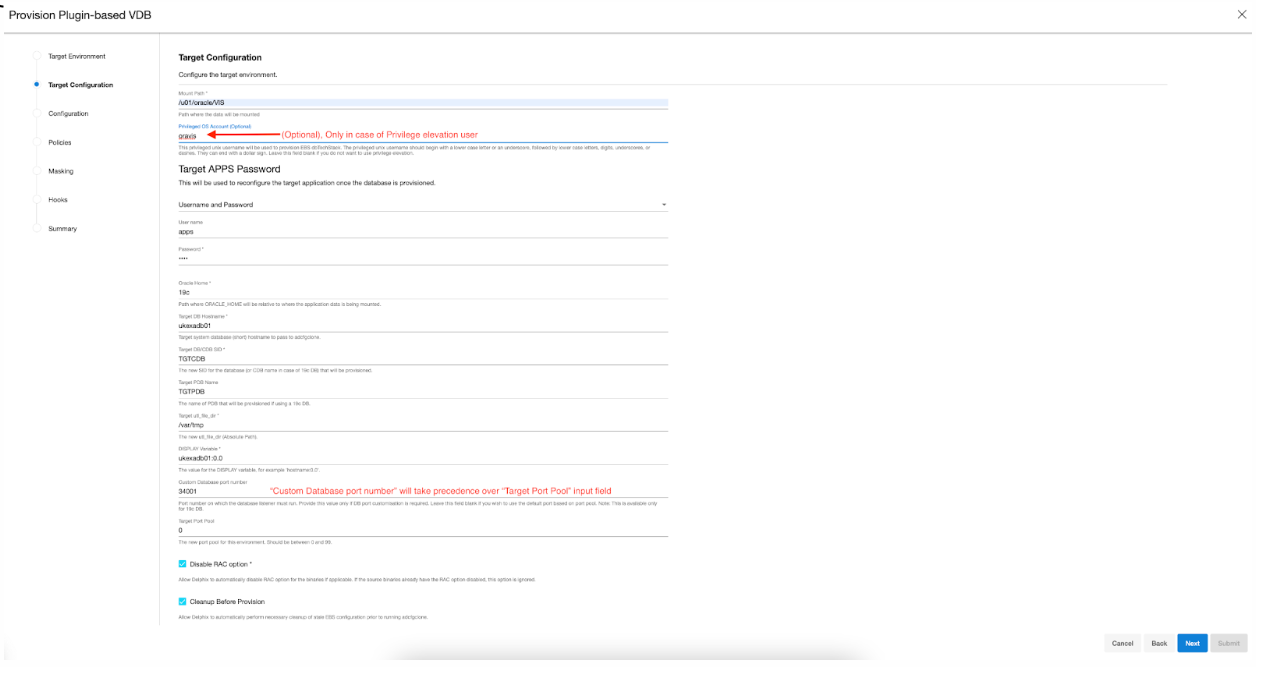
Enter a Mount Path for the virtual DBTechstack files.
Enter the EBS-specific parameters for the virtual DBTechstack. A subset of these parameters is discussed in more detail below.
The Privileged OS Account (Optional) field should contain the high-privileged user when the low-privileged user is being used for provisioning.
The Target APPS Password is the new apps password that is required to configure virtual DBTechstack. This password is encrypted when stored within the Delphix Continuous Data Engine and is available as an environment variable to the adcfgclone process.
Provide source Oracle home directory name relative to Oracle base installation directory that was provided during linking of DBTechstack in Oracle Home input field.
Ensure that the Target DB Hostname value is the short hostname, not the fully qualified hostname.
The Target DB/CDB SID is the new database SID (CDB SID in case of 19c) that is required to configure the virtual DBTechstack.
The Target PDB Name field is added for the pluggable database to be configured for the Oracle 19c database. Please leave this field empty when using the Oracle 11g/12c database.
Provide Target utl_file_dir , the default value for this field will be “/var/tmp". The utl_file_dir initialization parameter is deprecated in Oracle Database 12c Release 2 (12.2.0.1).
Provide DISPLAY Variable, the default value is hostname:0.0
[Optional] Provide the Custom Database Port Number on which the database listener must run.
Info: Enter a numeric port value in this field only if you want to use DB port customization. Leaving this field blank automatically uses the default port based on the port pool. The custom database port number is applicable only for the Oracle 19c database.To run the DBTechstack and listener on a custom DB port, it is recommended to provide Target Port Pool value either as default or 0; also the Target Port Pool value in DBTechstack is not related to Run/Patch Edition Port Pool value in AppsTier.
Provide Target Port Pool, please provide an available port pool. By default, the value is 1. The range for this value is 0 to 99.
Enable the Disable RAC option if you want to permit the Delphix Continuous Data Engine to automatically disable the RAC option for the binaries when applicable. The Disable RAC option is ticked(enabled) by default. This option is necessary if provisioning from a dSource with RAC dbTier because the binaries are relinked with the rac_on option even after running adcfgclone. If the source binaries already have the RAC option disabled (also the case for SI dbTier), the Delphix Continuous Data Engine ignores this option.
Enable the Cleanup Before Provision Option if you want to permit the Delphix Continuous Data Engine to automatically clean up stale EBS configuration during a refresh. This option is recommended, but only available if your Oracle Home is patched with Oracle Universal Installer (OUI) version 10.2 or above.
With this option enabled, the Delphix Continuous Data Engine will inspect the target environment's oraInventory prior to refreshing this virtual DBTechstack. If any Oracle Homes are already registered within the specified Mount Path, the Delphix Continuous Data Engine will detach them from the inventory prior to running adcfgclone. These homes must be detached prior to running post-clone configuration. If they are not detached, adcfgclone will fail, citing conflicting oraInventory entries as an issue.
Without this option enabled, Oracle Homes that conflict with the specified Mount Path will be reported in an error instead of automatically detached. For refresh to succeed, you must manually detach conflicting Oracle Homes prior to refresh.
Provide Oracle OS User and Group, it’s optional.
Click Next.
Enter a VDB Name.
Select a Target Group for the VDB.
If necessary, click the green Plus icon to add a new group.(Optional)When provisioning a new VDB in the VDB Provisioning wizard, check the Auto VDB Restart box. Reference - Automatich VDB restart on target server after reboot.
Select a Snapshot Policy for the VDB.
If necessary, click the Plus icon to create a new policy.
To avoid SnapSync conflicts, spread out your SnapSync policies for an EBS instance by one hour or more.Click Next.
(Optional) Enter any custom hook operations that are needed to help correctly manage the virtual DBTechstack files. For more information about these hooks, when they are run and how operations are written, visit the Hook scripts for automation and customization page and section.
The Configure Clone hook will be run after the adcfgclone.pl tool has both mounted and configured the DBTechstack.Click Next.
Click Submit.
When provisioning starts, you can review the progress of the job in the Datasets panel, or in the Job History panel of the Dashboard. When provisioning is complete, the DBTechstack VDB will be included in the group you designated and listed in the Datasets panel. If you select the DBTechstack VDB in the Datasets panel and click the Configuration tab, you can view information about the virtual files and its Data Management settings.
For tips on monitoring the progress of DBTechstack provisioning, see Monitoring EBS R12.2 DBTechstack Provisioning Progress
Registering the EBS DBTechstack before database provisioning
Register the freshly-provisioned DBTechstack with the Delphix Continuous Data Engine.
It is a mandatory step to register the freshly-provisioned DBTechstack so we can provision the VDB using this ORACLE_HOME only.
There are two ways to discover the new DBTechstack ORACLE_HOME are as below -
First approach:
Refresh the dbTier environment.
Refreshing the environment will discover an EBS database listener and ensure it is available for selection when provisioning the EBS database.Click the Refresh button in the top right-hand corner of the environment card.
Note: If the DBTechstack is not discovered by the first approach, follow the second approach to discover it manually.
Second approach:
Login to the Delphix Management application.
Click Manage.
Select Environments.
Select the target dbTier environment.
Click the Databases tab.
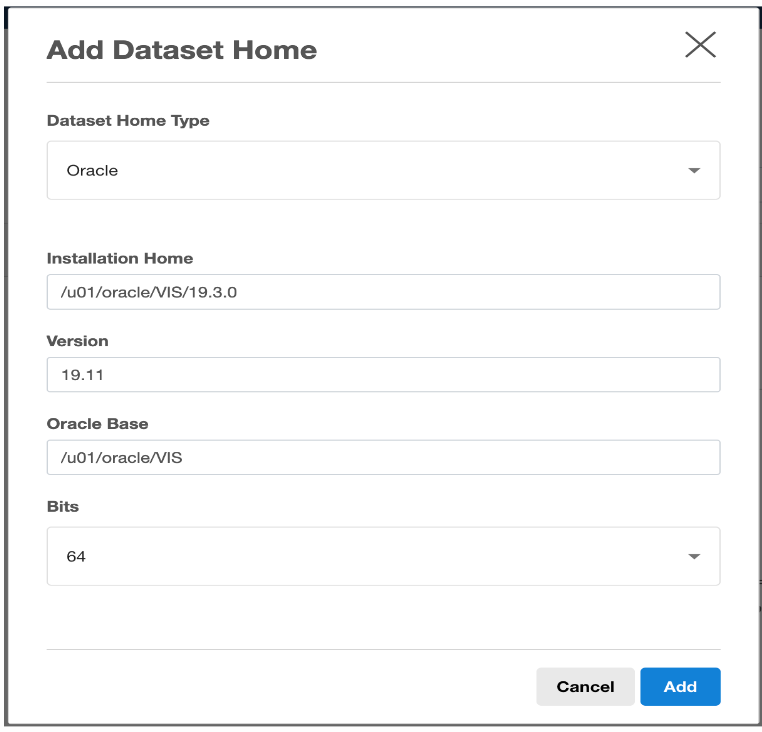
Click the Add Dataset Home button.
Select Oracle as your Dataset Home Type.
Enter an Installation Home.
This path should be the value of $ORACLE_HOME on your target dbTier; this path will live under the Delphix mount path specified when you provisioned the virtual DBTechstack.
Commonly, this path looks like /u01/oracle/VIS/11.2.0.Enter the version of your Oracle installation in the Version textbox.
Enter the Oracle Base directory in the Oracle Base field.
Click the add button to save your dataset home.
If necessary, scroll down the list of dataset homes to view and edit this dataset home.