
User management activities
This document describes the process of creating a user and assigning that user to a data container. It also provides an overview of the User Details page.
Creating a User
Follow the same process when creating a new user or modifying an existing Delphix user. Delphix Self-Service users do not have access to the existing admin user interface, and they can only access the Data Container page for containers they own.
-
From the Management application, select Manage.
-
Select Users.
-
Click + to add a new user or to make an existing Delphix Engine user a Delphix Self-Service user, select the user from the list.
-
Enter the appropriate information.
-
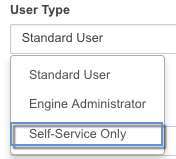
From the User Type drop-down menu, select Self-Service Only.
-
Press Submit.
The user is now a Delphix Self-Service user! They can now login to the Delphix Self-Service user interface, and you can make them the owner of a data container.
Notes
-
Users will only be able to access the Data Management page. They will not be able to access the other portions of the Delphix Self-Service interface, nor the Management application.
-
A Delphix admin user cannot be made a Self-Service Only user. However, admins can still use Delphix Self-Service and own a data container. Admins are also able to manage all data containers.
-
A user who owns one or more data containers cannot be deleted.
-
For the list of data containers that a given user owns, see User Details.
-
-
You cannot revoke a user's Self-Service Only role if they own any data containers.
-
For the list of data containers that a given user owns, see User Details.
-
Assigning a user to a data container
This section describes how to assign a user (created in the previous section) to a data container. Making a user the owner of a data container allows them to perform operations such as Refresh on that data container. Users cannot see or manipulate data containers that they do not own. You can either assign a user when creating a new data container or modify the owner of an existing data container.
Case 1: Assigning a user to a new data container
-
Navigate to the Overview page.
-
Select a template from which you want to create the data container. This will take you to the Data Template page.
-
In the upper right-hand corner of the screen, click Add Container.
-
Optional: Enter information about the data container, such as the Name and Description.
-
Select the Owners for the data container from the search box. It is acceptable to have multiple owners for each data container.
-
Select the VDBs to use for this container's data sources and Save.
Case 2: Changing the owner of an existing data container
-
On the Management Overview page, select the data template from which the data container was provisioned.
-
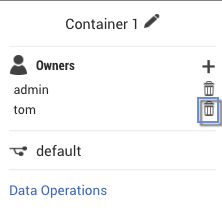
Click the Containers tile in the left-hand panel.
-
Select the trash can icon next to the username.
-
Click the Plus icon.

-
Select the desired owner from the drop-down list.
The user you selected is now the owner of the data container and can perform operations on that data container.
User details page
This section provides an overview of Delphix Self-Service User Details. This page displays graphs related to the user's Delphix Self-Service activity, as well as a list of all of the data containers that the user owns.
-
On the Management Overview page, click the Users tab.

-
Select the name of the desired user to go to their User Details page.
The following sections will display important information:
|
Section |
Information displayed |
|---|---|
|
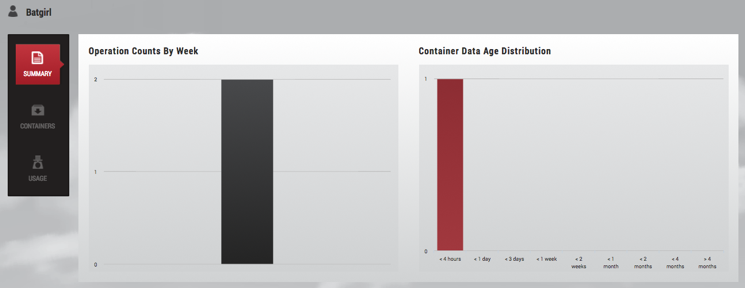
Operation Counts By Week graph |
Shows the aggregate of all Delphix Self-Service operations performed this user has performed on all of their containers. |
|
Container Age Distribution graph |
Shows the average time since a data operation was performed on all of the user's containers |
|
Containers |
Lists all containers that the user owns |
User Details