
Quick start guide for Db2
This quick start guide, which is excerpted from the larger User Guide, is intended to provide you with a quick overview of working with DB2 database objects in the Delphix Engine. It does not cover any advanced configuration options or best practices, which can have a significant impact on performance. It assumes that you are working in a Lab/Dev setting and attempting to quickly test Delphix functionality. It assumes you will use the VMware Hypervisor.
Overview
In this guide, we will walk through deploying a Delphix Engine, starting with configuring Source and Target database environments. We will then create a dSource, and provision a VDB.
For purposes of the QuickStart, you can ignore any references to Replication or Masking.
Deploy OVA on VMware
Use the Delphix-supplied OVA file to install the Delphix Engine. The OVA file is configured with many of the minimum system requirements. The underlying storage for the install is assumed to be redundant SAN storage.
Download the OVA file from https://download.delphix.com. You will need a support login from your sales team or a welcome letter.
Navigate to the Delphix Product Releases/<Current Version>/Appliance Images page.
Login using the vSphere client to the vSphere server (or vCenter Server) where you want to install the Delphix Engine.
In the vSphere Client, click File.
Select Deploy OVA Template.
Browse to the OVA file.
Click Next.
Select a hostname for the Delphix Engine.
This hostname will also be used in configuring the Delphix Engine network.Select the data center where the Delphix Engine will be located.
Select the cluster and the ESX host.
Select one (1) data store for the Delphix OS. This datastore can be thin-provisioned and must have enough free space to accommodate the 127GB comprising the Delphix operating system.
Select four (4) or more data stores for Database Storage for the Delphix Engine. The Delphix Engine will stripe all of the Database Storage across these VMDKs, so for optimal I/O performance, each VMDK must be equal in size and be configured Thick Provisioned - Eager Zeroed. Additionally, these VMDKs should be distributed as evenly as possible across all four SCSI I/O controllers.
Select the virtual network you want to use.
If using multiple physical NICs for link aggregation, you must use vSphere NIC teaming. Do not add multiple virtual NICs to the Delphix Engine itself. The Delphix Engine should use a single virtual network. For more information, see Optimal Network Architecture for the Delphix Engine.Click Finish.
The installation will begin and the Delphix Engine will be created in the location you specified.Once the installation has completed, power on the Delphix Engine and proceed with the initial system configuration as described in Setting Up Network Access to the Delphix Engine.
If your source database is 4 TB, you probably need 4 TB of storage for the Delphix Engine. Add at least 4 data disks of similar size for the Delphix VM. For example: for a source database of 4 TB, create 4 VMDKs of 1 TB each.
For a full list of requirements and best practice recommendations, see Virtual Machine Requirements for VMware Platform.
Setup network access to the Delphix engine
Power on the Delphix Engine and open the Console.
Wait for the Delphix Management Service and Delphix Boot Service to come online.
This might take up to 10 minutes during the first boot. Wait for the large orange box to turn green.Press any key to access the sysadmin console.
Enter
sysadmin@SYSTEMfor the username andsysadminfor the password.You will be presented with a description of available network settings and instructions for editing.
CODEDelphix Engine Network Setup To access the system setup through the browser, the system must first be configured for networking in your environment. From here, you can configure the primary interface, DNS, hostname, and default route. When DHCP is configured, all other properties are derived from DHCP settings. To see the current settings, run "get." To change a property, run "set =." To commit your changes, run "commit." To exit this setup and return to the standard CLI, run "discard." defaultRoute IP address of the gateway for the default route -- for example, "1.2.3.4." dhcp Boolean value indicating whether DHCP should be used for the primary interface. Setting this value to "true" will cause all other properties (address, hostname, and DNS) to be derived from the DHCP response dnsDomain DNS Domain -- for example, "delphix.com" dnsServers DNS server(s) as a list of IP addresses -- for example, "1.2.3.4,5.6.7.8." hostname Canonical system hostname, used in alert and other logs -- for example, "myserver" primaryAddress Static address for the primary interface in CIDR notation -- for example, "1.2.3.4/22" Current settings: defaultRoute: 192.168.1.1 dhcp: false dnsDomain: example.com dnsServers: 192.168.1.1 hostname: Delphix primaryAddress: 192.168.1.100/24Configure the
hostname. If you are using DHCP, you can skip this step.CODEdelphix network setup update *> set hostname=<hostname>Note : Use the same
hostnameyou entered during the server installation.Configure DNS. If you are using DHCP, you can skip this step.
CODEdelphix network setup update *> set dnsDomain=<domain> delphix network setup update *> set dnsServers=<server1-ip>[,<server2-ip>,...]Configure either a static or DHCP address.
DHCP Configuration
CODEdelphix network setup update *> set dhcp=trueStatic Configuration
CODEdelphix network setup update *> set dhcp=false delphix network setup update *> set primaryAddress=<address>/<prefix-len>Note: The static IP address must be specified in CIDR notation (for example,
192.168.1.2/24)Configure a default gateway. If you are using DHCP, you can skip this step.
CODEdelphix network setup update *> set defaultRoute=<gateway-ip>Commit your changes. Note that you can use the
getcommand prior to committing to verify your desired configuration.CODEdelphix network setup update *> commit Successfully committed network settings. Further setup can be done through the browser at: http://<address> Type "exit" to disconnect, or any other commands to continue using the CLI.Check that you can now access the Delphix Engine through a Web browser by navigating to the displayed IP address, or hostname if using DNS.
Exit setup.
CODEdelphix> exit
Setting up the Delphix engine
The setup procedure uses a wizard process to take you through a set of configuration screens:
Administrators
Time
Network
Network Security
Storage
Outbound Connectivity
Authentication
Network Authorization
Registration
Summary
Connect to the Delphix Engine at
http://<Delphix Engine>/login/index.html#serverSetup.
The Delphix Setup application will launch when you connect to the server.
Enter your sysadmin login credentials, which initially defaults to the username sysadmin, with the initial default password of sysadmin. On first login, you will be prompted to change the initial default password.Click Next.
Administrators
The Delphix Engine supports two types of administrators:
System Administrator (sysadmin) - this is the engine system administrator. The sysadmin password is defined here.
Engine Administrator (admin) - this is typically a DBA who will administer all the data managed by the engine.
On the Administrators tab, you set up the sysadmin password by entering an email address and password. The details for the admin are displayed for reference.
The default domain user created on Delphix Engines is now admin instead of delphix_admin. When engines created before 5.3.1 are upgraded to 5.3.1 or later they will retain their old username 'delphix_admin'. To avoid complications Delphix recommends creating users with an admin role and then Disabling delphix_admin.
System time
The engine time is used as the baseline for setting policies that coordinate between virtual databases and external applications.
Choose your option to set up system time in this section.
For a Quick Start, simply set the time and your timezone. You can change this later.
Network
The initial out-of-the-box network configuration in the OVA file is set to use a single VMXNET3 network adapter.
You have already configured this in the initial configuration. Delphix supports more advanced configurations, but you can enable those later.
Storage
You should see the data storage VMDKs or RDMs you created during the OVA installation. Click Next to configure these for data storage.
Serviceability
Choose your options to configure serviceability settings.
For a Quick Start, accept the defaults. You can change this later.
Authentication
Choose your options to configure authentication services.
For a Quick Start, accept the defaults. You can change this later.
Registration
If the Delphix Engine has access to the external Internet (either directly or through a web proxy), then you can auto-register the Delphix Engine:
Enter your Support Username and Support Password.
Click Register.
If external connectivity is not immediately available, you must perform manual registration.
Copy the Delphix Engine registration code in one of two ways:
Manually highlight the registration code and copy it to clipboard. Or,
Click Copy Registration Code to Clipboard.
Transfer the Delphix Engine's registration code to a workstation with access to the external network Internet. For example, you could e-mail the registration code to an externally accessible e-mail account.
On a machine with access to the external Internet, please use your browser to navigate to the Delphix Registration Portal at http://register.delphix.com.
Login with your Delphix support credentials (username and password).
Paste the Registration Code.
Click Register.
Although your Delphix Engine will work without registration, we strongly recommend that you register each Delphix Engine as part of the setup. Failing to register the Delphix Engine will impact its supportability and security in future versions.
To regenerate the registration code for a Delphix Engine please refer to, Regenerating the Delphix Engine Registration Code. Delphix strongly recommends that you regenerate this code and re-register the engine regularly to maximize the Support Security of the Delphix Engine. Delphix recommends doing this every six months.
Summary
The final summary tab will enable you to review your configurations for System Time, Network, Storage, Serviceability, and Authentication.
Click the Back button to go back and to change the configuration for any of these server settings.
If you are ready to proceed, then click Submit.
Click Yes to confirm that you want to save the configuration.
Click Setup to acknowledge the successful configuration.
There will be a wait of several minutes as the Delphix Engine completes the configuration.
Db2 source and target environment requirements
Source Db2 hosts are servers that have Db2 binaries installed and have Db2 instances created on them. The hosts that contain the data that we wish to ingest are referred to as the source environment. Hosts with empty instances (no dbs in instance) are used as either staging or target hosts. This topic describes the requirements for creating connections between the Delphix Engine and Db2 hosts and instances.
Requirements for Db2 source hosts and instances
Each Db2 Source host must have IBM Db2 installed and at least one instance created on the machine. Depending on the way you intend to ingest data into the Staging server, you will also need to ensure that the following requirements are met:
For HADR Ingestion: HADR settings for each database to be used with the standby server should be preset before the linking process begins as described in Linking a Db2 dSource.
For Backup and Log Ingestion, no additional requirements are needed at this point.
Requirements for Db2 staging and target hosts and instance
The staging environment that the Delphix Engine uses must have access to an existing full backup of the source database on disk to create the first full copy. Delphix recommends using compressed backups as that will reduce storage needs and speed up ingest. It is recommended to test the integrity of the backup before using it for ingestion. Once this first full backup is available, subsequent refreshes can be accomplished via HADR or Archive Logs.
The staging and target Db2 instances that you wish to use must already exist on the host. We can use the same instance for the dSource and VDB creation and can also have multiple VDBs on the same instance.
The available instances on each host can be verified by going to the databases tab for the environment in question.
Instance level configuration values such as the bufferpool value will need to be managed by the customer independent of Delphix.
The instances used for staging and target environments must be compatible with the source Db2 instance.
Requirements for Db2 DPF staging and target hosts and instances
It is highly recommended that the Database Partitioning Feature (DPF) for Db2 staging and target should be configured on separate hosts due to reason that the DPF environment consumes a lot of resources.
The staging and target hosts should be configured with the same number of logical partition nodes as the source.
The logical portion configuration should be added in $HOME/sqllib/db2nodes.cfg file where $HOME is the home directory of the instance user.
The hostname to be used should be a fully qualified domain name.
db2 nodes.cfg file configured for 4 logical partitions should look like:
CODE0 <FQDN hostname> 0 1 <FQDN hostname> 1 2 <FQDN hostname> 2 3 <FQDN hostname> 3Each logical partition should have a corresponding port entry in /etc/services of hosts. In the example below, db2inst1 is the instance the user and port number from 60000 to 60003 are reserved for inter-partition communication.
CODEDB2_db2inst1 60000/tcp DB2_db2inst1_1 60001/tcp DB2_db2inst1_2 60002/tcp DB2_db2inst1_END 60003/tcpRegistry variables DB2RSHCMD and DB2COMM should be updated with values as shown below:
CODESSHCMD=$(which ssh) db2set DB2RSHCMD="$SSHCMD" db2set DB2COMM=TCPIPAfter the environment is configured on staging and target, execute db2_all echo hello on both staging and target servers to add host key in the known_hosts file. This will also help to check for any ssh issues on these servers.
The backup files (or log directory if using Customer Supplied Archive Logs) should be consistent with the partitions configured on staging.
Additional environment requirements
There must be an operating system user (delphix_os) with these privileges:
Ability to login to the staging and target environment via SSH
Ability to run mount, umount, mkdir, and rmdir as a super-user. If the staging and target host is an AIX system, permission to run the nfso command as a super-user. See Sudo Privilege Requirements for Db2 Environments for further explanation of the commands and Sudo File Configuration Examples for Db2 Environments for examples of the /etc/sudoers file on different Outdent operating systems.
There must be a directory on the staging and target environment where you can install the Delphix Engine Plugin. For example, /var/opt/delphix/toolkit .
The delphix_os user must own the toolkit path directory (__/var/opt/delphix/toolkit).
If the delphix_os user and instance users (responsible for the Delphix Engine operations such as linking and provisioning) are sharing any common group, then the toolkit path directory (__/var/opt/delphix/toolkit) must have permissions rwxrwx-- (0770), but you can also use more permissive settings. This allows instance users who are part of the same group as the delphix_os user's group to be able to create directories inside the toolkit path directory.
If the delphix_os user and instance users (responsible for the Delphix Engine operations such as linking and provisioning) are not sharing any common group, then the toolkit path directory must have -rwxrwxrwx (0777) permissions.
The directory should have 1.5GB of available storage: 400MB for the Plugin and 400MB for the set of logs generated by each Db2 instance that runs on the host
In Db2 Plugin, plugin directory space will be used as the base location for the mount point
When multiple engines access the same host environment, create a separate Db2 plugin directory for each engine that will discover this environment.
When configuring staging and target environment for multiple partitions (dpf), the
ClientAliveIntervaloption must be set to 0 or commented out to prevent the SSH connection from getting severed in the midst of command executions.
For Db2 plugin version 4.0.0 and onwards, follow the steps below to change the toolkit directory.
Disable all the datasets related to that environment
The instance of the dataset must have the DIR_CACHE configuration parameter set to No, as shown below.
db2 update dbm cfg using DIR_CACHE NOUpload the new vSDK-based plugin. The plugin has upgrade logic implemented in it and will upgrade the existing Lua-based plugin.
Refresh the environment to allow the plugin to create plugin paths and files under the scratch path.
Enable all the datasets and complete the migration process
The Delphix Engine must be able to initiate an SSH connection to the staging and target environment
NFS client services must be running on the staging and target environment
Staging and Target host instances must have the same Db2 instance code page as the production instance. The instance owner must have a compatible value defined in LC_ALL or LC_CTYPE for the Db2 code page. Preferably derived from the value of LC_ALL, LC_CTYPE, or LANG of the instance owner on the production host.
The primary environment user should share its primary group with the instance user. For example, if the delphix_os is the primary environment user which is used for environment addition and its primary group is also delphix_os then instance users (responsible for the Delphix Engine operations such as linking and provisioning) should share group delphix_os as their secondary group.
Custom configurations in Db2 plugin
DB2 plugin v3.x
The advanced config file is named advanceConfFlag.conf and is created under the during discovery or environment refresh operation if the file does not pre-exist already. This file will have the following configurable parameters:
Common Group (notCommonGroupFlag):
This parameter sets the permission of "mnts", "logs" and "code" directories under the /db2="">location.
Set notCommonGroupFlag to false, if the primary group of the primary environment user (user which is used to do discovery) is shared with the instance user.
Set notCommonGroupFlag to true, if the primary environment user and the instance user do not share any user group.
Once the necessary changes are made, refresh the environment in order to apply the changes.
By default, the notCommonGroupFlag parameter is commented out in the file. This means that the plugin implicitly assumes its value as false. The valid values for this parameter are true or false.
Allow Source Database on Same Instance (allowSourceDBonSameInst)
By default, the DB2 Plugin restricts the provisioning of a VDB on a DB2 instance which contains a database with the same name as the VDB's source database
For example:When provisioning a VDB from a VDB then the latter is treated as the source database.
When provisioning a VDB from a dSource then the staging database representing the dSource is treated as the source database.
Set allowSourceDBonSameInst to true, if the user wants to provision a VDB on an instance which contains a database with the same name as the VDB's source database. The valid values for this parameter are true or false.
Restore Pipeline limit (restorePipelineLimit):
Db2 DPF Plugin performs restoration of all non-catalog partitions in parallel.
The parameter restorePipelineLimit allows the user to configure the number of partitions that could be restored in parallel by the plugin. When the new advanceConfFlag.conf file is created during environment refresh or discovery operation, the default value of restorePipelineLimit is set to 10. The user can modify the value of this parameter to a desired value. The valid value for this field is any positive integer.
A default config file created during discovery or environment refresh operation:
# If the user is not sharing a common group between primary environment user and instance user.

# Then the user needs to set parameter notCommonGroupFlag as true.

# notCommonGroupFlag=true

# During provision operation check if instance contains a database name which is identical to the source DB name  used for provisioning operation.

# By default plugin will never allow creating a VDB on the instance where source database (or other database which is identical in name with source DB) already exists.

# If the user still wants to create a VDB on the instance which contains a database name which is identical to the source DB name used for provisioning operation,

# then the user needs to set parameter allowSourceDBonSameInst as true.

# allowSourceDBonSameInst=true

# Limit for parallel restores

restorePipelineLimit=10
DB2 plugin v4.x and onwards
DB2 plugin config file is named db2_plugin.conf and is created under the >> directory during discovery or environment refresh operation if the file does not already exist. This file has two sections represented by the headers - plugin_custom_parameters and plugin_logging_parameters.
It is important for the users to maintain two section headers in the db2_plugin.conf file.
If any of the sections get deleted, the plugin will pick the default value for the parameters under the deleted section.
Plugin custom parameters
Common group (usersHaveCommonGroup)
This parameter sets the permission for the "mnts" directory located under the /db2="">directory and for the "logs" directory located under the <delphix_common> plugin/db2_18f4ff11-b758-4bf2-9a37-719a22f5a4b8/=""></delphix_common>>directory.
Set the usersHaveCommonGroup parameter as True, if the primary group of the primary environment user (user which is used to do discovery) is shared with the instance user.
Set the usersHaveCommonGroup parameter as False, if the primary environment user and the instance user do not share any user group.
Once the necessary changes are made, refresh the environment in order to apply the changes.
By default, the usersHaveCommonGroup parameter is set to True. The valid values for this parameter are true or false.
Allow source database on same instance (allowSourceDbOnSameInstance)
By default, the DB2 Plugin restricts the provisioning of a VDB on a DB2 instance which contains a database with the same name as the VDB's source database
For example:
When provisioning a VDB from a VDB then the latter is treated as the source database.
When provisioning a VDB from a dSource then the staging database representing the dSource is treated as the source database.
If the user wants to provision a VDB on an instance which contains a database with the same name as the VDB's source database, then the parameter allowSourceDbOnSameInstance must be set to true. The valid values for this parameter are true or false.
Restore pipeline limit (restorePipelineLimit)
Db2 DPF Plugin performs restoration of all non-catalog partitions in parallel.
The parameter restorePipelineLimit allows the user to configure the number of partitions that could be restored in parallel by the plugin. When the new advanceConfFlag.conf file is created during environment refresh or discovery operation, the default value of restorePipelineLimit is set to 10. The user can modify the value of this parameter to the desired value. The valid value for this field is any positive integer.
Plugin logging parameters
This feature provides three options to configure and control enhanced logging by the plugin:
To set debug log levels.
To set active log file size.
To set log retention levels.
Delphix users can modify the above parameters defined under the plugin_logging_parameters section of this file.
Setting log levels (level)
Delphix users can set the logging level of the plugin-generated logs by setting the parameter level under the plugin_logging_parameters header. Higher logging levels will help to expedite debugging issues. There are two levels of logging which are: Info and Debug. The configured logging level will apply to all the objects (both dSources and VDBs) present on a staging/target host. For example; if we have 4 dSources on a host associated with a Delphix Engine then the log level will apply to all the dSources.
Log level description:
level=INFO: This level will print only informational logs. This is the default log level.
level=DEBUG: This level will print informational logs and debug statements.
Setting maximum size of active log file (logFileSize)
Delphix users can set the maximum size of the active log file by defining the value of the logFileSize parameter under the plugin_logging_parameters header of the db2_plugin.conf file. Once this maximum size limit is reached, the plugin will rotate the log as per the retention property described below. This parameter only takes in a positive integer value. The minimum value of this parameter is 1 MB and the maximum value is 10 MB. The default value is 1 MB.
Setting log retention levels (retention)
Delphix users can set a retention level for plugin-generated logs for each dataset (.diag.log)="" using="" the="" parameter="">retention under the plugin_logging_parameters header. As per this parameter, the log files are moved (archived), renamed or deleted once they reach the value set in the logFileSize parameter. New incoming log data is directed into a new fresh file (at the same location).
By default, the value for this parameter will be set to a minimum value of 2. The user can change this value and set its value within the range 2 and 50. For example; if retention is set to 4, the plugin will have the following log files: <DB Name>.diag.log, <DB Name>.diag.log.1, <DB Name>.diag.log.2, <DB Name>.diag.log.3, <DB Name>.diag.log.4.
File <DB Name>.diag.log is the active log file
File <DB Name>.diag.log.1 is the most recent archive log file
File <DB Name>.diag.log.4 is the oldest one
The DB2 plugin will ignore values for a parameter if the values do not fit the description above and will continue the operation with the default set of values for that particular parameter.
db2_plugin.conf
#
# The parameters must not be left padded with spaces. The plugin will otherwise not accept the specified parameter
# values and will use the default values.
#

[plugin_custom_parameters]
#
# If the user has not shared a common group between primary environment user and instance user.
# Then the user needs to set parameter usersHaveCommonGroup as False.
#

usersHaveCommonGroup=True

#
# During provision operations the plugin checks if the target instance contains a database name which is identical to
# the source DB name from which the VDB is to be created. By default the plugin will never allow creating a VDB on the
# instance where the source database already exists, or on any instance that has a database with the same name. If the
# users still want to create a VDB on an instance which contains a database with the same name as the source DB then
# they need to set parameter allowSourceDbOnSameInstance as True.
#

allowSourceDbOnSameInstance=False

#
# If the users want to control the number of parallel restores then they can tune the parameter restorePipelineLimit.
# By default the value of this parameter would be 10.
#

restorePipelineLimit=10

[plugin_logging_parameters]
#
# This flag will set the debug level of plugin logs on the remote server (both staging and target). There are two levels:
# Info
# Debug
# The above are the only valid values that can be assigned. If any other value is assigned, the plugin will set the
# default level as Info. the string is case insensitive so info, Info and INFO are acceptable.
#

level=INFO

#
# This parameter will set the maximum size of the active log file in MB. Once this limit is reached, the plugin will
# rotate the log as per the retention property defined below. The minimum value of this parameter is 1 MB and maximum
# value is 10 MB. This parameter only takes in a positive integer value. The default value is 1 MB
# logFileSize=<positive integer>
#

logFileSize=1

#
# Whenever the size of <DB Name>.diag.log file exceeds the value provided by logFileSize parameter then the plugin will
# rename the active log file to <DB Name>.diag.log.<number> and a new log file with name <DB Name>.diag.log will be
# generated. For example, if LogRetention is set to 4, the plugin will have the following log files: <DB Name>.diag.log,
# <DB Name>.diag.log.1, <DB Name>.diag.log.2, <DB Name>.diag.log.3, <DB Name>.diag.log.4.
# File <DB Name>.diag.log.4 will be the oldest one.
# File <DB Name>.diag.log.1 will be the most recent archive log file.
# File <DB Name>.diag.log will be the active log file.
# The minimum and default value for retention flag is 2.
# retention=<positive integer>
#

retention=2
Instance user requirements
The instance owner of each instance you wish to use within staging or a target host must be added as an environment user within the Delphix engine. See Managing Db2 Users and Instance Owners.
For HADR synced dSources the staging instance owner must be able to "read" the ingested database contents as Delphix will check the validity of the database by querying tables before each dSource snapshot.
Note: If a container is added or deleted, the dSource will have to be resynced.
Ensure that the following database configurations are set to default values:
LOGPRIMARY, LOGSECOND - default values are set by DB2 configuration advisor and shouldn’t be changed. For more info, see logsecond - Number of secondary log files configuration parameter.
LOGARCHCOMPR1, LOGARCHCOMPR2- the default values are set to OFF so that the workflows can work properly.
Database container requirements
All Db2 database container types are fully supported with the exception of Db2 raw containers.
It is recommended not to use special characters for source database container paths as this may create problems while parsing such container paths and may also result in failures during dSource and VDB creation.
Sudo privilege requirements for Db2 environments
This topic describes the rationale behind specific sudo privilege requirements for virtualizing Db2 Databases.
Privilege | Sources | Targets and staging | Rationale |
|---|---|---|---|
| Not Required | Required | Delphix dynamically makes and removes directories under the provisioning directory during VDB operations. This privilege is optional, provided the provisioning directory permissions allow the delphix os user to make and remove directories. |
| Not Required | Required | Delphix dynamically mounts and unmounts directories under the provisioning directory during VDB operations. This privilege is required because |
It is required to specify the NOPASSWD qualifier within the "sudo" configuration file, as shown here: Sudo File Configuration Examples for Db2 Environments. This ensures that the "sudo" command does not demand the entry of a password, even for the "display permissions" (i.e. "sudo -l") command.
Delphix issues "sudo -l" in some scripts to detect if the operating system user has the correct sudo privileges. If it is unable to execute this command, some actions may fail and Delphix will raise an alert suggesting it does not have the correct sudo permissions. Restricting the execution of "sudo -l" by setting “listpw=always” in the “/etc/sudoers” file when the Delphix operating system user is configured to use public key authentication will cause the Delphix operating system user to be prompted for a password which will fail certain Delphix actions. Use a less restrictive setting for listpw than "always" when the Delphix operating system user is using public-key authentication.
Adding a Db2 environment
Prerequisites
Make sure that the staging environment in question meets the requirements described in Requirements for Db2 Hosts and Databases.
Procedure
Login to the Delphix Management application.
Click Manage.
Select Environments.
Next to Environments, click the Actions (...) menu and select Add Environment.
In the Add Environment dialog, select Unix/Linux in the menu.
Select Standalone Host.
Click Next.
Enter a Name for the environment.Enter the Host IP address or hostname.
Enter the SSH port.
The default value is 22.Enter an OS Username for the environment.
For more information about the environment user requirements, see Requirements for Db2 Hosts and Databases.Select Login Type.
— Username and Password - enter the OS username and password
— Username and Public Key - enter the OS username.
— Password Vault - select from an existing Enterprise Password VaultNote: Currently, the Enterprise Password Vault option is not supported.
Info: Using Public Key Authentication
If you want to use public-key authentication for logging into your Unix-based environment, there are two options: use the engine's key pair or provide a key pair for this environment.
To use the engine's key pair:
Select Public Key for the Login Type.
Click View Public Key.
Copy the public key that is displayed, and append it to the end of your
~/.ssh/authorized_keysfile. If this file does not exist, you will need to create it.Run chmod 600 ~/.ssh/authorized_keys to allow only the file's owner to read and write to it (make sure the file is owned by the user).
Run chmod 755 ~ to restrict access to the user's home directory so no other user may write to it.
Run chmod 700 ~/.ssh so that others cannot write to it. The ~/.ssh directory cannot be writable by group or other users. Otherwise, authentication will fail.
As an alternative, you can provide a key pair specific for this environment via the API or CLI. See Option 2 in this CLI Cookbook article for instructions.
For Password, enter the password associated with the user in step 11.
Using Public-Key Authentication:
Run chmod 600 ~/.ssh/authorized_keys to allow only the file's owner to readand write privileges to it (make sure the file is owned by the user).
Run chmod 755 ~ to restrict access to the user's home directory so no other user may write to it.
Run chmod 700 ~/.ssh so that others cannot write to it. The ~/.ssh directory cannot be writable by group or other users. Otherwise, authentication will fail.
You can also add public key authentication to an environment user's profile by using the command-line interface, as explained in the topic CLI Cookbook: Setting Up SSH Key Authentication for UNIX Environment Users.
For Password Login, click Verify Credentials to test the username and password.
Enter a Toolkit Path (make sure the toolkit path does not have spaces).
For more information about the toolkit directory requirements, see Requirements for Db2 Hosts and Databases.To provide your own Oracle Java select the Provide my own JDK checkbox and click Next.
In the Java Development Kit tab enter the absolute path to your Oracle JDK and click Next.
Click Submit.
As the new environment is added, you will see two jobs running in the Delphix platform Job History, one to Create and Discover an environment, and another to Create an environment. When the jobs are complete, you will see the new environment added to the list in the Environments tab. If you do not see it, click the Refresh icon in your browser.
Managing DB instances
When you add an environment with the Delphix Management Application, all existing DB2 instances on the host are automatically discovered by Delphix. A list of all instances and databases are available to Delphix based on the environment discovery process.
View instances
Login to the Delphix Management application.
Click Manage.
Select Environments.
In the Environments panel, click on the name of the environment you want to refresh.
Select the Databases tab to see a list of all DB2 instances found in the environment.
Linking a data source (dSource)
Prerequisites
Be sure that the source and staging instances meet the host requirements and the databases meet the container requirements described in Requirements for Db2 Hosts and Databases.
Source database preparation
Instance Owner Permissions
Delphix uses the Db2 instance owner account on the dSource for multiple operations, including verifying the data inside the databases. In order to ingest a database on the staging server with different instances, we need permissions on the source database in order to perform a restore on the staging server. As an example, if we have an instance named "auto1051" at the source with a database name "delphix" and we want to create a dSource on the "auto1052" instance on the staging server, then you must explicitly grant DBADM and SECADM to the dSource instance "auto1052" on the source instance using the following steps:Connect to the source database as the source instance owner.
connect to <DB_NAME> user <SOURCE_INSTANCE_OWNER>
Issue database grant command
grant DBADM, SECADM on the database to user <DSOURCE_INSTANCE_OWNER>
grant DBADM, SECADM on the database to user <VDB_INSTANCE_OWNER>
Repeat step 2 for every database to be included in the dSource, on the corresponding source database.
Determine if your dSource will be a non-HADR instance, a HADR single standby instance, or a HADR multiple standby instance. Non-HADR dSources can only be updated via a full dSource resync from a newer backup file
Non-HADR Database
See the "InstanceOwner Permissions" section above.
Ensure that the source database has the necessary user permissions for the provisioned VDBs as described in Database Permissions for Provisioned Db2 VDBs.
HADR single standby database
All items in Non-HADR Database section above.
The following database configuration settings must be set:
update db cfg for <DB_NAME> using HADR_LOCAL_HOST <PRIMARY_IP> HADR_LOCAL_SVC <PRIMARY_PORT > immediate
update db cfg for <DB_NAME> using HADR_REMOTE_HOST <STANDBY_IP> HADR_REMOTE_SVC <STANDBY_PORT> immediate
update db cfg for <DB_NAME> using HADR_REMOTE_INST <STANDBY_INSTANCE_NAME> immediate
update db cfg for <DB_NAME> using HADR_SYNCMODE SUPERASYNC immediate
If database configuration parameter LOGINDEXBUILD is set to OFF, do the following:
update db cfg for <DB_NAME> using LOGINDEXBUILD ON
Force off all connections to the database and reactivate the database
If database configuration parameter LOGARCHMETH1 is set to OFF, do the following:
update db cfg for <DB_NAME> using LOGARCHMETH1 XXXX (must be a valid log archiving method)
Take an offline backup
If LOGARCHMETH1 points to a third-party backup server (i.e. TSM or Netbackup) define LOGARCHMETH2 to disk
update db cfg for <DB_NAME> using LOGARCHMETH2 DISK:<full path to archive log directory>
Log files in the directory must be available from the time of the backup until the restore has successfully completed on the dSource.
db2 start hadr on db <DB_NAME> as primary by force
Take a full online backup as defined in the "Backup Source Database" section below.
Record the following information, as it must be entered on the Delphix Engine while creating the dSource.
HADR Primary hostname
HADR Primary SVC
HADR Standby SVC (auxiliary standby port)
HADR multiple standby databases
This assumes a single standby database HADR setup already exists. The existing standby will be referred to as the main standby. The new delphix standby will be referred to as the auxiliary standby.
The following database configuration settings must be set on the primary database:
update db cfg for <DB_NAME> using HADR_SYNCMODE <SYNC MODE> immediate – set whichever sync mode you wish to use on your main standby.
update db cfg for <DB_NAME> using HADR_TARGET_LIST "<MAIN_STANDBY_IP:MAIN_STANDBY_PORT|AUXILIARY_STANDBY_IP:AUXILIARY_STANDBY_PORT>" immediate
You may have up to two auxiliary standbys defined separated by a '|'; one of which must be the delphix dSource.
stop hadr on db <DB_NAME>
sart hadr on db <DB_NAME> as primary by force
Take a full online backup as defined in the "Backup Source Database" section below. While this backup is running, you may continue with step 5.
The following database configuration settings must be set on the existing main standby database:
update db cfg for <DB_NAME> using HADR_SYNCMODE <same mode as defined in 1.a above.> – It must be the same value used for the primary database.
update db cfg for <DB_NAME> using HADR_TARGET_LIST "<PRIMARY_IP:PRIMARY_PORT|MAIN_STANDBY_IP:MAIN_STANDBY_PORT>"
stop hadr on db <DB_NAME>
start hadr on db <DB_NAME> as standby
Record the following information, as it must be entered on the Delphix Engine while creating the dSource (the auxiliary standby database):
HADR Primary hostname
HADR Primary SVC
HADR Standby SVC (auxiliary standby port)
HADR_TARGET_LIST <PRIMARY_IP:PRIMARY_PORT|MAIN_STANDBY_IP:MAIN_STANDBY_PORT>
Delphix recovery with customer supplied archive logs
The Delphix Recovery with Customer Supplied Archive Logs (formerly known as Delphix Backup and Logs ingestion), feature allows users to provide Delphix with the location of the source database archive logs. Full backups only have to be restored during dSource creation, or during RESYNC operations when there are exceptions, for example, lost/corrupt log files. Archived logs get applied during the snapshot operation.
A full backup is required to create a dSource and prior to the snapshot operation, users can provide the archive logs to update the dSource during the snapshot operation, user-provided logs will be applied to the staging database. Applying the logs on a regular basis allows users to keep their dSource in sync with their source database. The staging database will always be in a roll forward pending state. The Plugin performs validation before applying the logs. Plugin managed Pre and Post Hooks can be used for preparing and purging the full backups and archive logs. A list of logs that are available for purging is stored in the snapshot metadata of the dSource. In case DPF is enabled, users need to place archive logs inside a folder with a name as NODE<Partition number> where <Partition number> is a four-digit number. For example, if the source environment has two partitions, then the user-provided log path will have folder names as NODE0000 and NODE0001. Both these folders will have respective archive logs. Snapshot operation will be used to apply the archive logs.
HADR and non-HADR configured dSources can be moved to this feature by performing a RESYNC operation.
Delphix supports Customer Supplied Archive Logs with Db2 version 10.5 and 11.1. To use Customer Supplied Archive Logs simply check the checkbox provided during dSource creation. Customer Supplied Archive Logs require that:
A full backup must be accessible on the staging server, it could be a shared location but must be mounted on the staging host and visible as a file system.
Archived logs must also be accessible on the staging server
The following command can be used to generate archive logs from the source database;
db2 archive log for database <database name>
Instance users must have read permissions on logs so that Delphix-managed recover can apply the logs.
Instance users must have read permissions on logs and additional write permissions on customer-provided log location if Delphix is planning to use customer-provided log location for applying the logs.
If the user has placed the archive logs at a user-provided log location, then the logs must be valid and the first active log of the staging database must be present in the user-provided log location.
If database configuration parameter LOGINDEXBUILD is set to OFF, do the following:
update db cfg for <DB_NAME> using LOGINDEXBUILD ON
Force off all connections to the database and reactivate the database
The customer does log purging from the provided log location. Delphix only provides the list of logs that are eligible for purging.
Limitations:
Continuous updates to the dSource are not available. The DB_SYNC operations apply new logs from the log location and keep the dSource updated with changes on the source.
Read access to the staging database is not available.
Staging push
With the "Staging Push" feature, you can now manage the restore and rollforward operations from the CLI. During dSource creation (or RESYNC), the plugin will create an empty mount point and will provide a restore and rollforward template that will allow you to restore the database. You can restore the dSource using the steps mentioned in the readme or through any other method of their choice. You can also configure the dSource with HADR by following the steps provided in the "HADR Single/Multiple Standby Database" sections above.
Once the dSource is ready, you can perform restore and rollforward operations from the CLI. After the restore, the staging database should remain in the rollforward pending state, and prior to the next snapshot, the user can do a rollforward to a specific Point-in-Time (by providing a timestamp to the rollforward command) against the available archive logs. In the case of HADR dSource, you will have to stop HADR before taking a snapshot and starting it back on after the snapshot operation is complete.
You can create a pre-snapshot and post-snapshot hook to perform HADR stop and start operations on the staging database respectively so that you don't have to connect to the staging host every time a snapshot is captured.
Prior to the snapshot operation, the user should validate the backups and the archive logs before applying them to the staging database. Below are the user side validations:
User side validation prior to snapshot operation
The user must validate the backup files using db2ckbkp utility on the staging host.
The user must validate the archive logs using db2cklog utility on the staging host.
The authenticity of archive logs would be managed by the user.
The user has to provide the first active log at the staging database log directory location after applying the logs.
If there is a scenario where a user performed some load copy (non-logged transactions) operations on the source side then it’s the responsibility of the user to make those non-logged transactions available on the staging database.
Backup source database
New feature: Source database with Raw DEVICE type storage
Several users use raw device-based tablespaces for source Db2 databases. To leverage these environments with Delphix, Delphix has built a workflow using Db2s native tools that allow Delphix to discover and convert a raw device-based tablespace into an automatic storage-based tablespace during ingestion. Once the data is ingested into staging, customers will be able to provision VDBs of the automatic storage-based database.
In order to complete the linking process, the Standby dSource must have access to a full backup of the source Db2 databases on disk. This should be a compressed online Db2 backup and must be accessible to the dSource instance owner on disk. Delphix is currently not set up to accept Db2 backups taken using third-party sources such as Netbackup or TSM. All three features of data ingestion, namely HADR, Non-HADR, and Customer Supplied Archive Logs backups must also include logs. Starting with the Db2 plugin version 3.1.1, we are also supporting full online backups, which are taken using the "exclude logs" syntax. This support is only applicable to the dSources created using the Customer Supplied Archive Logs (Backup and Logs) ingestion mechanism on a single partition.
Support for named pipe type DB2 backup
Users can also provide Db2 backups of type named-pipe. Db2 plugin will check the type (type will be either named-pipe or a file) of backup and will use the restore syntax accordingly.
Example backup command: db2 backup database <DB_NAME> online compress include logs.
Backup types supported in DPF
The type of backups supported by Db2 plugin when used with DPF are:
SSV backups through backup files or named pipes.
Non-SSV backups through backup files or named pipes.
Example backup command for DB2 SSV backups: db2_all "db2 BACKUP DATABASE<DB_NAME> ON all dbpartitionnums online to <Backup File Location> compress include logs"
Example backup command for DB2 Non SSV backups: db2_all "db2 backup database <DB_NAME> online to <Backup File Location> compress include logs"
Best practices for taking a backup
The following best practices can help improve backup and restore performance:
Compression should be enabled
Following parameters should be optimally configured:
Utility Heap Size (UTIL_HEAP_SZ)
No. of CPUs
No. of Table Spaces
Extent Size
Page Size
Parallelism & Buffer configuration may be used to improve backup performance. Parameters that should be configured are:
Parallelism
Buffer Size
No. of Buffers
More information about backup best practices is available in IBM Knowledge Center.
Procedure
Login to the Delphix Management Application.
On the Databases tab of the Environment Management screen, add a source config against the discovered staging instance.
Then, click Manage and select Datasets.
Click the Plus (+) icon and select Add dSource, you’ll get a list of available source configs using which you can go for dSource creation.
In the Add dSource wizard, select the required source configuration.
Consider the following when choosing an ingestion method.
Users can specify their own mount path to host the dSource dataset by specifying the path in the Mount Base field.
The restore and rollforward operations on the staging database can be managed by selecting the “Use Staging Push” checkbox. If the “Use Staging Push” checkbox is selected, the other checkboxes must not be selected.
If you are working with a HADR setup and want to ingest the database on a staging using HADR configurations, you need to check the Link against source using HADR checkbox and uncheck the Customer Supplied Archive Logs checkboxes. However, if you want to setup a dSource using HADR configurations using Staging Push, you need to only select the Staging push checkbox and handle restore and HADR configuration manually.
To use a non-HADR method for database ingestion, you need to uncheck the Link against the source using HADR and Customer Supplied Archive Logs checkboxes.
To use the Customer Supplied Archive Logs method for database ingestion check the Customer Supplied Archive Logs checkbox and uncheck the Link against source using HADR checkbox and enter the path in Archive Log Path.
To use the Database partition feature check Use DPF checkbox and uncheck the Link against the source using HADR checkbox. For more information on DPF please view IBM Db2 Overview.
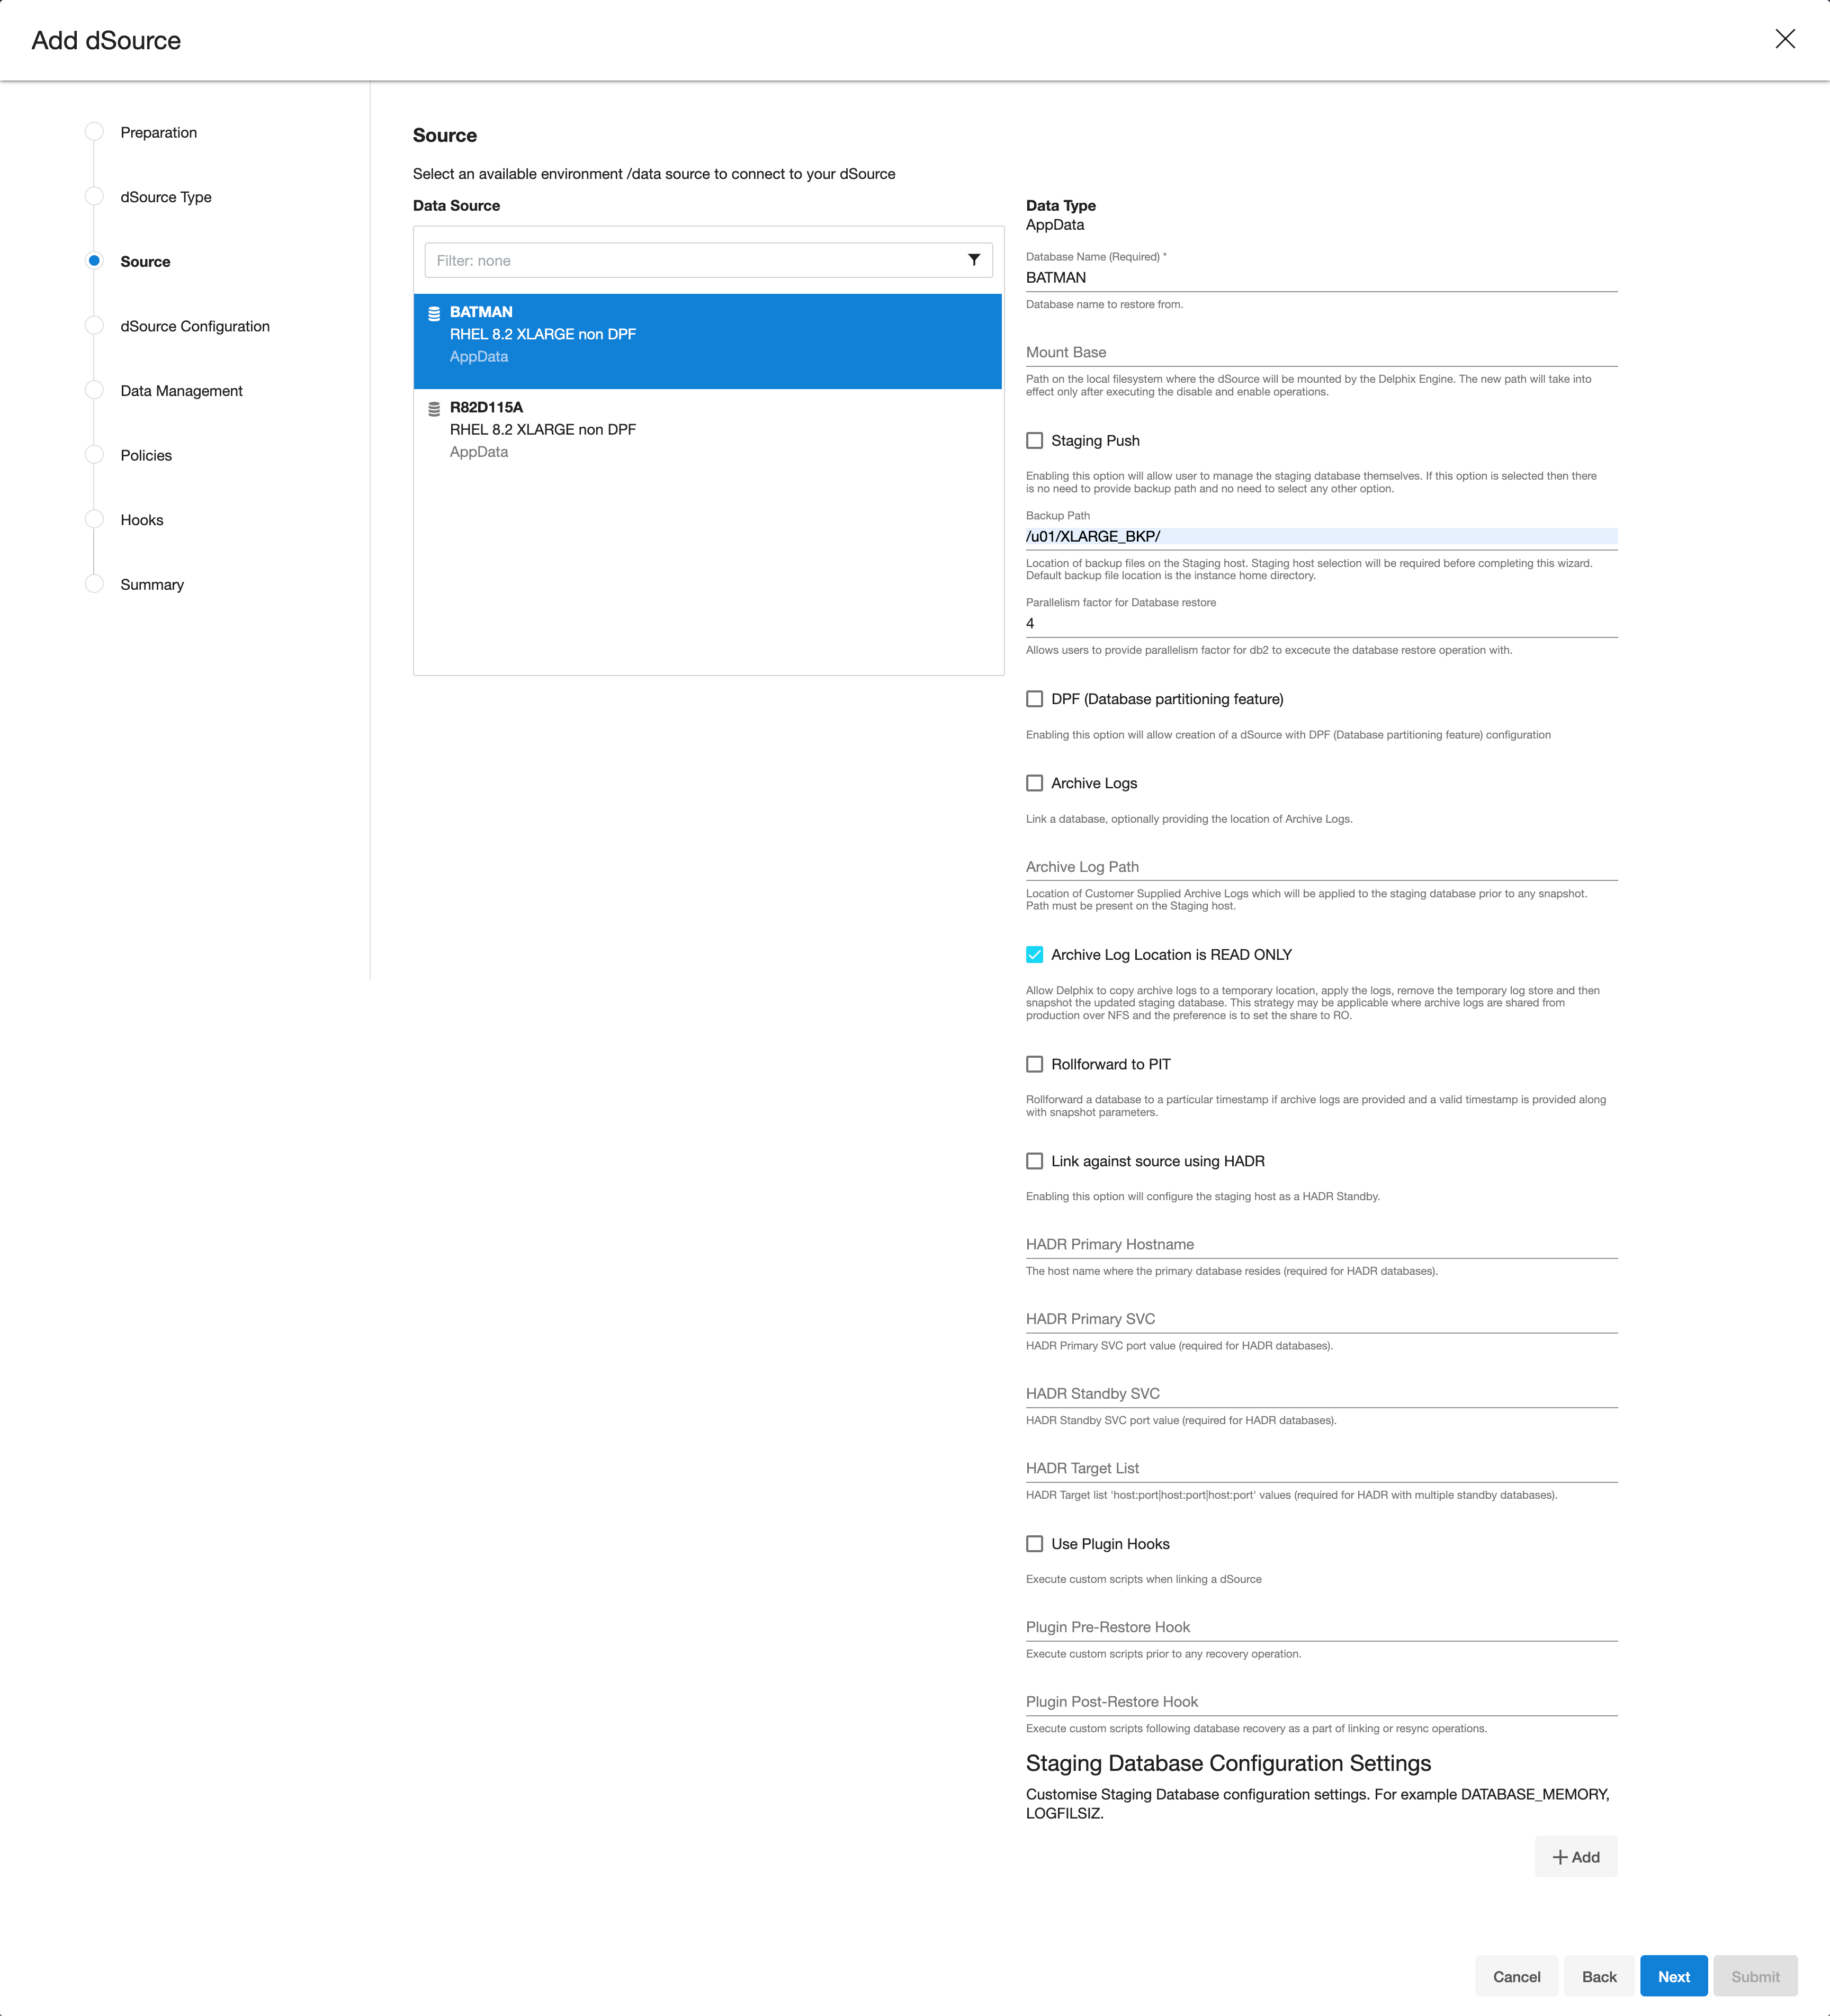
The database name is mandatory and must be unique for a given instance. This is the name that the database was on the instance it was restored from.
If the user is planning to create a dSource with the "Staging Push" feature then the user must need to select the "Use Staging Push" checkbox.
Enter the complete Backup Path where the database backup file resides. If no value is entered, the default value used is the instance home directory. If there are multiple backup files for a non-DPF database on the backup path, the most current one will be used. If there are multiple sets of backup files for a DPF database on the backup path, the most recent one will be used.
Optionally, you can add the Parallelism factor for Database restore to provide the degree of parallelisation to run the database restore operation. If no value is entered, the Db2 plugin inherently assigns parallelism factor.
Info: Info :Parallelism factor depends on the resources provided on the staging host, you may not see any difference in performance if there aren't enough resources for Db2 plugin to implement the parallelism.
You can provide any positive integer value for parallelism factor. Db2 plugin will provide that level of parallelism given that the system has appropriate resources to offer.
Parallelism factor is inversely proportional to the Database restore time, which implies that a higher parallelism factor will result in reduced restoration time.
For optimal performance during restoration, make sure to provide the same parallelism factor while creating the backups.
If the user wants to roll forward a snapshot to a user-specified timestamp, then the user must select the Rollforward to PIT checkbox. Users can also manually do this through the snapshot option.
Info: The user-specified timestamp needs to be provided along with the timezone. For example, 2021-11-14-04.15.00 UTC. If the timezone is not entered, then the user's local timezone is considered.
Optionally, users can set the database configuration parameters during the linking operation in the Config Settings section.
Optionally, users can provide a bash script as a Plugin defined hook. Delphix has two Plugin managed Hooks:
Plugin Pre-Restore Hook: The bash script entered in this field will get executed before restoration. This hook is useful in such cases where the users want to prepare the full backup before the restore operation.
Plugin Post-Restore Hook: The bash script entered in this field will get executed after completion of the restore operation. This hook is useful in such cases where the user wants to purge the full backup file after the restore operation.
1. Plugin managed pre-Hook - User can copy the required full backup file from some remote location to staging host. Below is an example of such bash script (name of below script is copyBackup.sh)#!/bin/bash
# Copying backup file from a remote host remote.delphix.comscp auto1051@remote.delphix.com:/backuplocation/R74D105A.0.auto1051.DBPART000.20180510073639.001 /db2backup/
The user can provide the above scriptinPlugin managed pre-Hook field as"sh copyBackup.sh"
2. Plugin managed post-Hook - User can purge the full backup file from the staging host. Below is an example of such bash script (name of below script is purgeBackup.sh)#!/bin/bash
# Purging full backup file from staging host for saving the staging storagerm -f /db2backup/R74D105A.0.auto1051.DBPART000.20180510073639.001
The user can provide the above scriptinPlugin managed post-Hook field as"sh purgeBackup.sh"
If the dSource is to use HADR please enter the following fields. For more information about HADR please view Linking a dSource from a Db2 Database: An Overview.
a. Enter a fully qualified HADR Primary Hostname. This is a required field for HADR and must match the value set for HADR_LOCAL_HOST on the master.
b. Enter the port or /etc/services name for the HADR Primary SVC. This is a required field for HADR and uses the value set for HADR_LOCAL_SVC on the master.
c. Enter the port or /etc/services name for the HADR Standby SVC. This is a required field for HADR and uses the value set for HADR_REMOTE_SVC on the master.
If you are using Customer Supplied Archive Logs for dSource creation complete the following fields:
Check the Customer Supplied Archive logs checkbox
Provide the log location of the archive logs. In this location, users can load copy files by appending schema and table name to it so that plugin can process those load copy files during log apply process. Archive logs will be used for applying the logs during the snapshot operation. This location must be a part of the staging server and this location must be different than full backup location.
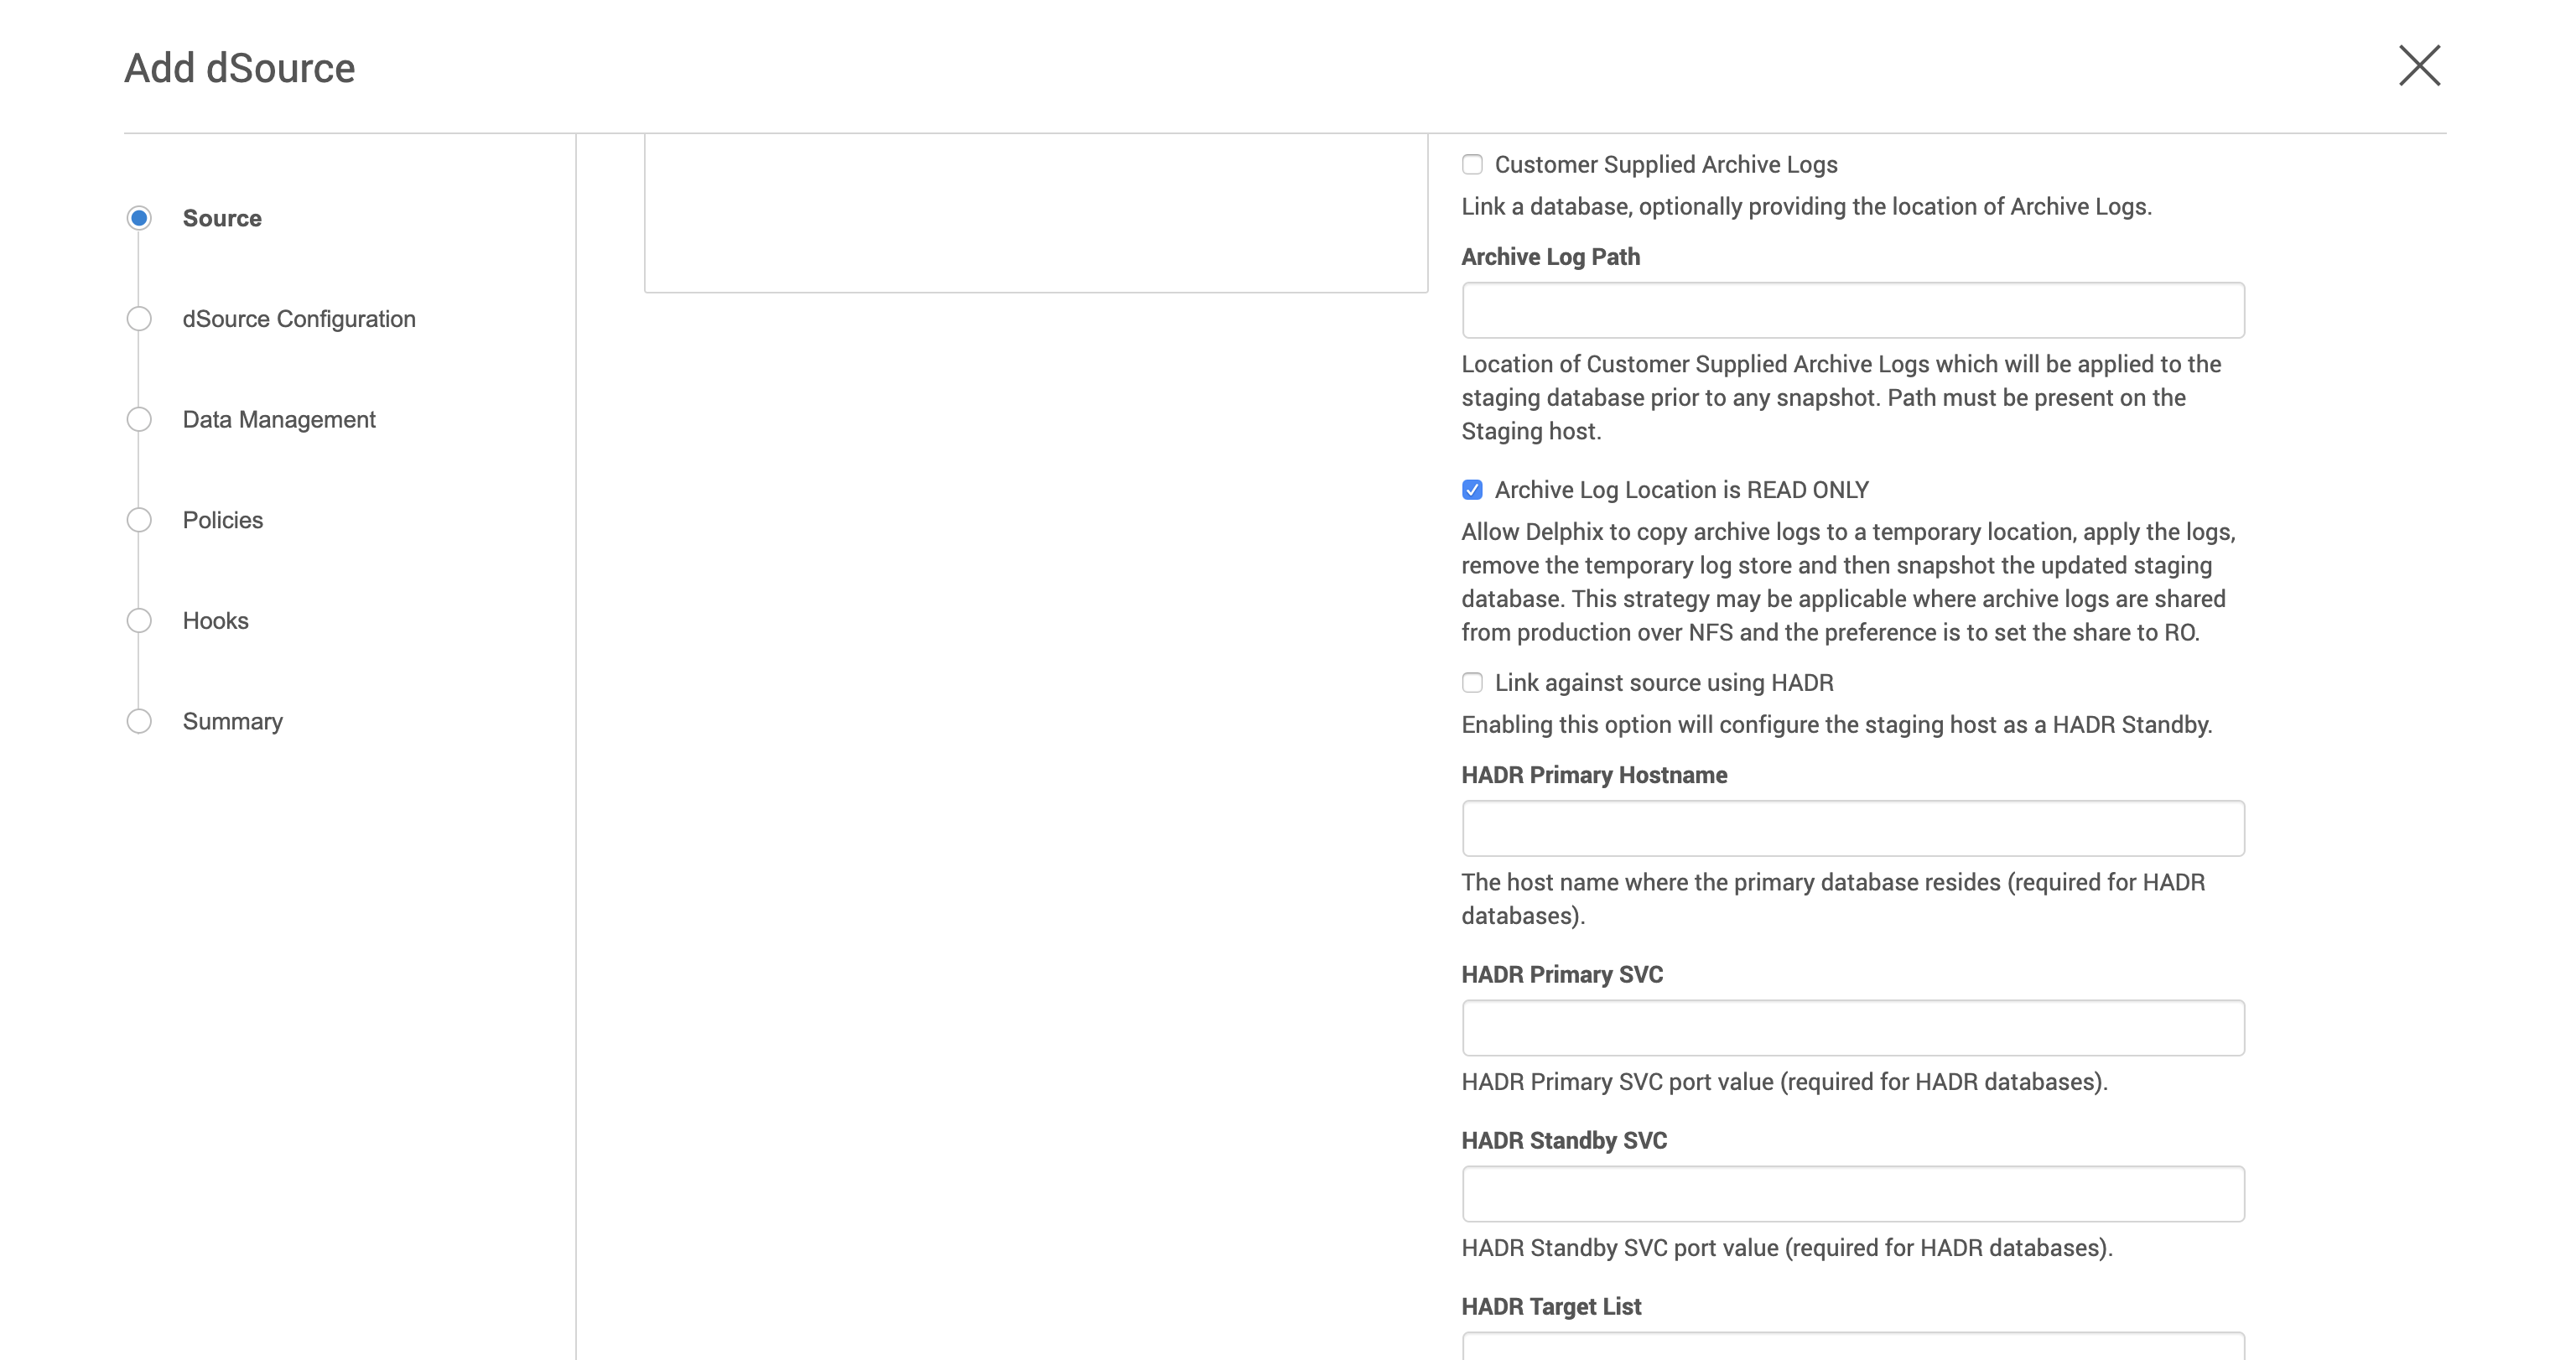
The Archive Log Location is READ ONLY( default) option indicates whether Delphix should copy the log files to the dSource’s filesystem prior to the log apply process. If this is not selected the staging database will read the log files directly from the user-provided log location and perform the log apply operation.
Note: Special considerations for Archive Log Location is READ ONLY
If this operation is performed on the source database and user want the Plugin to process the load files place the load copy files in your location and append the schema and table names (for example: <DB Name>.<Number>.<Instance>.DBPART<partNumber>.<Timestamp>.001.<schema name>.<table name>) to the load copy file names
If you do not want to process load copy files via the Plugin place the load copy files in a similar structure as it is on the source or set a DB2 registry parameter DB2LOADREC.
Note: Special consideration during dSource upgrade from older version plugin to Customer Supplied Archive Logs feature enabled plugin
Suppose the user is having a dSource with an older version of the plugin and now wants to upgrade that dSource to Customer Supplied Archive Logs feature then the user needs to perform the following steps :
1. Go to the configuration tab of dSource and then click on the custom sub-tab.
2. Click on the edit icon.
3. Check the Customer Supplied Archive Logs and Archive Log Location is READ ONLY checkbox.
4. Click on submit and then go for RESYNC operation to upgrade the dSource.
Click Next.
Enter a name and select a group for your dSource.
Adding a dSource to a dataset group lets you set Delphix Domain user permissions for that database and its objects, such as snapshots. See the topics under Users and Groups for more information.Click Next and set the Staging Environment to be the same as the dSource host. Select the Staging Environment User to be the same as the instance owner of the dSource instance.
Info : Changing the Environment User
If you need to change or add an environment user for the dSource instance, see Managing Db2 Users and Instance.
Note: Ensure that the Staging environment must be the environment that you have chosen to create the source config.
Select the User from the drop-down and set the SNAPSHOT PARAMETERS for the dSource snapshot.
Click on the Timestamp input field to enter the timestamp at which the snapshot will be taken.
The user-specified timestamp needs to be provided along with the timezone in YYYY-MM-DD-HH.MM.SS format. For example, 2022-03-12-04.15.00UTC. If the timezone is not entered, then the user's local timezone is considered.Note: Providing the timestamp will only work if the user has checked the Rollforward to PIT option in step 9 above.
Select Resynchronize dSource to resynchronize the dSource. This will force a non-incremental load of data from the source similar to when the dSource was created. This action avoids duplicating storage requirements and maintains a Timeflow history.
The Delphix Engine will initiate two jobs to create the dSource: DB_Link and DB_Sync. You can monitor these jobs by clicking Active Jobs in the top menu bar, or by selecting System > Event Viewer. When the jobs have completed successfully, the database icon will change to a dSource icon on the Environments > Host > Databases screen, and the dSource will also appear in the list of Datasets under its assigned group. Then, click Next and you’ll get the Policies section. Set the desired Snapsync Policy for the dSource. For more information on policies see Data Management Settings for Db2 dSources.
Click Next and specify any desired pre- and post-scripts. For details on pre- and post-scripts, refer to Customizing Db2 Management with Hook Operations.
Click Next. Review the dSource Configuration and Data Management information in the Summary section.
Click Submit.
The dSource configuration screen
After you have created a dSource, the dSource Configuration tab allows you to view information about it and make modifications to its policies and permissions. In the Datasets panel, select the dSource you wish to examine. You can now choose the configuration tab to see information such as the Source files, Data Management configuration, and Hook Operations.
Purging of archive logs after snapshot operation
Logs can be purged from your log location after the snapshot operation. The Plugin will preserve the list of logs that are eligible for purging in the snapshot's metadata. The snapshot metadata can be accessed via the Delphix CLI or API.
Backup Source Database
Source database with Raw DEVICE type storage
Several users use raw device-based tablespaces for source DB2 databases. To leverage these environments with Delphix, Delphix has built a workflow using Db2s native tools that allow Delphix to discover and convert a raw device-based tablespace into an automatic storage-based tablespace during ingestion. Once the data is ingested into staging, customers will be able to provision VDBs of the automatic storage-based database.
In order to complete the linking process, the Standby dSource must have access to a full backup of the source Db2 databases on disk. This should be a compressed online DB2 backup and must be accessible to the dSource instance owner on disk. Delphix is currently not setup to accept DB2 backups taken using third-party sources such as Netbackup or TSM. All three features of data ingestion, namely HADR, Non-HADR, and Customer Supplied Archive Logs backups must also include logs. Starting with Db2 plugin version 3.1.1, we are also supporting full online backups, which are taken using the "exclude logs" syntax. This support is only applicable to the dSources created using the Customer Supplied Archive Logs (Backup and Logs) ingestion mechanism on a single partition.
Example backup command: db2 backup database <DB_NAME> online compress include logs
Best practices for taking a backup
The following best practices can help improve backup and restore performance:
Compression should be enabled
Following parameters should be optimally configured:
Utility Heap Size (UTIL_HEAP_SZ)
No. of CPUs
No. of Table Spaces
Extent Size
Page Size
Parallelism & Buffer configuration may be used to improve backup performance. Parameters that should be configured are :
Parallelism
Buffer Size
No. of Buffers
More information about backup best practices is available in IBM Knowledge Center.
Procedure
Login to the Delphix Management Application using Delphix Engine credentials or as the owner of the database from which you want to provision the dSource.
On the Databases tab of Environment Management screen, add a source config against discovered staging instance.
Then, click Manage.
Select Datasets.
Click the Plus (+) icon and select Add dSource, you’ll get a list of available source configs using which you can go for dsource creation.
In the Add dSource wizard, select the required source configuration.
If you are working with an HADR setup, please leave the HADR checkbox checked unless you're working with Staging push dSource.
The database name is mandatory and must be unique for a given instance. This is the name that the database was on the instance it was restored from.
Enter the complete Backup Path where the database backup file resides. If no value is entered, the default value used is the instance home directory. If there are multiple backup files for a database on the backup path, the most current one will be used.
Enter the Log Archive Method1 you wish to use for the database. If no value is entered, the default value used is DISK:/mountpoint/dbname/arch
Optionally, users can set the database configuration parameters during the linking operation in the Config Settings section.
If the dSource is to use HADR please enter the following fields. If it will not use HADR skip ahead to step 13. For more information about HADR please view Linking a dSource from a Db2 Database: An Overview.
a. Enter a fully qualified HADR Primary Hostname. This is a required field for HADR and must match the value set for HADR_LOCAL_HOST on the master.
b. Enter the port or /etc/services name for the HADR Primary SVC. This is a required field for HADR and uses the value set for HADR_LOCAL_SVC on the master.
c. Enter the port or /etc/services name for the HADR Standby SVC. This is a required field for HADR and uses the value set for HADR_REMOTE_SVC on the master.
Click Next.
Select a dSource Name and Database Group for the dSource.
Click Next.
You will get Data Management section where you need to specify staging environment and user which will be used for dsource creation.Set the Staging Environment to be the same as the dSource host.
Select the Staging Environment User to be the same as the instance owner of the dSource instance.
Info: Changing the Environment User
If you need to change or add an environment user for the dSource instance, see Managing Db2 Users and Instance Owners.
Then, click Next and you’ll get the Policies section. Set the desired Snapsync Policy for the dSource.
Click Next.
Specify any desired pre- and post-scripts. For details on pre- and post-scripts.
Click Next.
Review the dSource Configuration and Data Management information in the summary section.
Click Submit.
The Delphix Engine will initiate two jobs to create the dSource: DB_Link and DB_Sync. You can monitor these jobs by clicking Active Jobs in the top menu bar, or by selecting System > Event Viewer. When the jobs have completed successfully, the database icon will change to a dSource icon on the Environments > Host > Databases screen, and the dSource will also appear in the list of Datasets under its assigned group.
The dSource configuration screen
After you have created a dSource, the dSource Configuration tab allows you to view information about it and make modifications to its policies and permissions. In the Datasets panel, select the dSource you wish to examine. You can now choose the configuration tab to see information such as the Source files, Data Management configuration, and Hook Operations.
Provisioning a virtual database (VDB)
Prerequisites
You will need to have linked a dSource from a staging instance, as described in Linking a Db2 dSource, or have created a VDB from which you want to provision another VDB
You should have set up the Db2 target environment with necessary requirements as described in Requirements for Db2 Hosts and Databases.
Make sure you have the required Instance Owner permissions on the target instance and environment as described in Managing Db2 Users and Instance Owners.
The method for Database Permissions for Provisioned Db2 VDBs is decided before the provisioning
You can take a new snapshot of the dSource by clicking the Camera icon on the dSource card. Once the snapshot is complete you can provision a new VDB from it.
Please note while creating a VDB on an instance
By default, DB2 Plugin will not allow provisioning a VDB on an instance which contains a database that has an identical name to the source database.
For e.g.;
When we are provisioning a VDB from a VDB then source VDB will be treated as the source database.
When we are provisioning a VDB from a dSource then a staging database will be treated as the source database.
If the user wants to provision a VDB on an instance which contains a source database, then the user needs to follow the below steps :
Check if any config file with name advanceConfFlag.conf exists at location <Toolkit directory>/. If it does not exist, then the user should create a file with name advanceConfFlag.conf at location <Toolkit directory>/. Instance user must have read permission to this file. Once the file is created, user should proceed to step 2. If the file already exists at this location with the required permission, the user should directly proceed to step 2.
Add the below line in this config file.
allowSourceDBonSameInst=true
Then create/Refresh the VDB again.
Procedure
Login to the Delphix Management application.
Click Manage.
Select Datasets.
Select a dSource.
Select a snapshot from which you want to provision.
Click Provision VDB icon to open Provision VDB wizard.
Select a target environment from the left pane.
Select an Installation to use from the dropdown list of available DB2 instances on that environment.
Set the Environment User to be the Instance Owner. Note: The picking of instance owner is only possible if you have multiple environment users set on that host.
Provide VDB Name as database name as parameter.
Optionally, set the database configuration parameters for the VDB.
Click Next.
Select a Target Group for the VDB.
Click the green Plus icon to add a new group, if necessary.Select a Snapshot Policy for the VDB.
Click Next.
Specify any desired hook operations.
Click Next.
Review the Provisioning Configuration and Data Management information.
Click Submit.
When provisioning starts, you can review the progress of the job in the Databases panel, or in the Job History panel of the Dashboard. When provisioning is complete, the VDB will be included in the group you designated and listed in the Databases panel. If you select the VDB in the Databases panel and click the Open icon, you can view its card, which contains information about the database and its Data Management settings.
Once the VDB provisioning has successfully completed, if the source and target instance ids are not the same, you may want to grant secadm and dbadm on the database to the target instance id. Refer to Database Permissions for Provisioned Db2 VDBs for more information.
Next steps
Congratulations! You have provisioned your first virtual database!
Now, perform some simple functional tests with your application. You can connect your app to the VDB using standard TNS/JDBC techniques. Delphix has already registered the VDB for you on the target listener.
We suggest the following next steps:
Drop a table and use the VDB Rewind feature to test the recovery of your VDB.
Take a snapshot of your dSource and refresh your VDB to quickly get fresh production data.
Provision a new VDB from your VDB to test sharing data quickly with other teams.
Mask your new VDB to protect sensitive data. Provision new VDBs from that masked VDB to quickly provide safe data to development and QA teams.