
Quick start guide for SAP HANA plugin
This quick start guide, which is excerpted from the larger User Guide, is intended to provide you with a quick overview of working with HANA database objects in the Delphix Engine. It does not cover any advanced configuration options or best practices, which can have a significant impact on performance. It assumes that you are working in a Lab/Dev setting and attempting to quickly test Delphix functionality. It assumes you will use the VMware Hypervisor.
Overview
In this guide, we will walk through deploying a Delphix Engine, starting with configuring Source and Target database environments on Windows servers. We will then create a dSource, and provision a VDB.
For purposes of the QuickStart, you can ignore any references to Replication or Masking.
Deploy OVA on VMware
Use the Delphix-supplied OVA file to install the Delphix Engine. The OVA file is configured with many of the minimum system requirements. The underlying storage for the install is assumed to be redundant SAN storage.
Download the OVA file from https://download.delphix.com. You will need a support login from your sales team or a welcome letter.
Navigate to the Delphix Product Releases/<Current Version>/Appliance Images page.
Login using the vSphere client to the vSphere server (or vCenter Server) where you want to install the Delphix Engine.
In the vSphere Client, click File.
Select Deploy OVA Template.
Browse to the OVA file.
Click Next.
Select a hostname for the Delphix Engine. This hostname will also be used in configuring the Delphix Engine network.
Select the data center where the Delphix Engine will be located.
Select the cluster and the ESX host.
Select one (1) data store for the Delphix OS. This datastore can be thin-provisioned and must have enough free space to accommodate the 127GB comprising the Delphix operating system.
Select four (4) or more data stores for Database Storage for the Delphix Engine. The Delphix Engine will stripe all of the Database Storage across these VMDKs, so for optimal I/O performance, each VMDK must be equal in size and be configured Thick Provisioned - Eager Zeroed. Additionally, these VMDKs should be distributed as evenly as possible across all four SCSI I/O controllers.
Select the virtual network you want to use. If using multiple physical NICs for link aggregation, you must use vSphere NIC teaming. Do not add multiple virtual NICs to the Delphix Engine itself. The Delphix Engine should use a single virtual network. For more information, see Optimal Network Architecture for the Delphix Engine
Click Finish. The installation will begin and the Delphix Engine will be created in the location you specified.
Once the installation has completed, power on the Delphix Engine and proceed with the initial system configuration as described in Setting Up Network Access to the Delphix Engine
If your source database is 4 TB, you probably need 4 TB of storage for the Delphix Engine. Add at least 4 data disks of similar size for the Delphix VM. For example: for a source database of 4 TB, create 4 VMDKs of 1 TB each.
For a full list of requirements and best practice recommendations, see Virtual Machine Requirements for VMware Platform
Setup network access to the Delphix engine
Power on the Delphix Engine and open the Console.
Wait for the Delphix Management Service and Delphix Boot Service to come online. This might take up to 10 minutes during the first boot. Wait for the large orange box to turn green.
Press any key to access the sysadmin console.
Enter
sysadmin@SYSTEMfor the username andsysadminfor the password.You will be presented with a description of available network settings and instructions for editing.
CODEDelphix Engine Network Setup To access the system setup through the browser, the system must first be configured for networking in your environment. From here, you can configure the primary interface, DNS, hostname, and default route. When DHCP is configured, all other properties are derived from DHCP settings. To see the current settings, run "get." To change a property, run "set =." To commit your changes, run "commit." To exit this setup and return to the standard CLI, run "discard." defaultRoute IP address of the gateway for the default route -- for example, "1.2.3.4." dhcp Boolean value indicating whether DHCP should be used for the primary interface. Setting this value to "true" will cause all other properties (address, hostname, and DNS) to be derived from the DHCP response dnsDomain DNS Domain -- for example, "delphix.com" dnsServers DNS server(s) as a list of IP addresses -- for example, "1.2.3.4,5.6.7.8." hostname Canonical system hostname, used in alert and other logs -- for example, "myserver" primaryAddress Static address for the primary interface in CIDR notation -- for example, "1.2.3.4/22" Current settings: defaultRoute: 192.168.1.1 dhcp: false dnsDomain: example.com dnsServers: 192.168.1.1 hostname: Delphix primaryAddress: 192.168.1.100/24Configure the
hostname. If you are using DHCP, you can skip this step.CODEdelphix network setup update *> set hostname=<hostname>Note:
Use the samehostnameyou entered during the server installation.Configure DNS. If you are using DHCP, you can skip this step.
CODEdelphix network setup update *> set dnsDomain=<domain> delphix network setup update *> set dnsServers=<server1-ip>[,<server2-ip>,...]Configure either a static or DHCP address.
DHCP Configuration
CODEdelphix network setup update *> set dhcp=trueStatic Configuration
CODEdelphix network setup update *> set dhcp=false delphix network setup update *> set primaryAddress=<address>/<prefix-len>Note:
The static IP address must be specified in CIDR notation (for example,192.168.1.2/24)Configure a default gateway. If you are using DHCP, you can skip this step.
CODEdelphix network setup update *> set defaultRoute=<gateway-ip>Commit your changes. Note that you can use the
getcommand prior to committing to verify your desired configuration.CODEdelphix network setup update *> commit Successfully committed network settings. Further setup can be done through the browser at: http://<address> Type "exit" to disconnect, or any other commands to continue using the CLI.Check that you can now access the Delphix Engine through a Web browser by navigating to the displayed IP address, or hostname if using DNS.
Exit setup.
CODEdelphix> exit
Setting up the Delphix engine
Once you set up the network access for Delphix Engine, navigate to the Delphix Engine URL in your browser for server setup.
The welcome screen below will appear for you to begin your Delphix Engine setup.
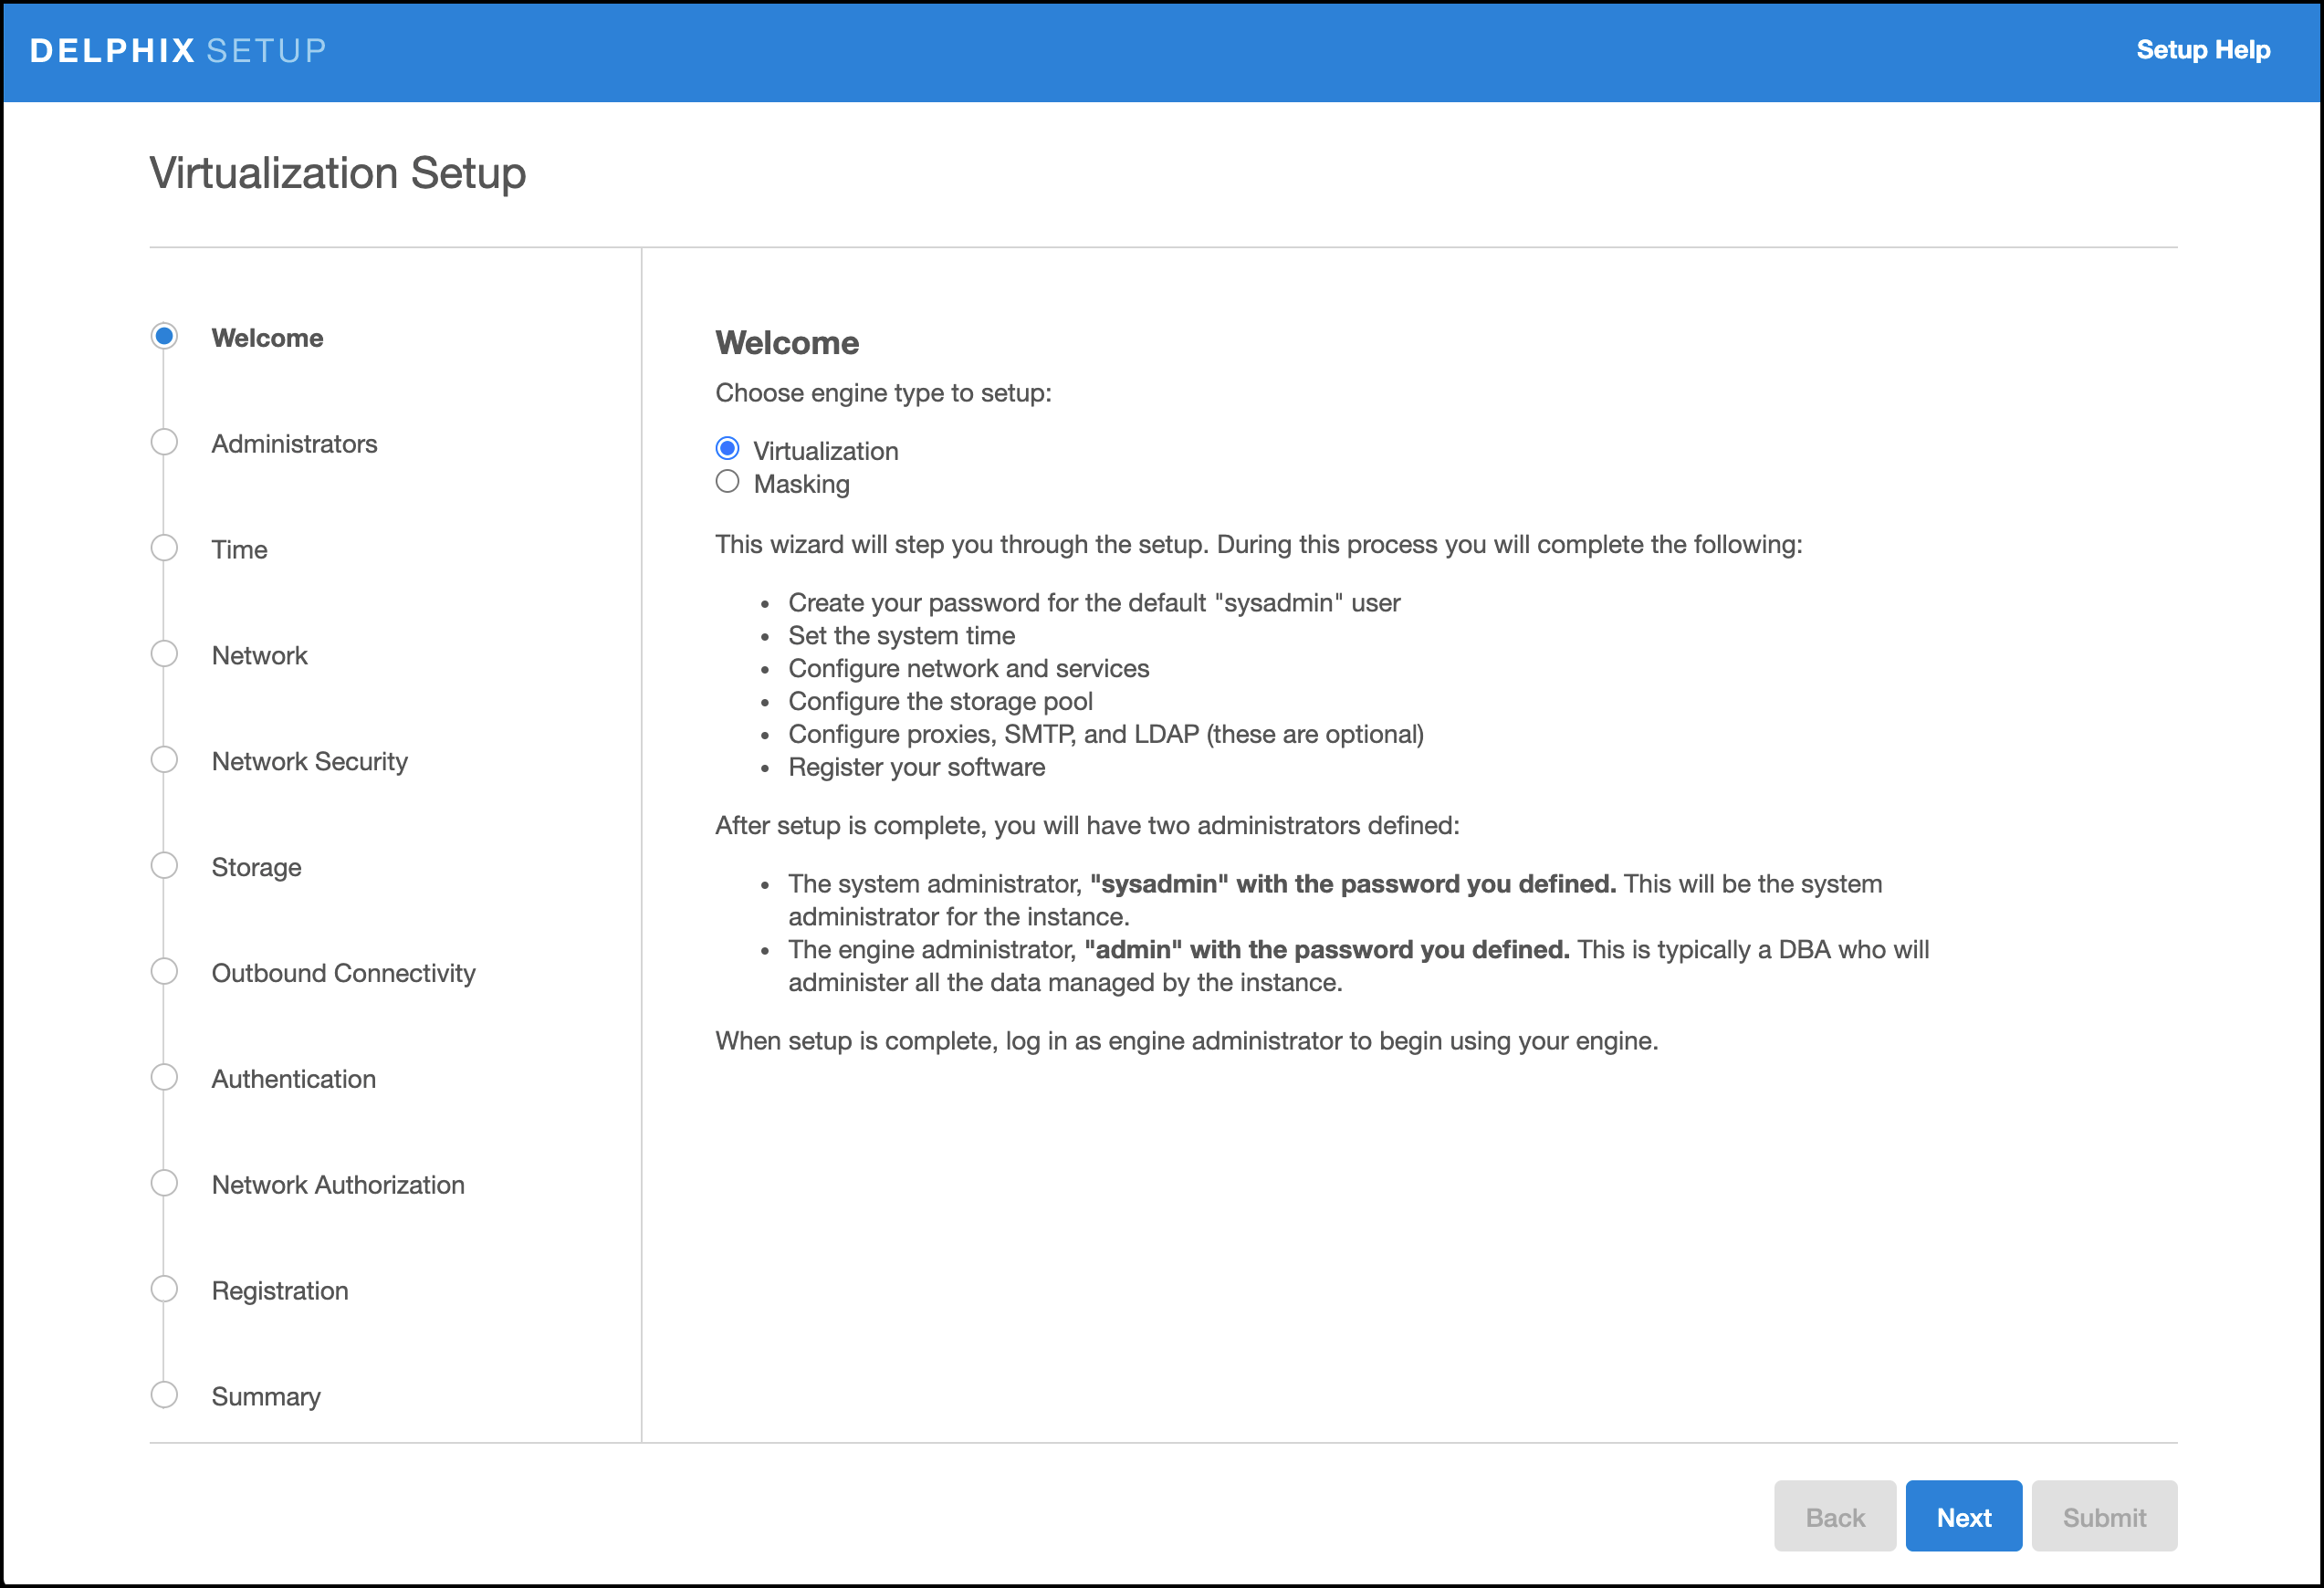
The setup procedure uses a wizard process to take you through a set of configuration screens:
Administrators
Time
Network
Network Security
Storage
Outbound Connectivity
Authentication
Network Authorization
Registration
Summary
Connect to the Delphix Engine at
http:///<Delphix Engine>login/index.html#serverSetup. The Delphix Setup application will launch when you connect to the server. Enter your sysadmin login credentials, which initially defaults to the username sysadmin, with the initial default password of sysadmin. On first login, you will be prompted to change the initial default password.Click Next.
Administrators
The Delphix Engine supports two types of administrators:
System Administrator (sysadmin) - this is the engine system administrator. The sysadmin password is defined here.
Engine Administrator (admin) - this is typically a DBA who will administer all the data managed by the engine.
On the Administrators tab, you set up the sysadmin password by entering an email address and password. The details for the admin are displayed for reference.
The default domain user created on Delphix Engines from 5.3.1 is known as admin instead of delphix_admin. When engines created before 5.3.1 are upgraded to 5.3.1 or later they will retain their old username 'delphix_admin'. To avoid complications Delphix recommends creating users with an admin role and then disabling the delphix_admin.
Time
The engine time is used as the baseline for setting policies that coordinate between virtual databases and external applications
Choose your option to setup system time in this section. For a Quick Start, simply set the time and your timezone. You can change this later.
Network
The initial out-of-the-box network configuration in the OVA file is set to use a single VMXNET3 network adapter.
You have already configured this in the initial configuration. Delphix supports more advanced configurations, but you can enable those later.
Storage
You should see the data storage VMDKs or RDMs you created during the OVA installation. Click Next to configure these for data storage.
Serviceability
Choose your options to configure serviceability settings.
For a Quick Start, accept the defaults. You can change this later.
Authentication service
Choose your options to configure authentication services.
For a Quick Start, accept the defaults. You can change this later.
Registration
If the Delphix Engine has access to the external Internet (either directly or through a web proxy), then you can auto-register the Delphix Engine:
Enter your Support Username and Support Password.
Click Register.
If external connectivity is not immediately available, you must perform manual registration.
Copy the Delphix Engine registration code in one of two ways:
Manually highlight the registration code and copy it to clipboard. Or,
Click Copy Registration Code to Clipboard.
Transfer the Delphix Engine's registration code to a workstation with access to the external network Internet. For example, you could e-mail the registration code to an externally accessible e-mail account.
On a machine with access to the external Internet, please use your browser to navigate to the Delphix Registration Portal at http://register.delphix.com.
Login with your Delphix support credentials (username and password).
Paste the Registration Code.
Click Register.
Although your Delphix Engine will work without registration, we strongly recommend that you register each engine as part of the setup. Failing to register the Delphix Engine will impact its supportability and security in future versions.
To regenerate the registration code for a Delphix Engine please refer to, Regenerating the Delphix Engine Registration Code. Delphix strongly recommends that you regenerate this code and re-register the engine regularly to maximize the Support Security of the Delphix Engine. Delphix recommends doing this every six months.
Summary
The final summary tab will enable you to review your configurations for System Time, Network, Storage, Serviceability, and Authentication.
Click the Back button to go back and to change the configuration for any of these server settings.
If you are ready to proceed, then click Submit.
Click Yes to confirm that you want to save the configuration.
Click Setup to acknowledge the successful configuration.
There will be a wait of several minutes as the Delphix Engine completes the configuration.
Requirements for HANA staging/target host and databases
Backup of the tenant must be present which needs to be recovered. Along with backup, metadata information generated by script create_backup_metadata.sh is also expected in the backup location. As we will be recovering a tenant through backup files the important thing while creating the dSource which should be taken care of is the user should have access to the backup directory where the backup file resides.
General staging Host Requirements
HANA database must be installed and running.
Read-write permission on the backup directory.
There must be an operating system user which has HANA administrative user privileges <sid>adm:
The Delphix Engine must be able to make an SSH connection to the staging environment using the operating system user.
The operating system user must have read and execute privileges on the HANA binaries installed on the staging environment.
The operating system user must have read, write, and execute access to the HANA data directories on the staging environment.
A plugin directory must exist on the staging host. The directory must have the following properties:
Should be writable by the operating system user described above.
Should have at least 256 MB of available storage.
TCP/IP connectivity to and from the staging environment must be configured as described in General Network and Connectivity Requirements
Hostname and IP address must be correctly configured.
Requirements for HANA target host and databases
A target environment is where virtualized databases run. A target environment must have a HANA instance installed and configured. The VDB will become a tenant on the target database instance.
General target environment requirements
The operating system of the target environment must match the staging environment.
The SAP HANA installation on the target environment must have the same or higher version than the staging environment.
There must be an operating system user with the following privileges:
The Delphix Engine must be able to make an SSH connection to the target environment using the operating system user.
The operating system user must have read and execute privileges on the HANA binaries installed on the target environment.
The operating system user must have permission to run mount and unmount as the superuser via sudo with neither a password nor a TTY. See Sudo Requirements for the HANA 2.0 Plugin
Prior to the discovery, a plugin directory on the target environment must exist with the following properties:
The plugin directory must be writable by the operating system user mentioned above.
The plugin directory must have at least 256 MB of available storage.
There must be a mount point directory (for example, /mnt) that will be used as the base for mount points that are created when provisioning a VDB with the following properties:
The mount point directory must be writable by the operating system user mentioned above.
The mount point directory should be empty.
TCP/IP connectivity to and from the source environment must be configured as described in General Network and Connectivity Requirements.
The hostname and IP address must be correctly configured.
HANA instance on which the VDB creation is being done should have the empty ports to host the services for the tenant database. The default port number range for tenant databases is 3<instance>40—3<instance>99. This means that the maximum number of tenant databases that can be created per instance is 20. However, you can increase this by reserving the port numbers of further instances. You do this by configuring the property [multidb] reserved_instance_numbers in the global.ini file. The default value of this property is 0. If you change the value to 1, the port numbers of one further instance are available (for example, 30040—30199 if the first instance is 00). If you change it to 2, the port numbers of two further instances are available (for example, 30040—30299 if the first instance is 00). And so on.
Adding a HANA environment
Prerequisites
Make sure that the HANA environment in question meets the requirements described in Requirements for HANA Staging Hosts and Databases and Requirements for HANA Target Hosts and Databases
Procedure
Login to the Delphix Management application.
Click Manage.
Select Environments.
Next to Environments, click the Actions (...) menu and select Add Environment.
In the Add Environment dialog, In the Host OS select Unix/Linux on the menu.
In Server Type, select Standalone Host.
Click Next.
Enter Name for the environment.
Enter the Host IP address or fully qualified hostname.
Enter the SSH port. The default value is 22.
Enter an OS Username for the environment which should be ‘’.>’.>
Select Login Type.
Note:Currently, the Enterprise Password Vault option is not supported.
Username and Password - enter the OS username and password
Username and Public Key - enter the OS username.
Password Vault - select from an existing Enterprise Password Vault
Using public key authentication
If you want to use public-key authentication for logging into your Unix-based environment, there are two options: use the engine's key pair or provide a key pair for this environment.
To use the engine's key pair:
Select Public Key for the Login Type.
Click View Public Key.
Copy the public key that is displayed, and append it to the end of your
~/.ssh/authorized_keysfile. If this file does not exist, you will need to create it.Run chmod 600 ~/.ssh/authorized_keys to allow only the file's owner to read and write to it (make sure the file is owned by the user).
Run chmod 755 ~ to restrict access to the user's home directory so no other user may write to it.
Run chmod 700 ~/.ssh so that others cannot write to it. The ~/.ssh directory cannot be writable by group or other users. Otherwise, authentication will fail.
As an alternative, you can provide a key pair specific for this environment via the API or CLI. See Option 2 in this CLI Cookbook article for instructions.
For Password, enter the password associated with the user in step 11.
Select Public Key for the Login Type.
Click View Public Key.
Copy the public key that is displayed, and append it to the end of your
~/.ssh/authorized_keysfile. If this file does not exist, you will need to create it.Run chmod 600 ~/.ssh/authorized_keys to allow only the file's owner to read and write to it (make sure the file is owned by the user).
Run chmod 755 ~ to restrict access to the user's home directory so no other user may write to it.
Run chmod 700 ~/.ssh so that others cannot write to it. The ~/.ssh directory cannot be writable by group or other users. Otherwise, authentication will fail.
For Password Login, click ‘Validate’ to test the username and password.
Enter a Plugin Path. The location specified must be a string without spaces. Ensure this directory path exists on the host in question. Environment discovery will fail if the directory does not exist on the host.
To provide your own Oracle Java select the Provide my own JDK checkbox and click Next.
In the Java Development Kit tab enter the absolute path to your Oracle JDK and click Next. For more information, see Providing Your Own Oracle Java
Click Submit. On success, the new environment will be added to the list in the Environments tab.
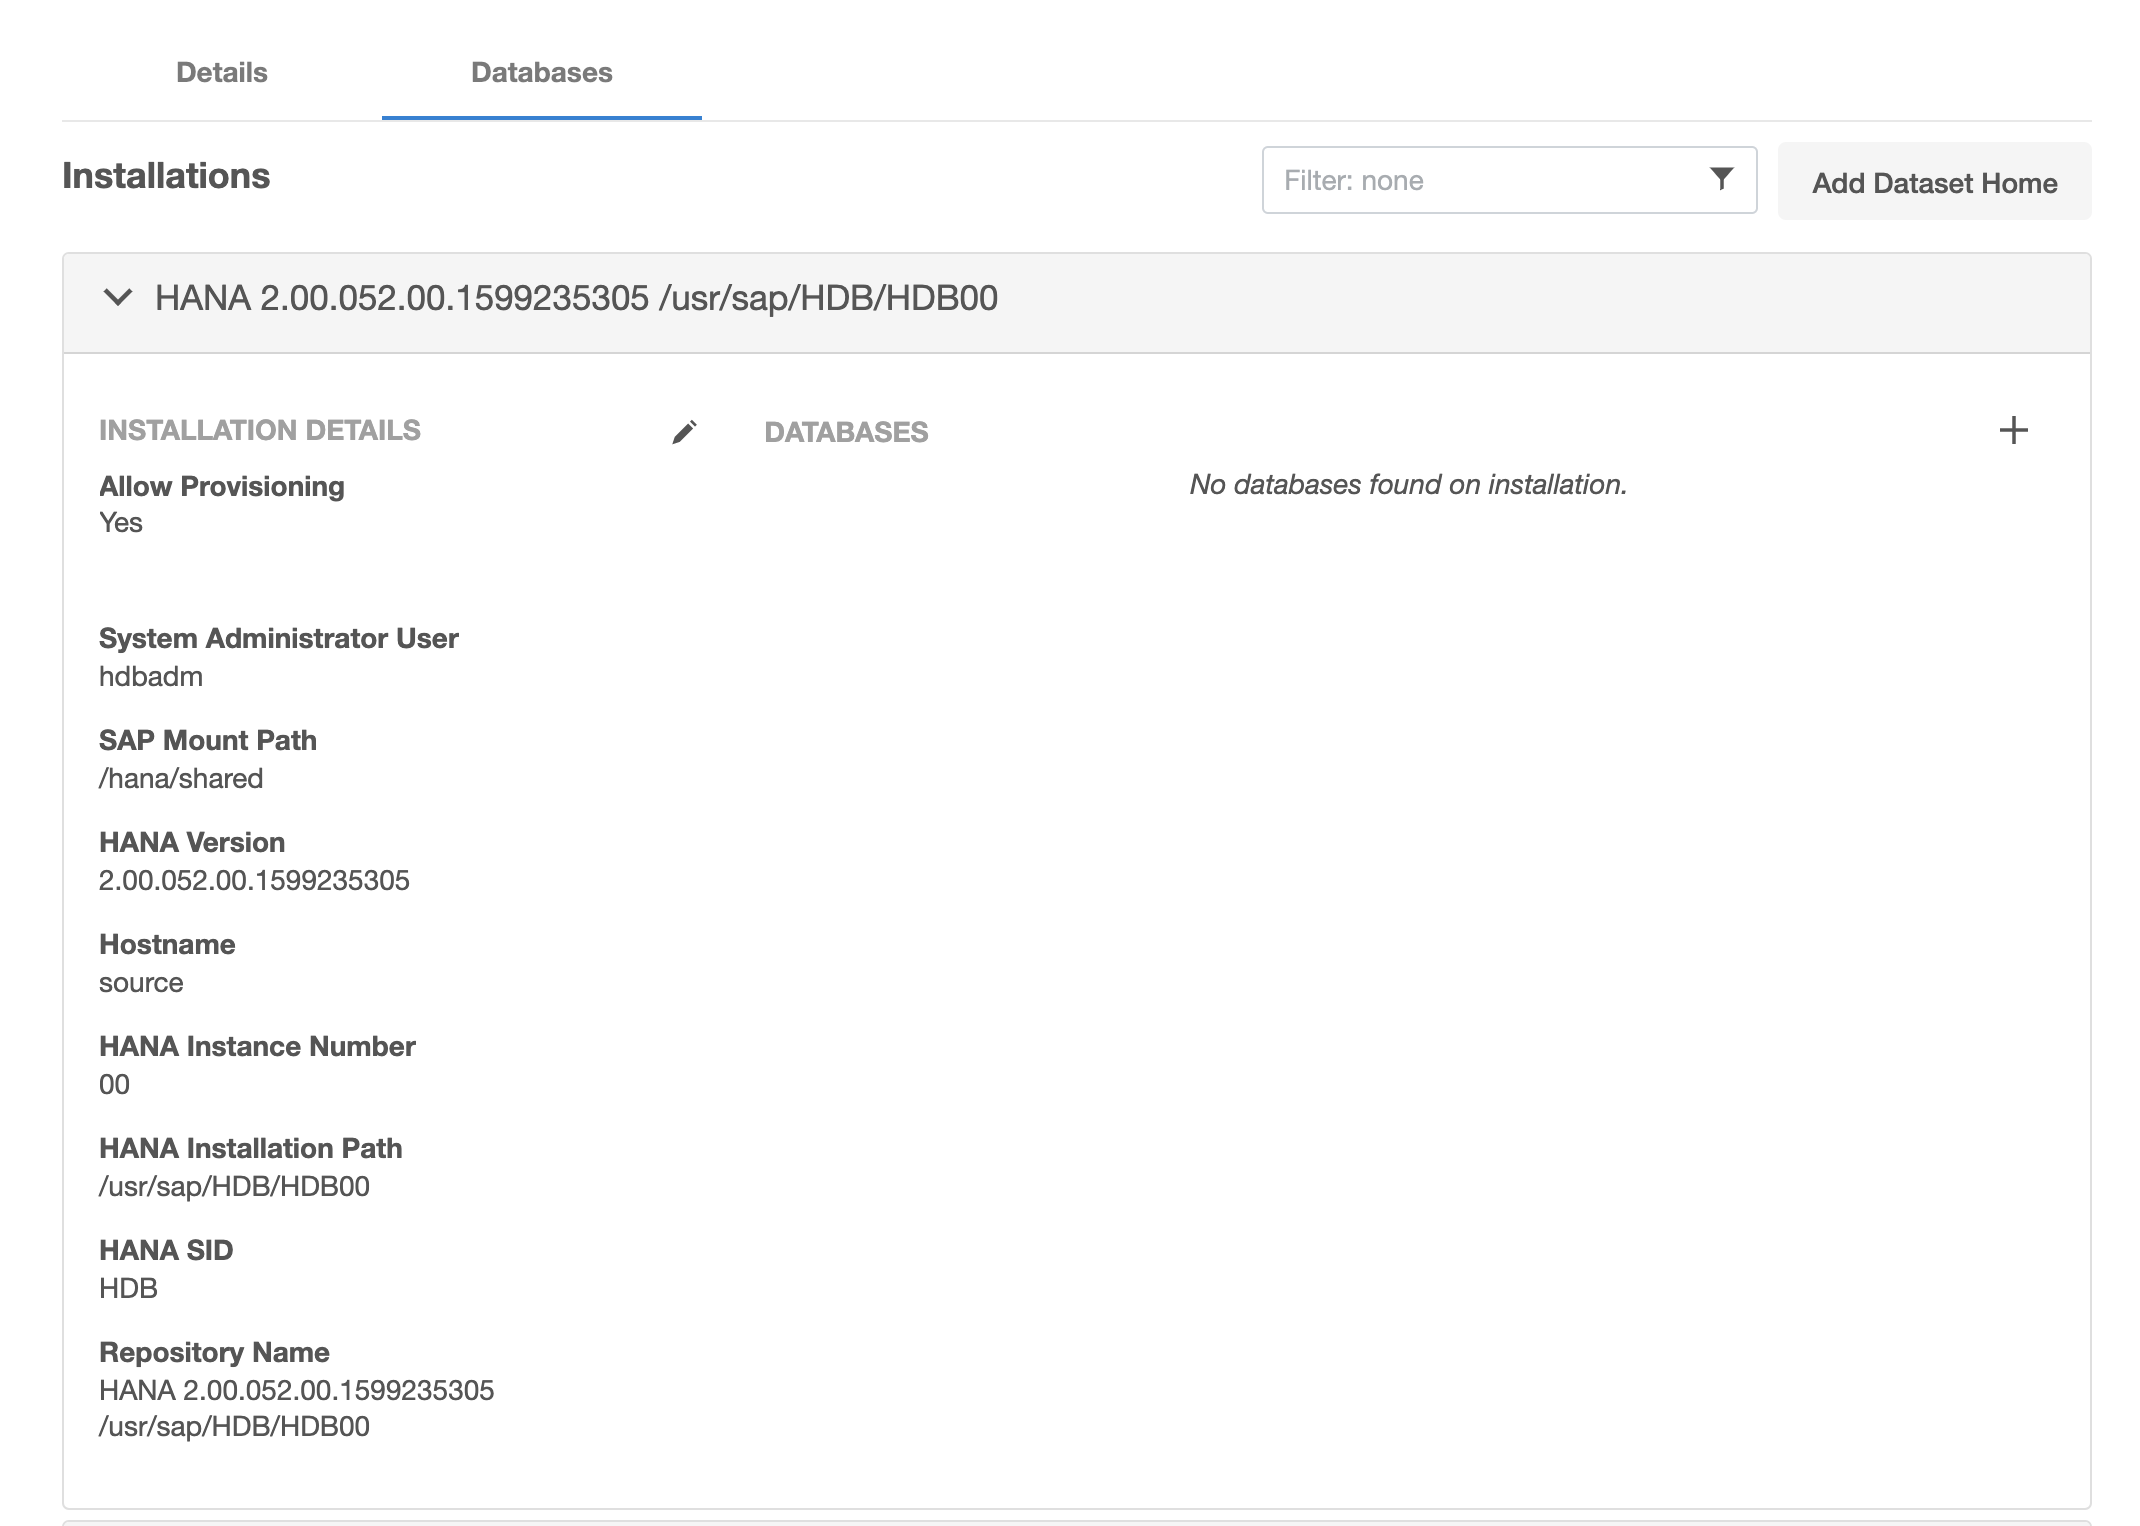
Select the “Databases” tab to view discovered HANA databases:
Linking a HANA data source
This topic describes basic concepts behind the creation of a dSource for a HANA database using conventional pull and Staging push mechanisms.
For Staging Push, only native/third-party backups are used to populate data in the staging database.
For Third-party Backups, users need to provide a “Backup Path” containing FULL and Incremental backups. These files will be copied to the Delphix Engine during the dSource linking process. In this scenario, the Delphix Engine will not require any credentials of the source database. Although credentials for the tenant database (for which backup has been placed) and systemdb of staging instances would be required.
Prerequisites for customer provided backups ingestion mechanism
Users need to run the create_backup_metadata.sh. This script will create the backupTimeInfo file at the same location where backups are kept. This script will gather all the required metadata information and will store that information in the backupTimeInfo file. This information will then get used by the plugin at the time of creating dSource.
More details regarding the script have been included in the HANA 2.0 Plugin Tools
Procedure
Login to the Delphix Management application.
Select Manage > Environments. Then select the Datasets tab.
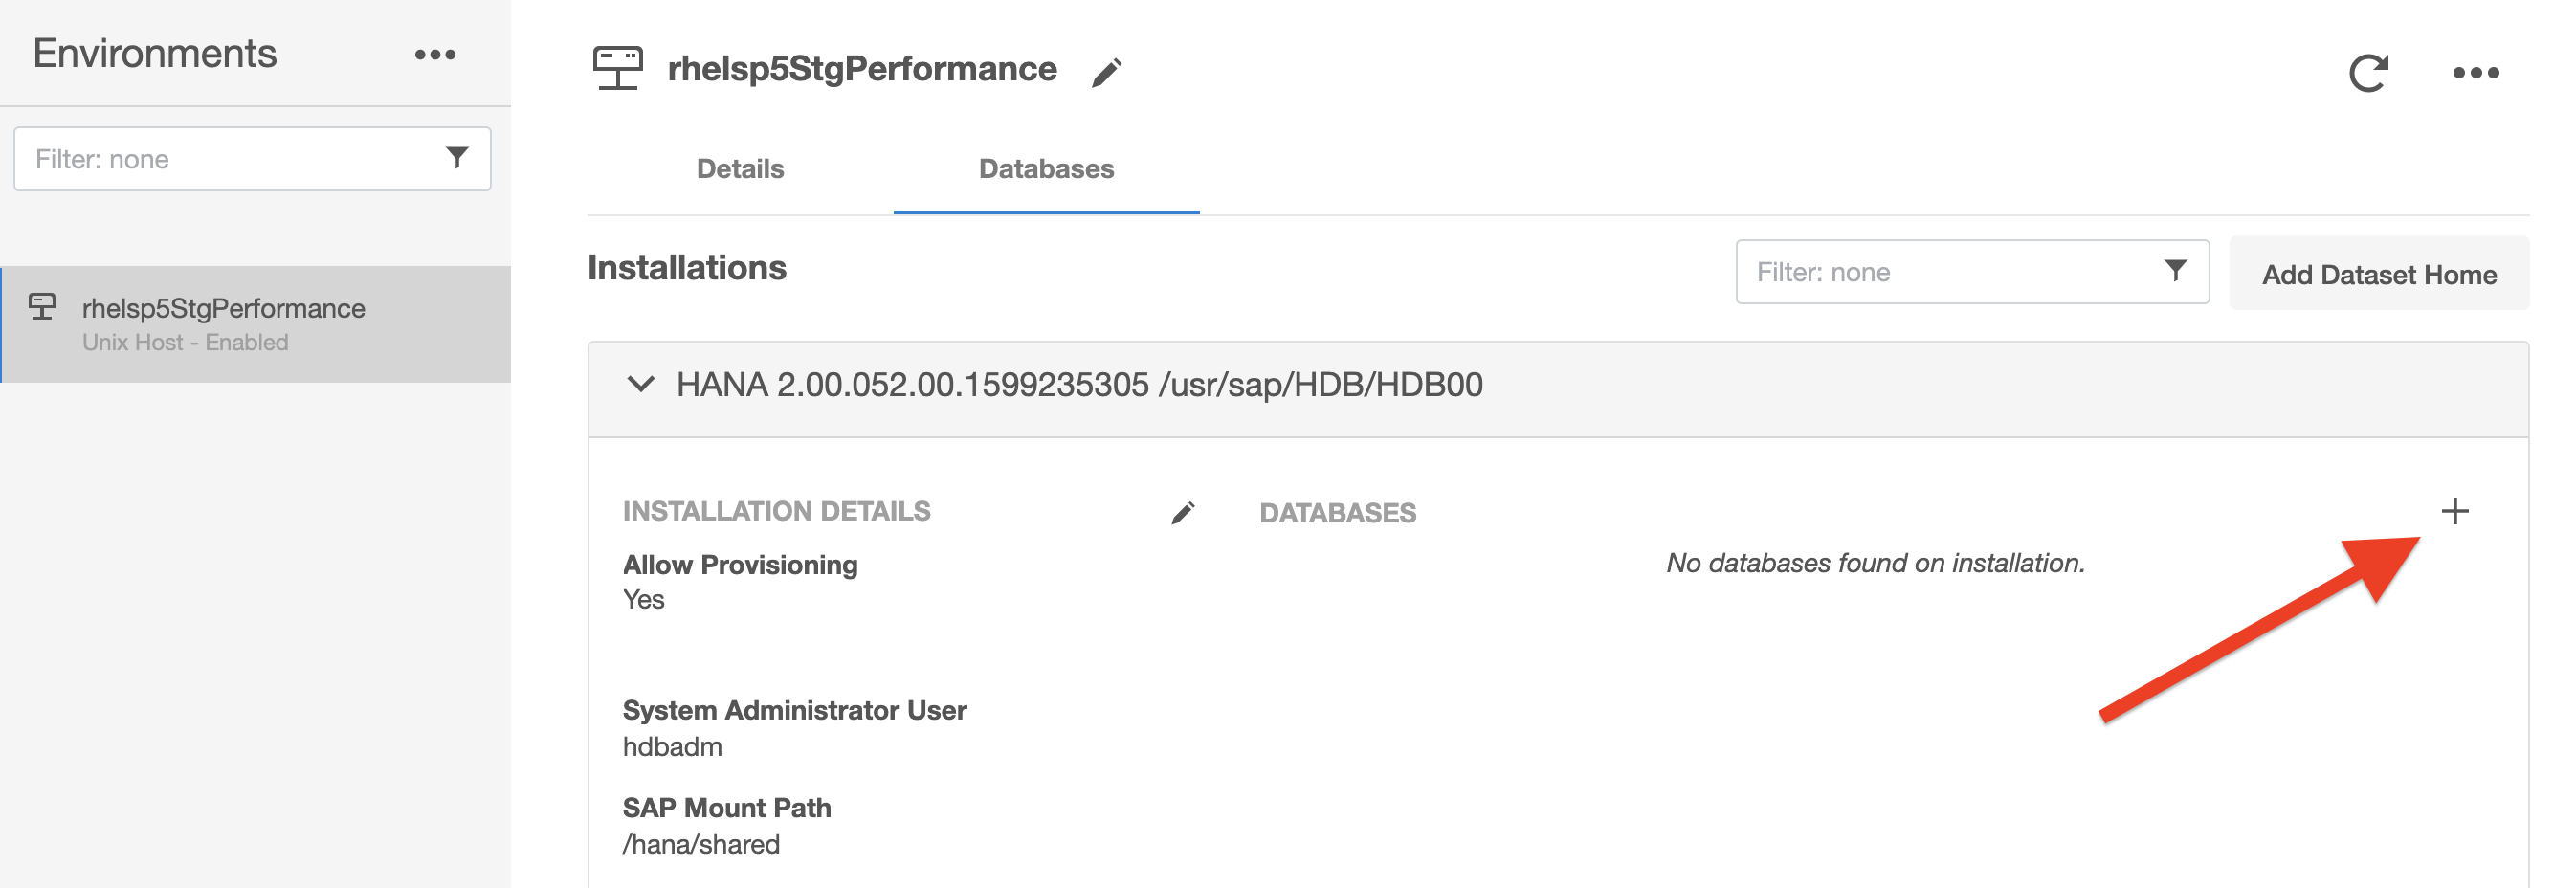
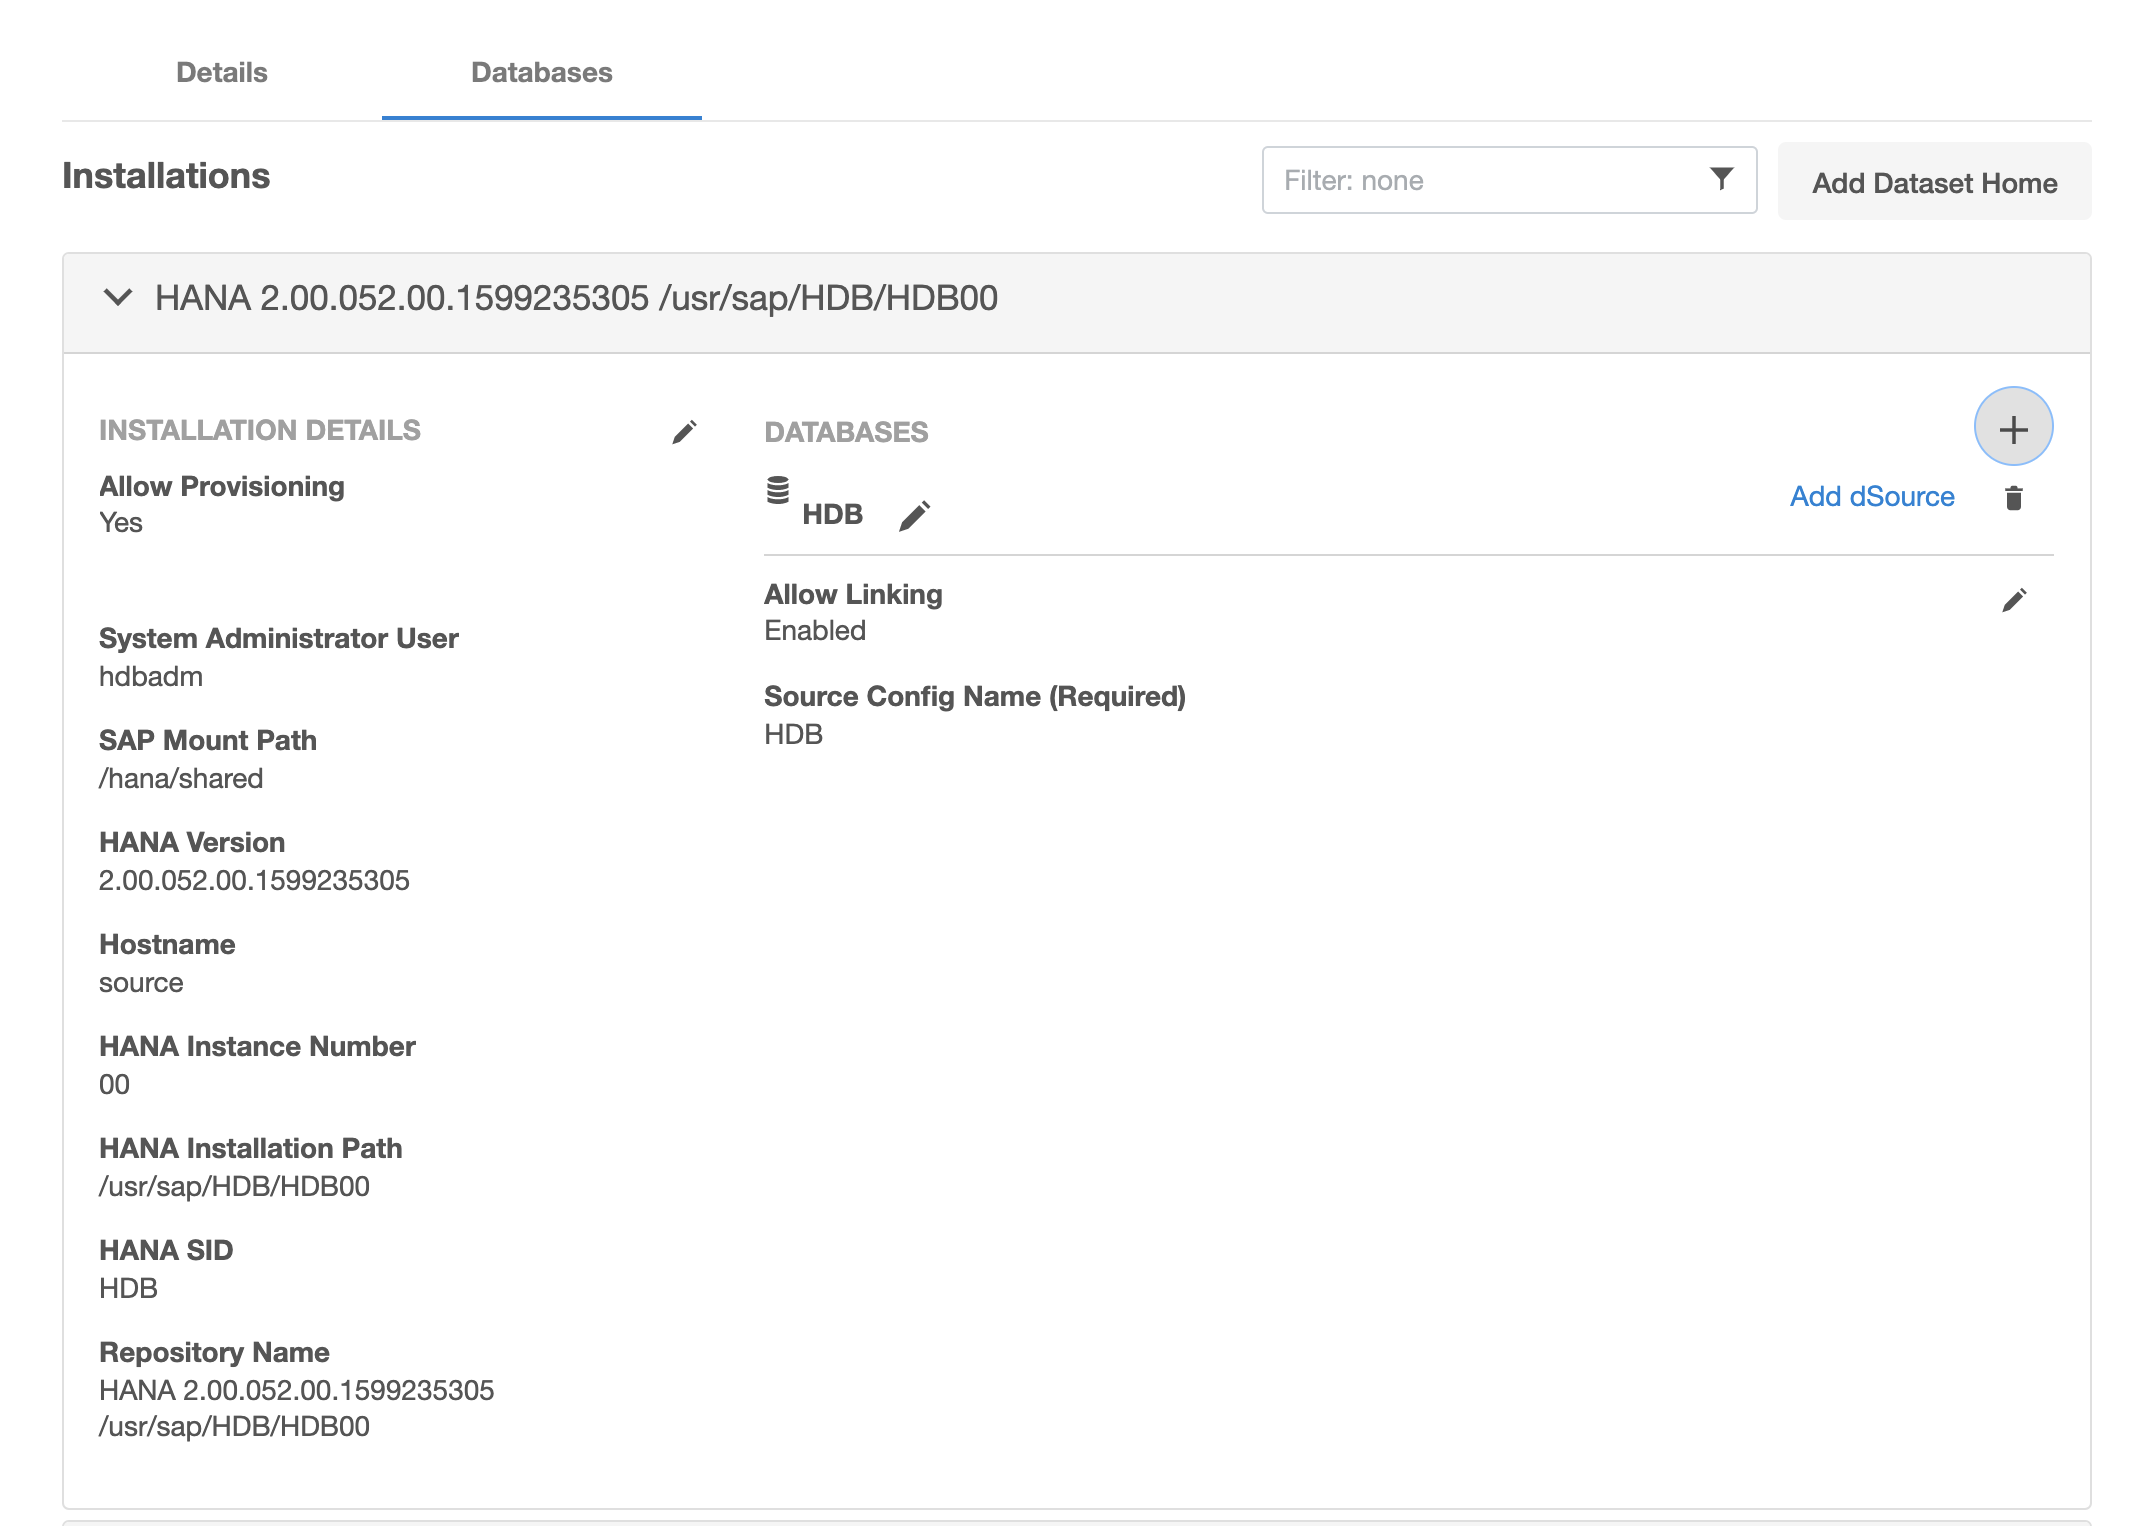
Create a source configuration on which to build the dSource. You can do this by clicking on the + symbol. The Source configuration can have any name.
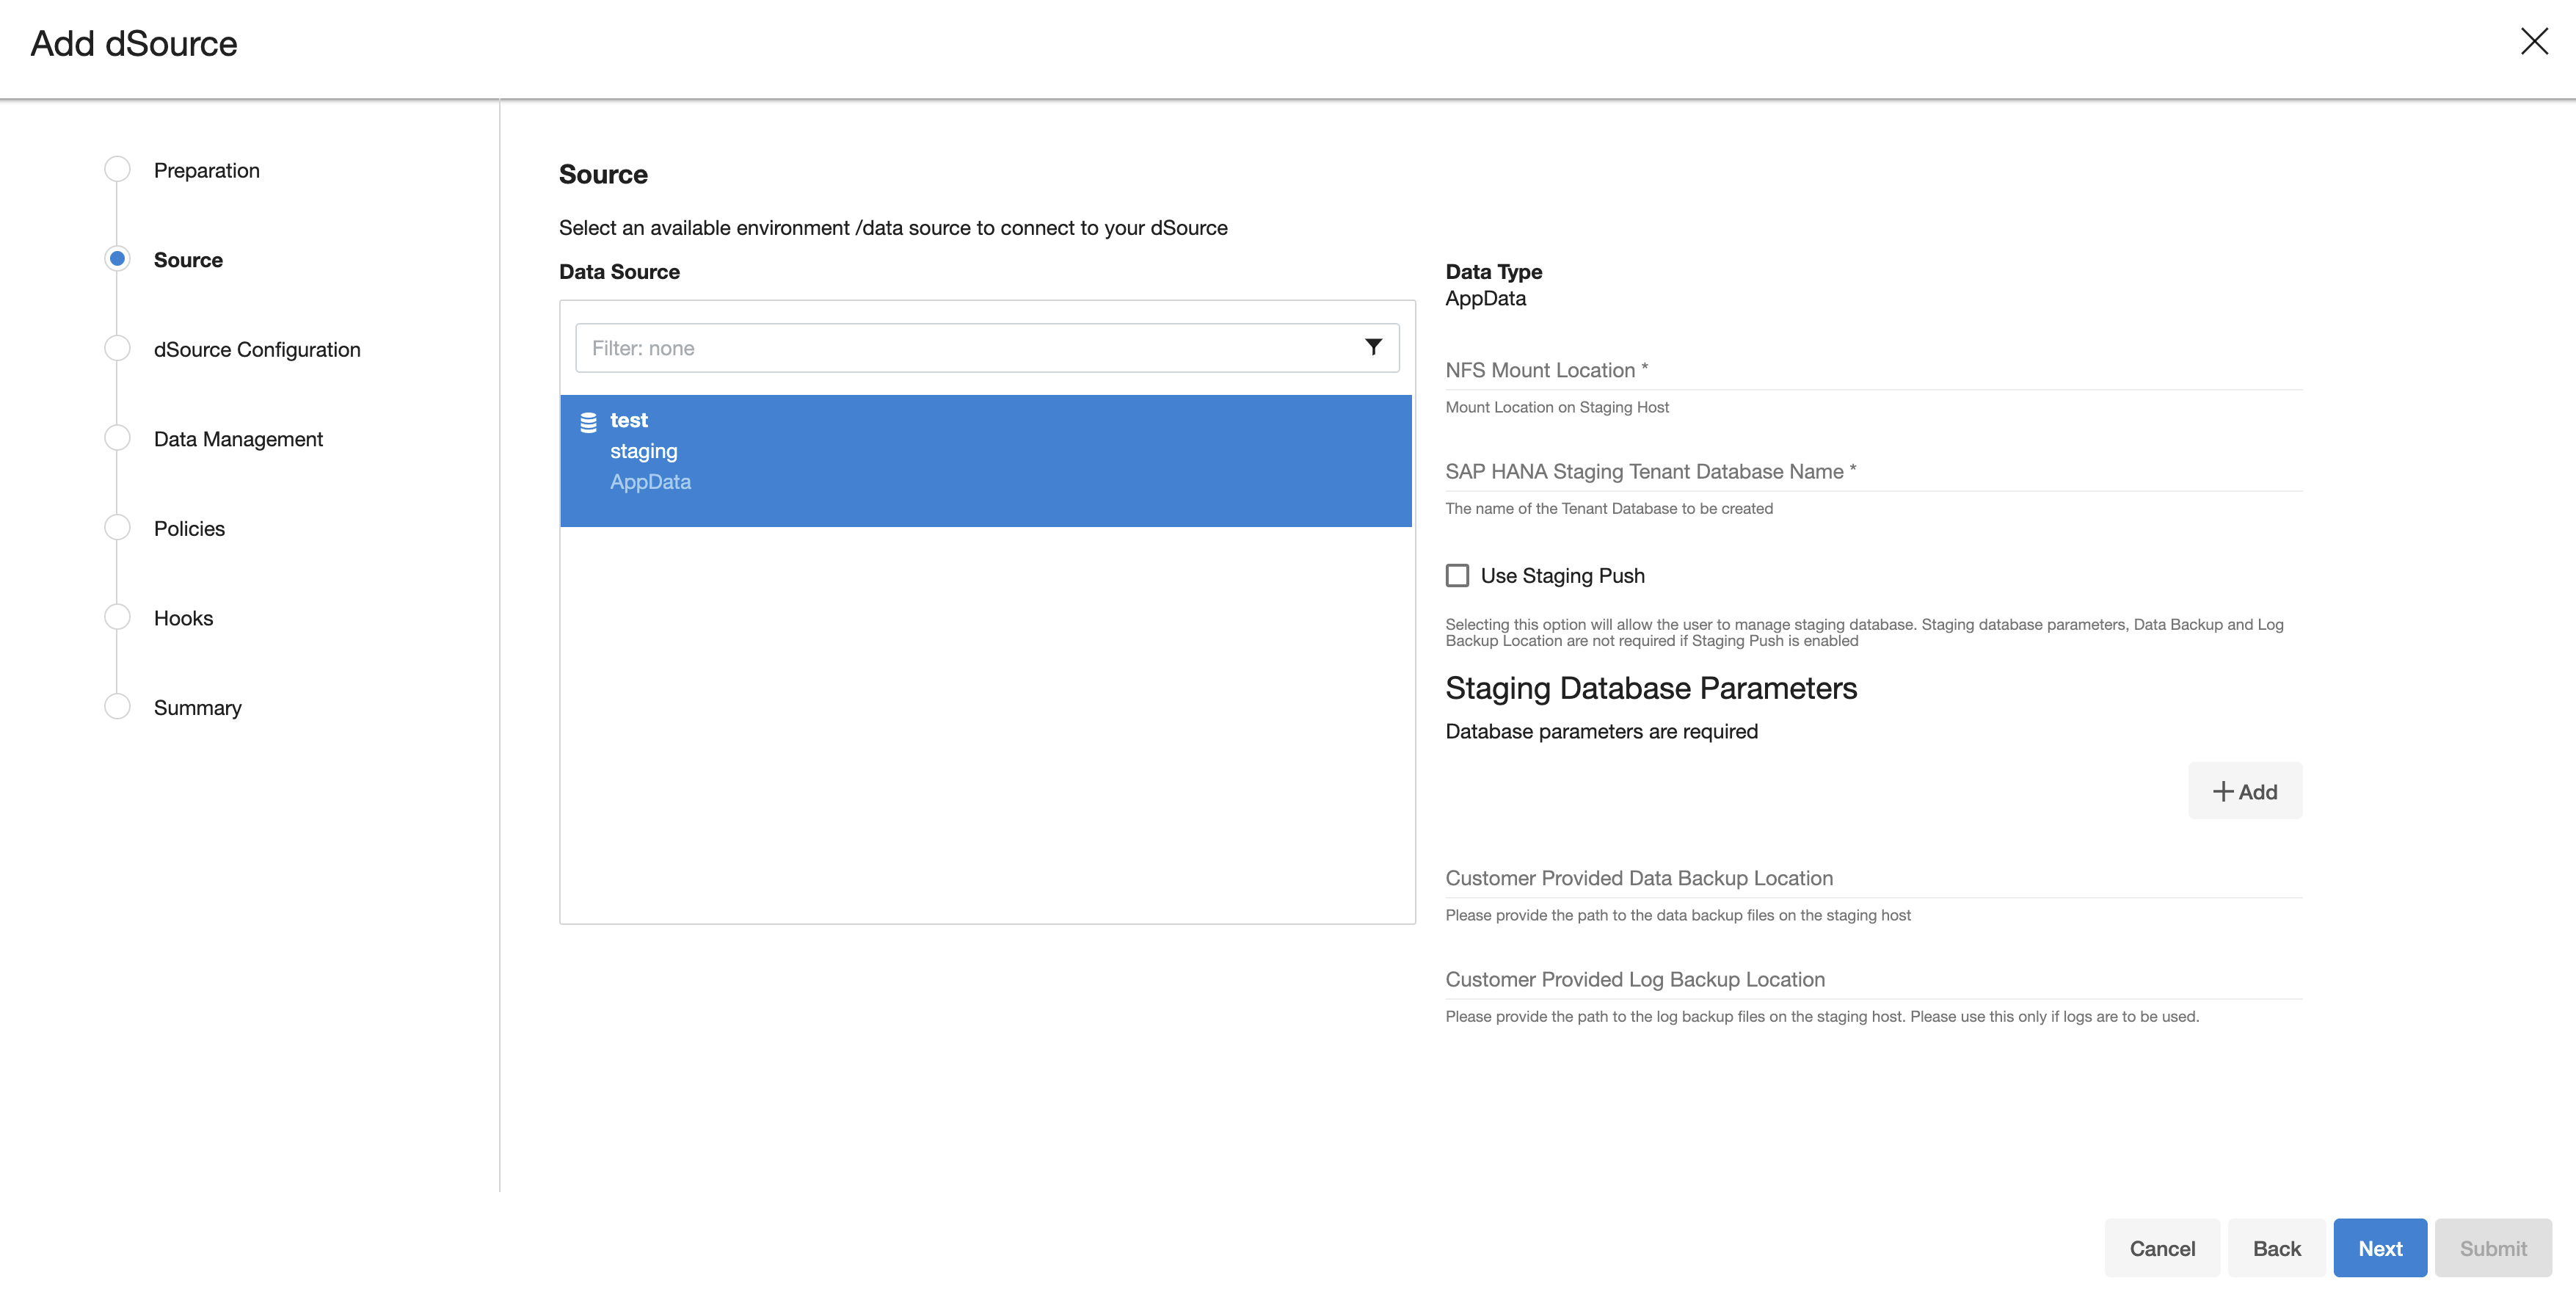
In the Add dSource wizard, select the required source configuration.
After selecting the source, below are the parameters required to create the dSource.
Parameters required for the conventional pull mechanism:
Mount Location on Staging Host
SAP HANA Source Tenant Database Name
Source SystemDB User Name
Source SystemDB Password
Source Tenant Database User Name
Source Tenant Database Password
Customer Provided Data Backup Location: This represents the path to the location of the customer-provided backup files.
Customer Provided Log Backup Location: This represents the path to log the location of the customer-provided log backup files. This parameter is optional.
Parameters required for the Staging push mechanism
Mount Location on Staging Host
SAP HANA Source Tenant Database Name
Enable the Staging Push feature by selecting the checkbox "Use Staging Push". With this feature, the user handles the Source Tenant database and its state on their own and you don't need to specify any other staging database parameters, data backup, and log backup locations. If this check box is selected, the HANA plugin will not invoke the tenant creation and recovery operation and if this checkbox is not selected then the default pull approach will be used.
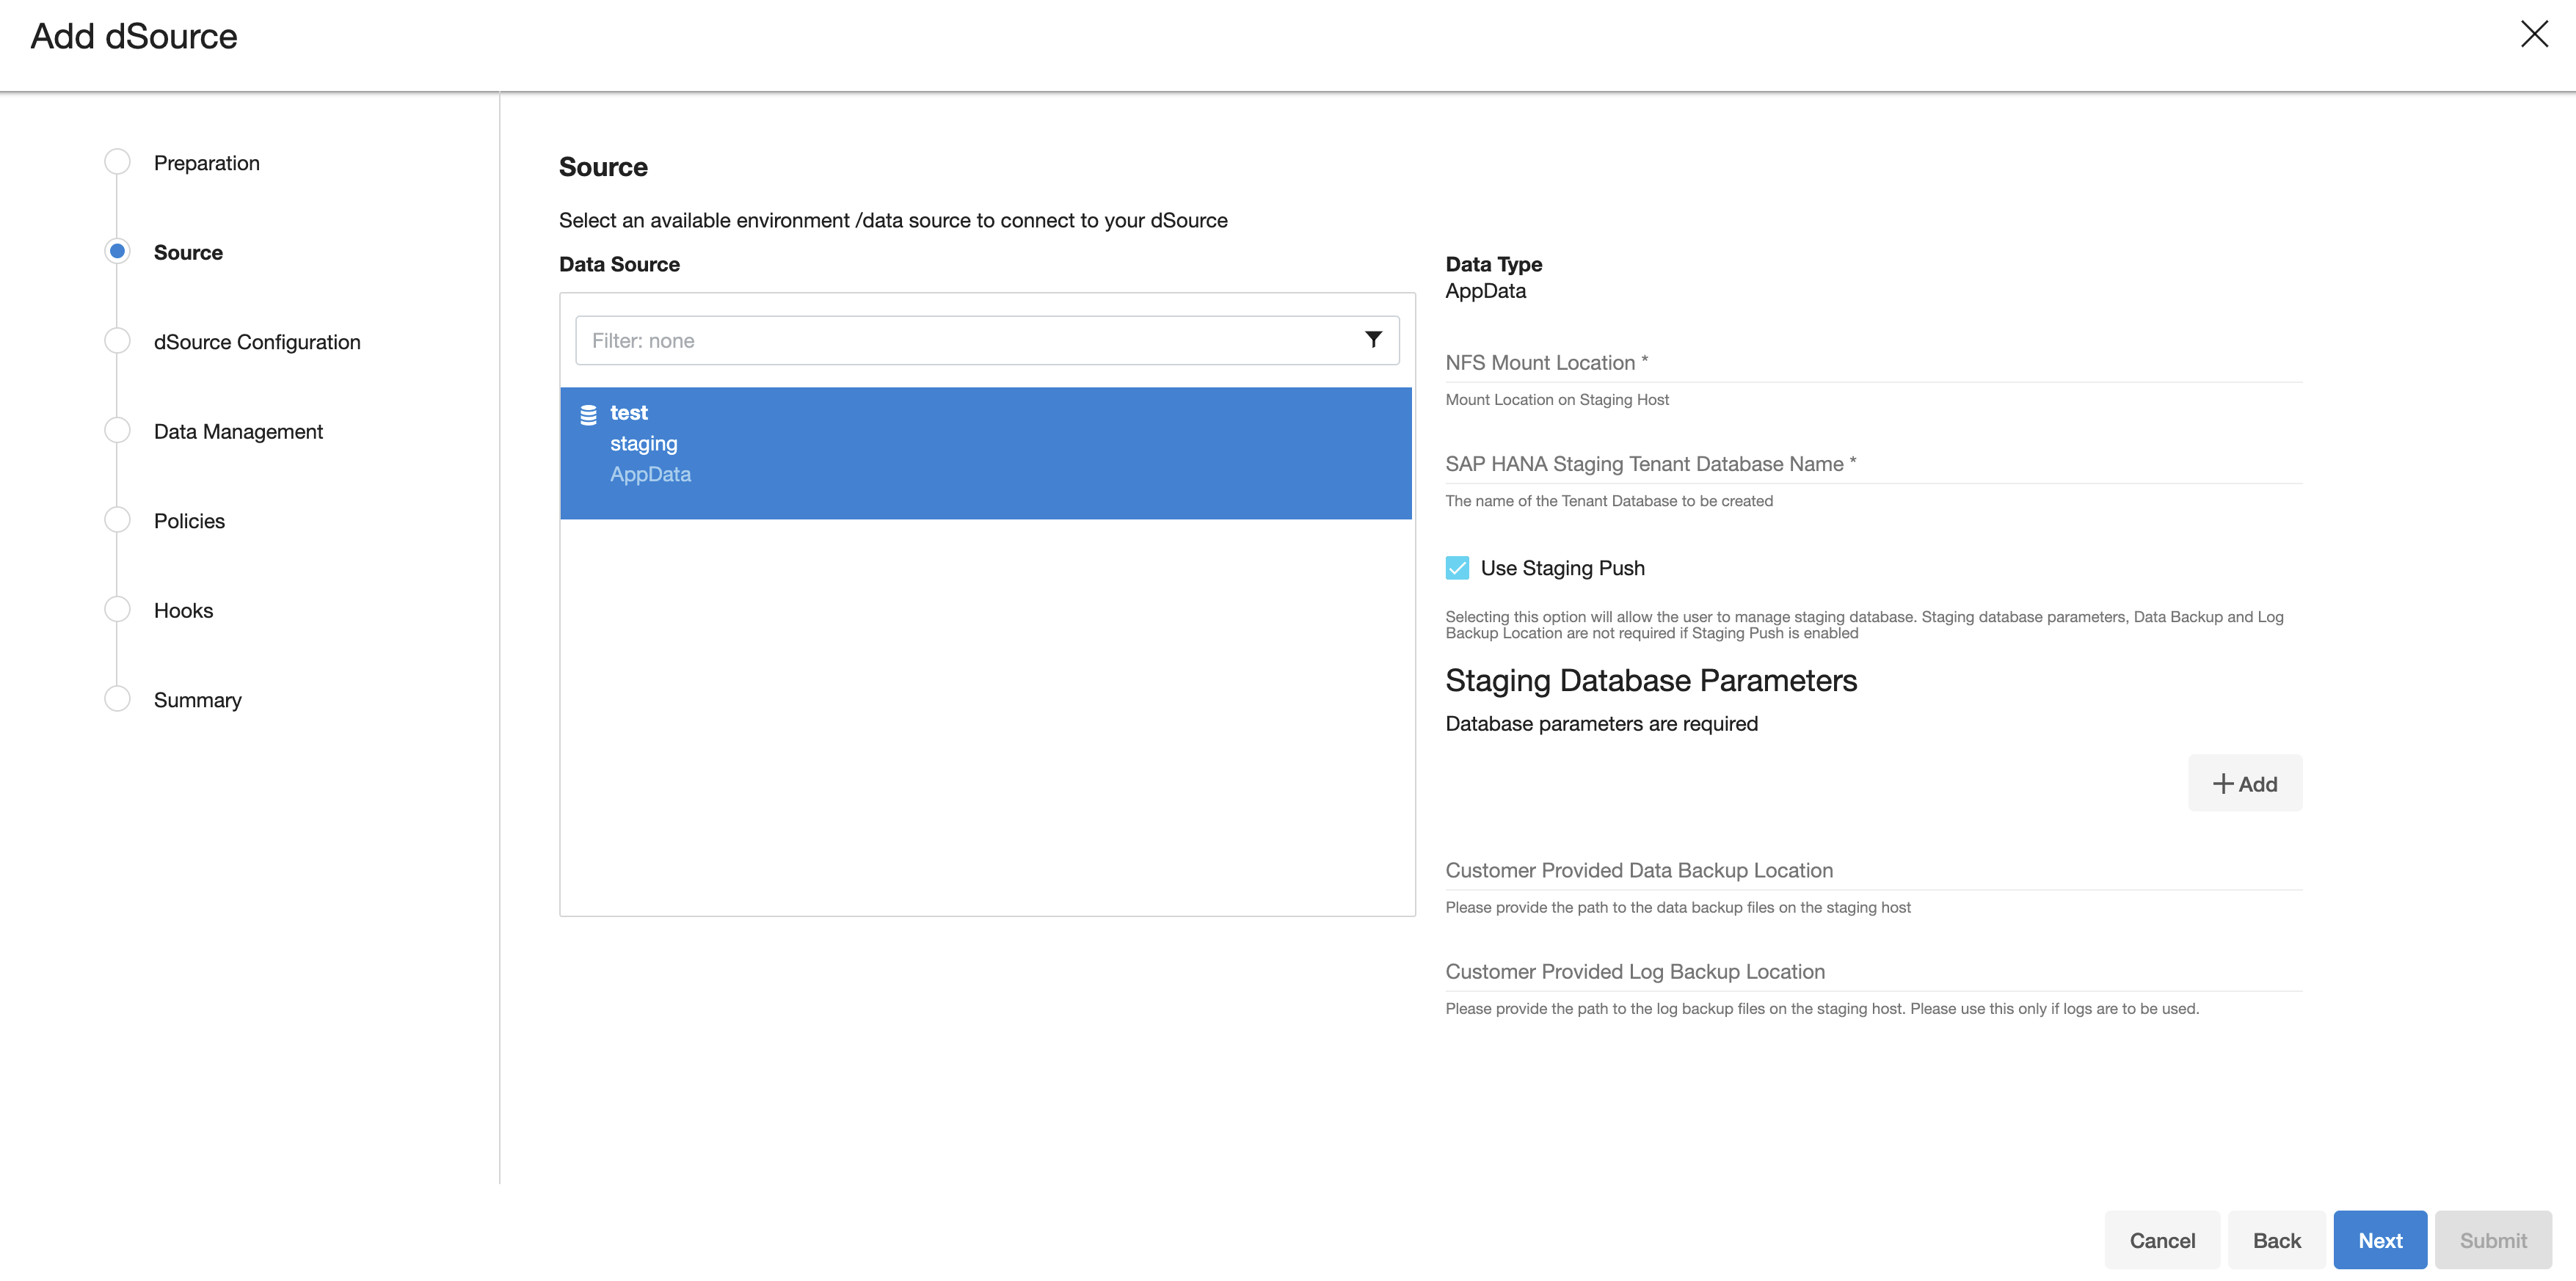
Click Next.
Enter a name and select a group for your dSource. Adding a dSource to a dataset group lets you set Delphix Domain user permissions for that database and its objects, such as snapshots. See the topics under Users and Groups for more information.
Configure the SnapSync and Retention Policy. The SnapSync policy can be set to ‘None’ for customers who wish not to run a scheduled SnapSync job.
Optionally, users can provide the bash script as a plugin-defined hook. Both Pre-Snapshot and Post-SnapShot hooks can be used.
Select Next.
At the end of the workflow, review the dSource Configuration in the Summary pane as shown below:
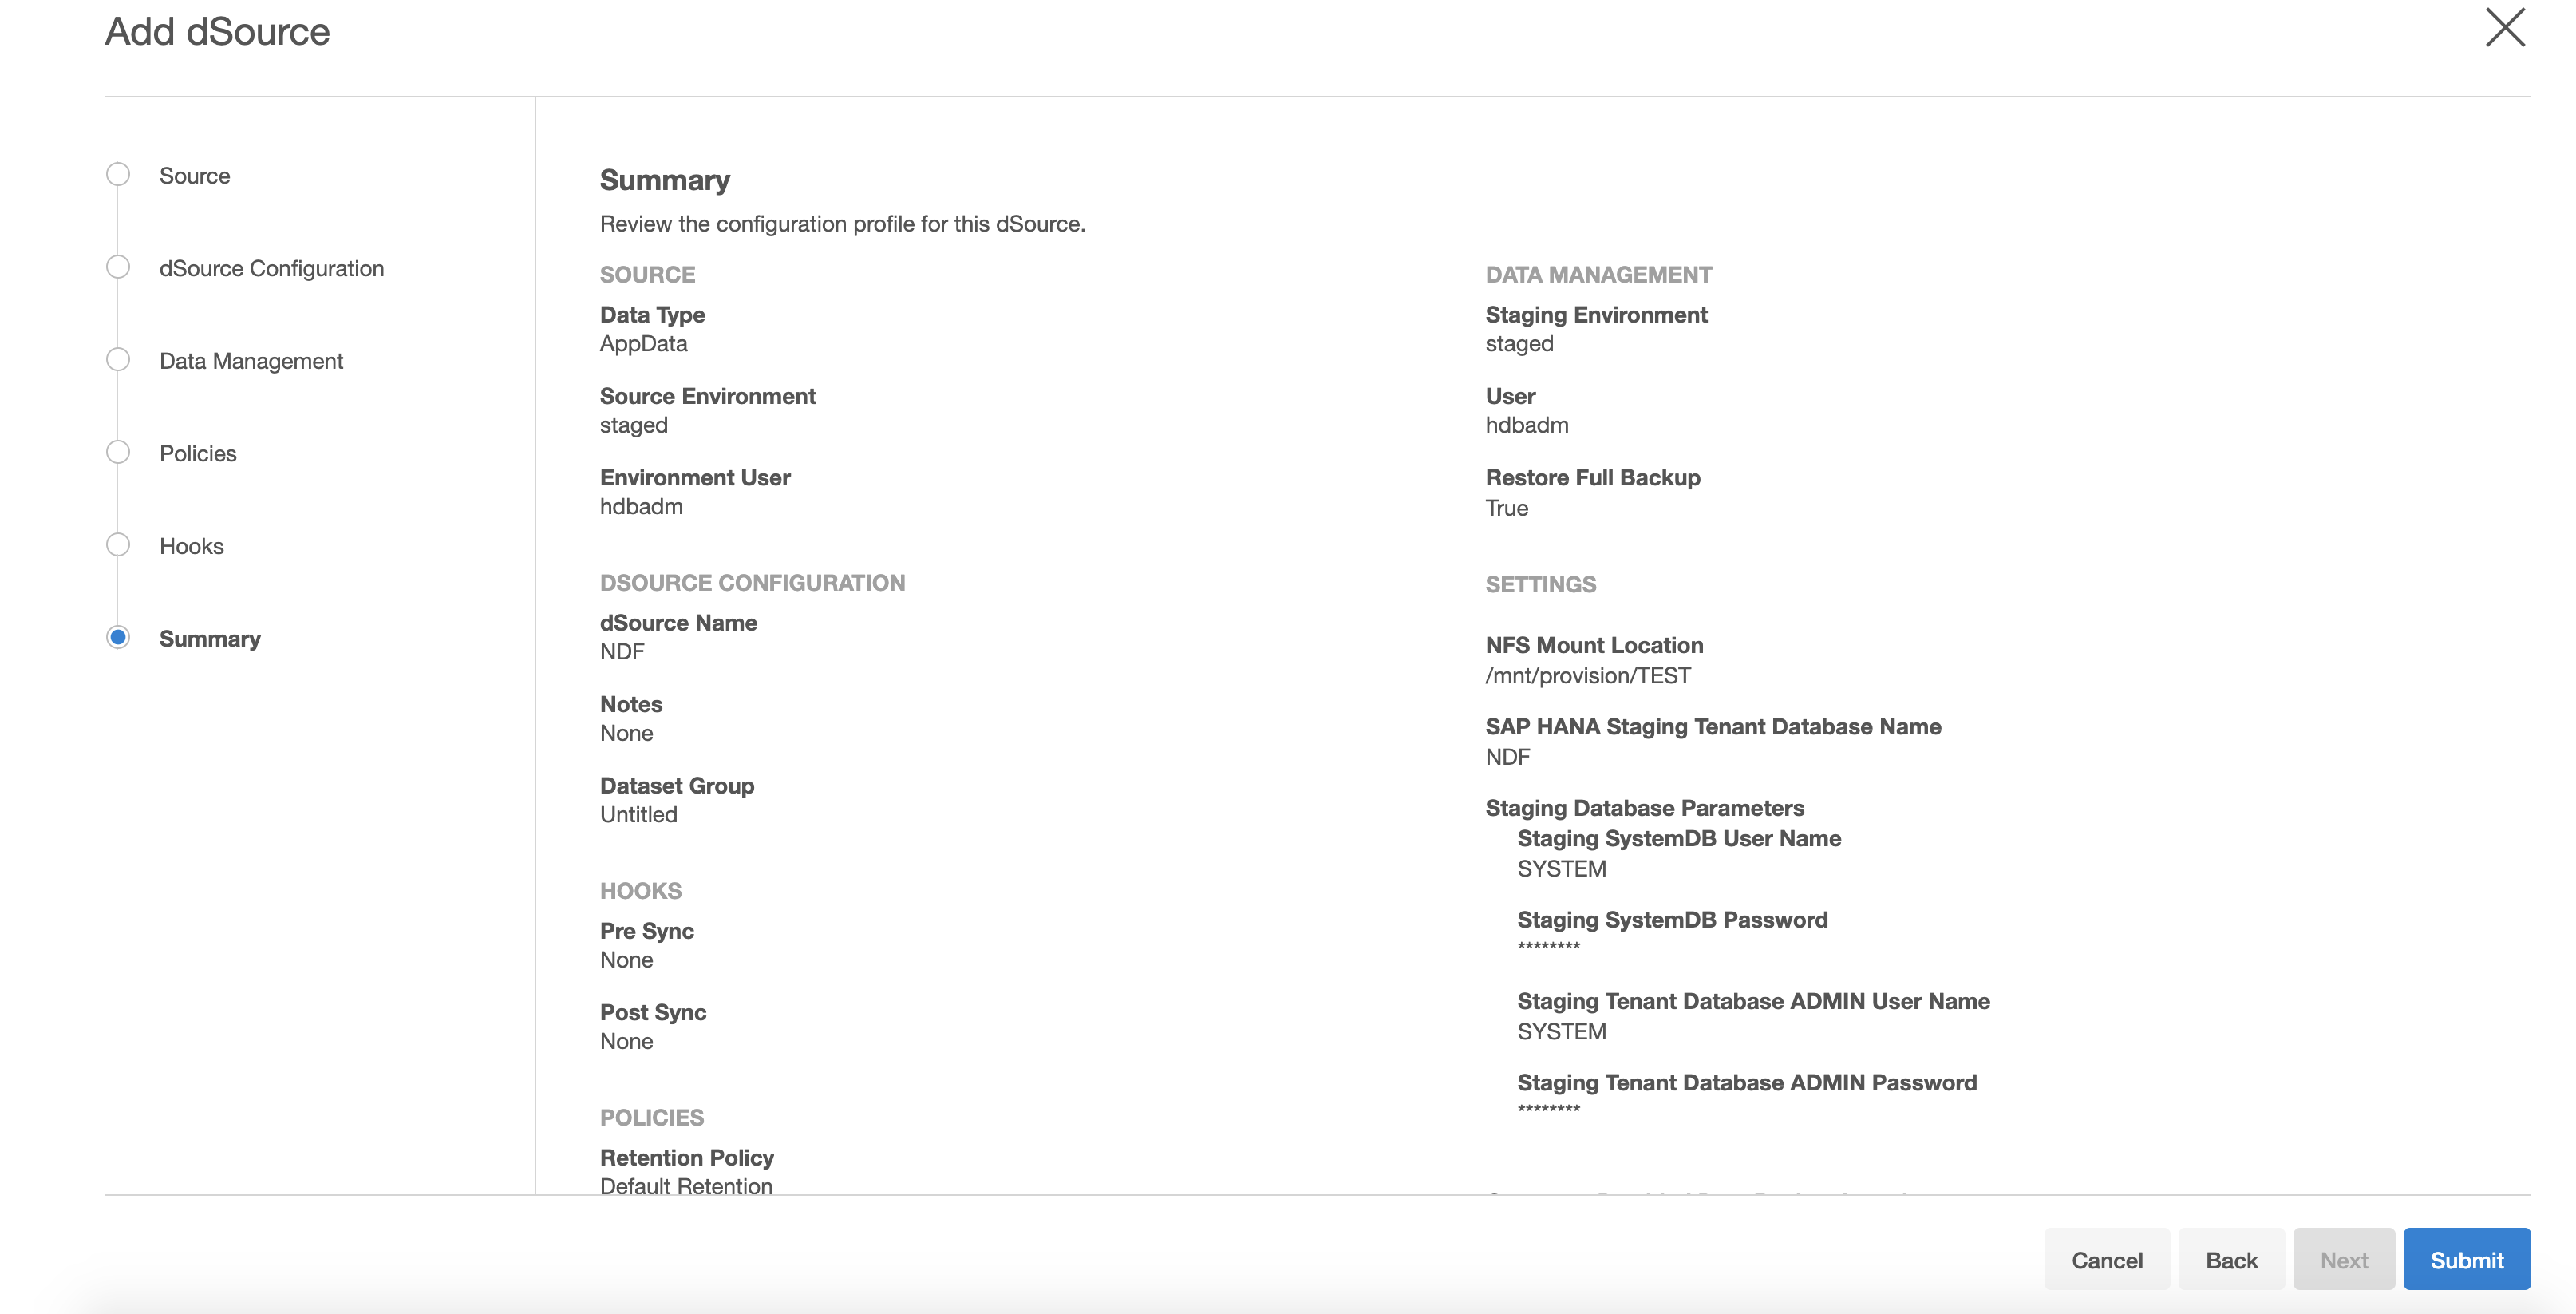
Once the dSource linking job is submitted it is possible to monitor progress by selecting Active Jobs in the top menu bar. On successful completion, the new dSource will be visible in the list of Datasets under its assigned group.
After dSource creation using the Staging Push mechanism, an empty snapshot will be created but users can not create VDB's from the same. Also, before creating the subsequent snapshots, users will have to create the database and point the database to use the Delphix provided mount point.
Provisioning a HANA VDB
Prerequisites
The provision requires a linked dSource built off a physical source tenant, as described in Linking a HANA dSource, or a VDB.
The HANA target environment should adhere to the Requirements for HANA Hosts and Databases
Operating system users and database users should be configured.
VDB creation UI
Procedure
Login to the Delphix Management application.
Click Manage.
Select Datasets.
Select a dSource.
Select a snapshot from which you want to provision.
Note:
If the first or empty dSource Snapshot that was created using the Staging Push mechanism is detected by the plugin and an error message is displayed. This check is done for every VDB creation operation.Click the Provision VDB icon to open the Provision VDB wizard.
Select a target environment from the left pane.
The HANA 2.0 Plugin supports one installation on the same host, hence the value in the Installation dropdown will be already populated. Multiple drop-down options should not be available.
Set the Environment User to be the Instance Owner. Note: The picking of instance owner is only possible if you have multiple environment users set on that host.
Click Next.
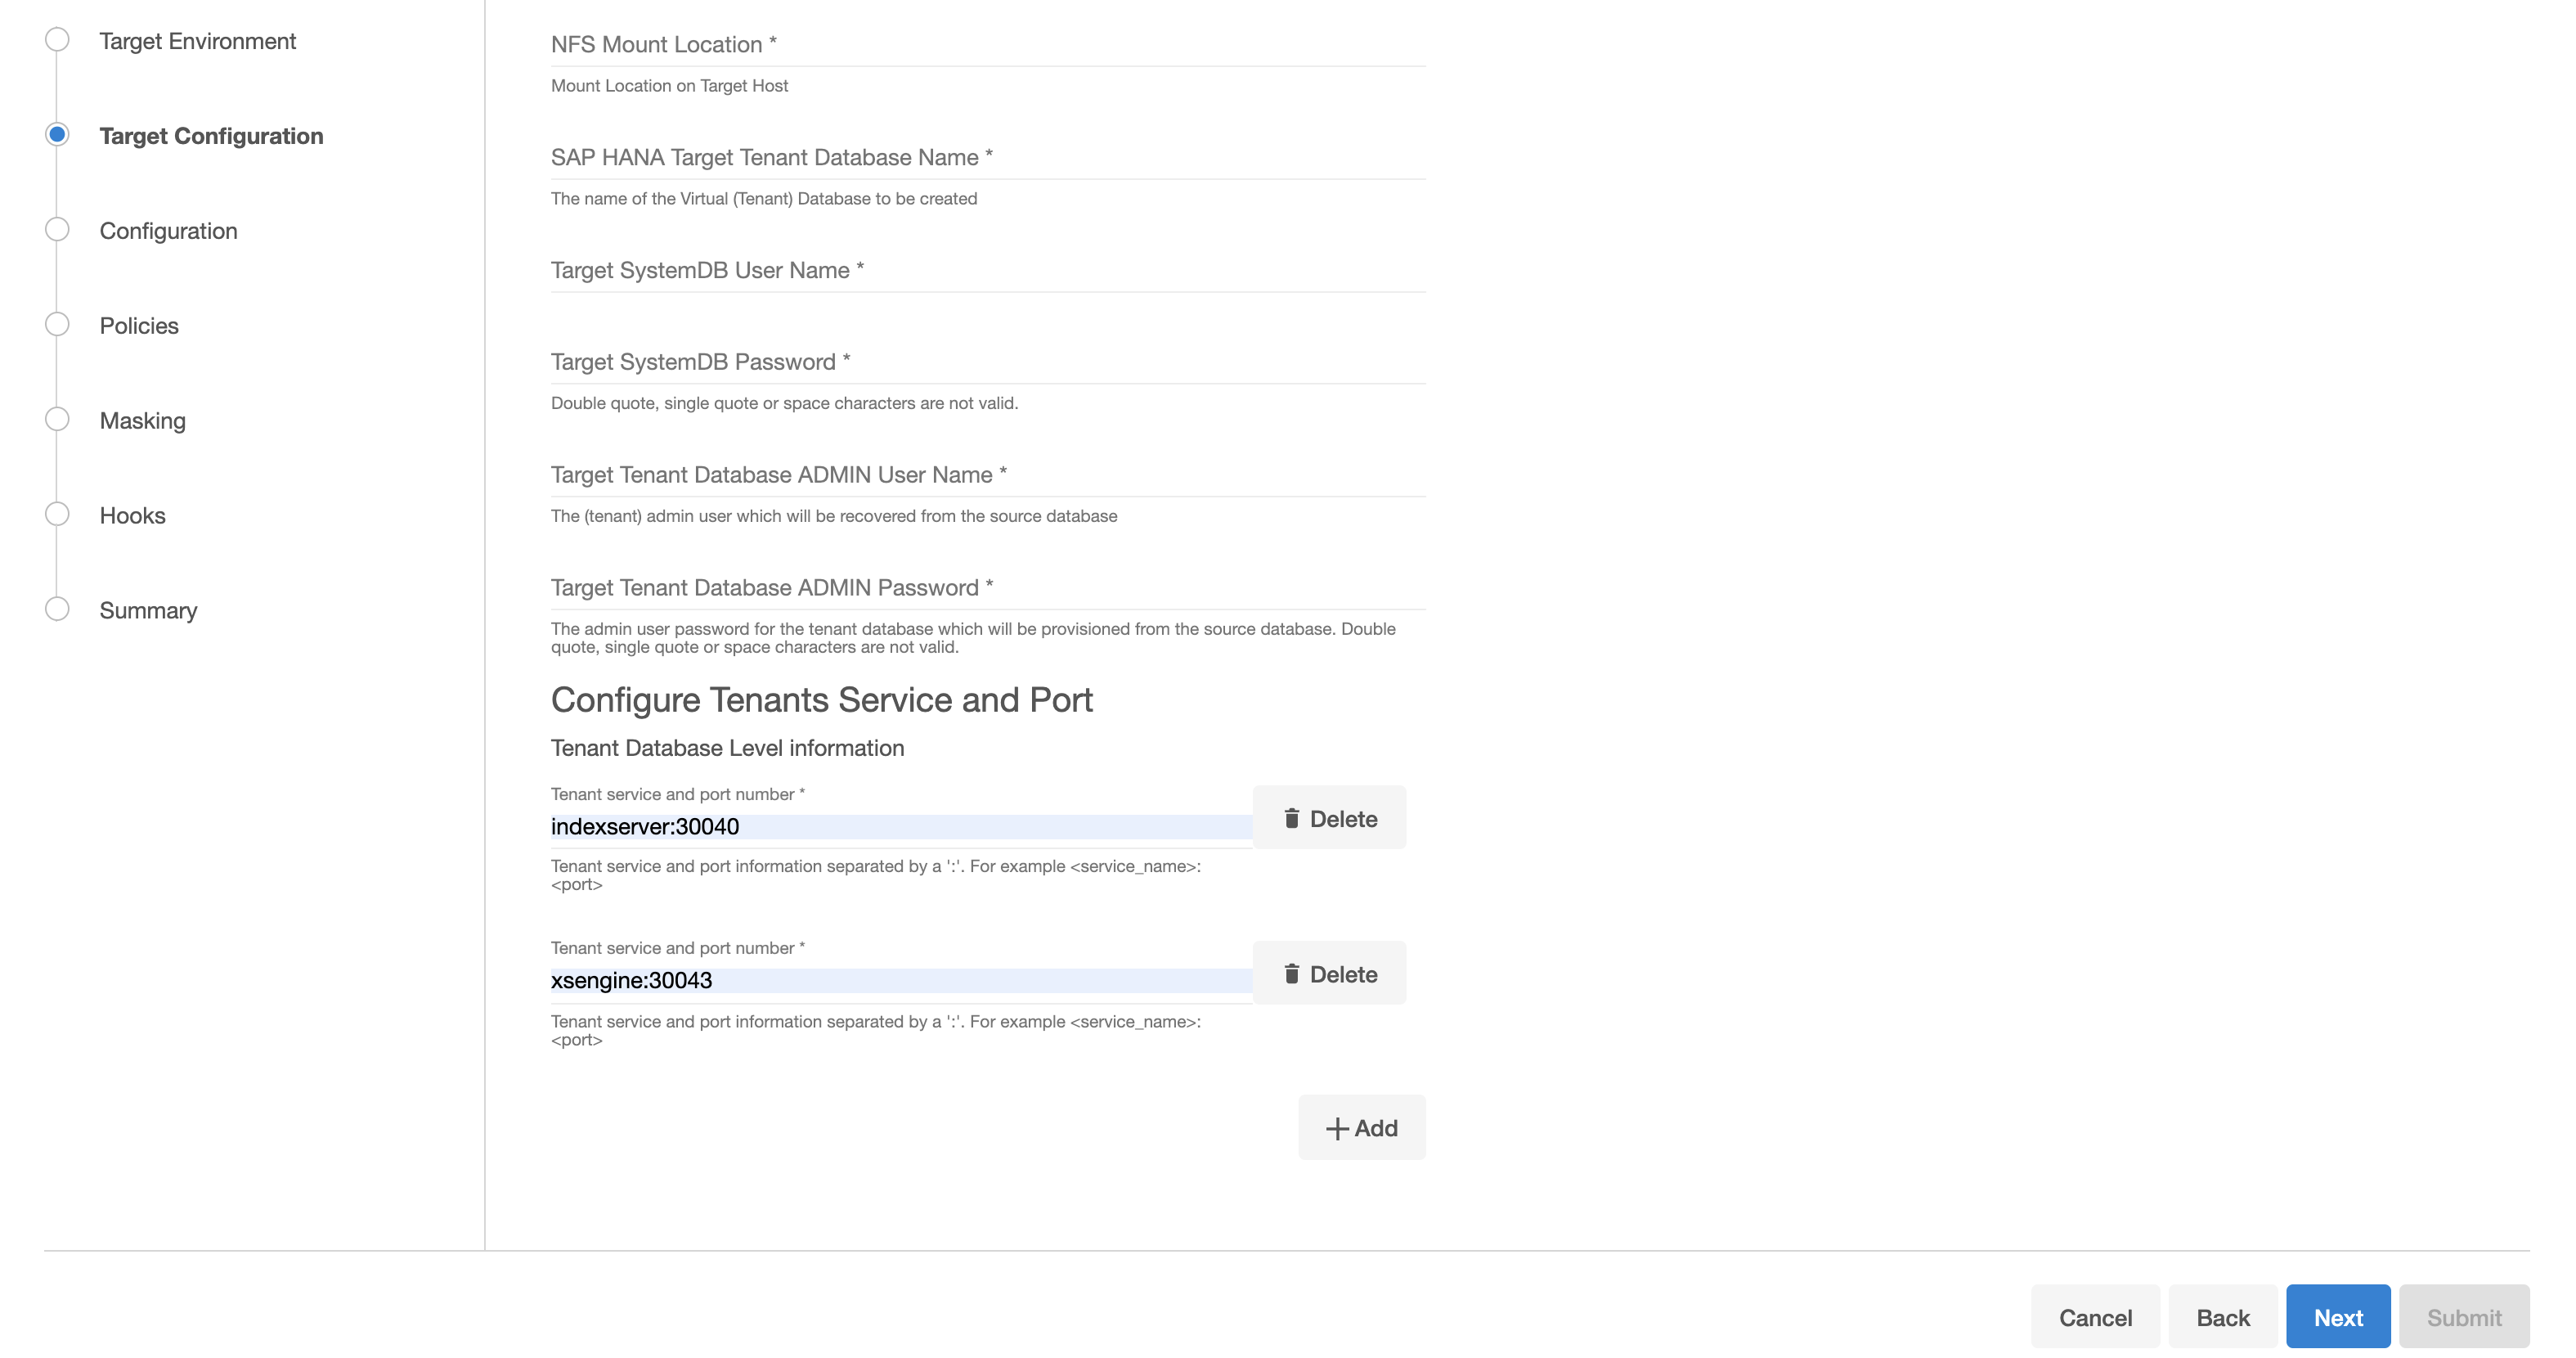
Target Configuration pane you will need to specify the following:
Note:
'*' indicates the mandatory fields.
NFS Mount Location*: Delphix recommends setting the trailing directory to match the VDB name to delineate mount points and support administration and troubleshooting. In the example shown, the NFS Mount Location is /mnt/provision/dev where dev matches the SAP HANA Target Tenant Database Name.
SAP HANA Target Tenant Database Name*: This refers to the target tenant database name which will be created upon VDB creation.
Target SystemDB User Name*: This refers to the SystemDB username in the target database.
Target SystemDB Password*: This refers to the SystemDB password in the target database.
Target Tenant Database ADMIN User Name*: This refers to the username of the tenant system user.
Target Tenant Database ADMIN Password*: This refers to the password of the tenant system user.
Note:The SYSTEM username and password derived from the physical source database should be entered during the provision of a VDB because those credentials will be recovered during provision.
Configure Tenants Service and Port: This refers to the list of tenant services and port numbers in the following format.
CODE<service>:<port> For example, indexserver:30043You can click "+Add" to add more services.
Note:This is not a mandatory field. If a user doesn't provide a value to this, then the plugin will proceed with the above fields and it will allocate the service and port on its own.
If an invalid service is provided, the plugin will proceed with input, but will eventually fail while creating the service and will display an error on the Delphix Engine UI.
In the configuration section
Set the vFile Name or accept the default, which is a random string. Delphix strongly recommends applying a consistent naming convention. We suggest this name should match the Target Tenant Name from the previous pane. Maintaining a consistent naming convention will support administration and troubleshooting activities. In the example shown, the vFile Name “dev” matches the actual tenant name and mount point from the previous pane.
Select a Target Group for the VDB.Click the Add Dataset Group icon to add a new group if required.
Set Auto VDB Restart option to automatically restart the VDB, where the target host is rebooted. Delphix recommends enabling this setting.
Click Next.
VDB Snapshot Policy. Select the Snapshot policy if an automated VDB snapshot schedule is required. Optionally, the Snapshot policy may be disabled by selecting “None”.
Click Next.
Masking. This page offers the opportunity to link the provision job to a masking job.
Hooks. Run a customized shell script via a hook operation at a particular moment in the provision operation.
Click Next.
Summary. Presents an opportunity to review all the information as a part of the initial provision workflow.
Click Submit.Once a provision job is submitted it is possible to monitor its progress by selecting “Active Jobs” in the top menu bar. On successful completion, VDB will be visible in the list of Datasets under its assigned group.
Next steps
Congratulations! You have provisioned your first virtual database!
Now, perform some simple functional tests with your application. You can connect your app to the VDB using standard TNS/JDBC techniques. Delphix has already registered the VDB for you on the target listener.
We suggest the following next steps:
Drop a table and use the VDB Rewind feature to test the recovery of your VDB.
Take a snapshot of your dSource and refresh your VDB to quickly get fresh production data.
Provision a new VDB from your VDB to test the sharing data quickly with other teams.
Mask your new VDB to protect sensitive data. Provision of new VDBs from that masked VDB to quickly provide safe data to development and QA teams.