
This topic describes how to provision a virtual database (VDB) from a SQL Server dSource.
Prerequisites
-
You must have already linked a dSource from a source database, as described in Linking a SQL Server dSource or have already created a VDB from which you want to provision another VDB.
-
You must have already set up Windows target environments and installed the Delphix Connector on them, as described in Adding a SQL Server Standalone Target Environment.
-
Make sure that you have the required privileges on the target environment.
-
If you are provisioning to a different target environment than the one where the staging database has been set up, make sure that the two environments have compatible operating systems. For more information on the staging database and the validated sync process.
-
If using Change Data Capture (CDC):
-
The SQL Server instance on which the VDB is being provisioned or exported must support CDC.
-
The SQL Server Agent for the instance must be running otherwise adding a CDC capture and cleanup jobs will fail.
-
Procedure
When provisioning, enabling or refreshing a SQL Server VDBs, both the DB_CHAINING and TRUSTWORTHY database parameters will be disabled (even if they were enabled on the dSource).
If these parameters are used, Delphix recommends a Post Start Hook to set them as desired. For more information, read the Inheritance of Database Properties During SQL Server VDB Operations KB article.
-
Login to the Delphix Management application.
-
Click Manage.
-
Select Datasets.
-
Select a dSource.
-
Click Timeflow tab.
-
Next to a snapshot select the

-
Select a target environment.
-
On the Target Configuration page, specify a Mount Path.
-
Linux and Unix hosts, this mount path must be the full path and not include symlinks.
-
-
On the Configuration page, do the following:
-
Under Target Group, select a Target Group for the VDB.
-
Enter a database name.
-
Under Recovery Model, click the drop-down list to select a recovery model. You can choose one of the following:
-
Simple - This option is recommended and selected by default. It allows SQL Server to automatically mark parts of its transaction log file for re-use if they are not in use.
-
Full - This option lets you take the responsibility for taking backups and log backups of the VDB to an external location.
-
Bulk Logged - This option lets you take the responsibility for taking backups and log backups of the VDB to an external location.
-
-
d. Specify any Pre-Scripts or Post-Scripts that should be used during the provisioning process. For CDC users, it is recommended that VDB Post Start hooks be configured to automatically start these jobs on successful provisioning
It is advised to use a Post Start hook as it is executed in all VDB operations like provision, refresh, rewind, disable/enable. Also, CDC jobs get deleted whenever we disable a VDB. The Post Start hook will add the CDC jobs again on enabling the VDB.
e. Under VDB configuration, enable Auto VDB Restart to allow the Delphix Engine to automatically restart the VDB when it detects the target host reboot.
f. To enable Change Data Capture (CDC), select the Enable checkbox.
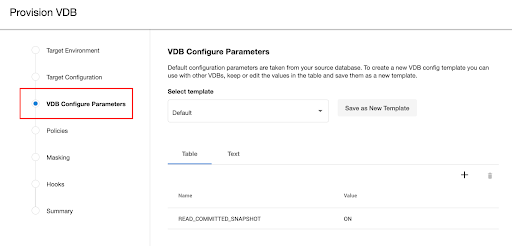
g. To enable VDB configuration parameters, select the VDB Configuration Parameters checkbox. This step displays a new page to either select an existing template or set configuration parameters.
READ_COMMITTED_SNAPSHOT is the only parameter that can be defined here, and the allowed values are OFF and ON.
To do so, perform the following steps on the VDB Configure Parameters page:
a. Click the plus icon to add a new key-value pair as a new template for the configuration parameters.
b. OR, From the Select Template dropdown list, select an existing configuration template to be applied on the VDB. Applied VDB Config Template will be displayed under the Configuration tab in the dataset and will remain editable.
h. Click Next.
CDC documentation
For more information see:
-
Under Policies, select a Snapshot Policy for the VDB and click Next.
-
Under Masking, select Mask this VDB checkbox to mask your data during provisioning and then select one of the following masking options:
-
Select an existing masking job
-
Masking Job is not currently available for the selected data type, please mask using script(s) instead. If you select this option, you should define a Configure Clone script in the Hooks step to mask the dataset.
-
-
Under Hooks, specify any Hooks to be used during the provisioning process. For more information, see Hooks for SQL Server.
-
Click Next.
-
The final summary tab will enable you to review your configurations.
-
Click Submit.
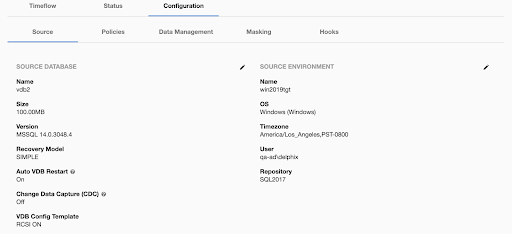
When provisioning starts, the VDB will appear in the Datasets panel. Select the VDB and navigate to the Status tab to see the progress of the job. When provisioning is complete, you can see more information on the Configuration tab.
You can select a SQL Server instance that has a higher version than the source database and the VDB will be automatically upgraded. For more information about compatibility between different versions of SQL Server, see SQL Server Support Matrix.
Provisioning by snapshot or logSync
When provisioning by snapshot, you can provision to the start of any particular snapshot, either by time or LSN.
You can take a new snapshot of the dSource and provision from it by clicking the Camera icon.
Provisioning By Snapshot
|
Provisioning By Snapshot |
Description |
|---|---|
|
Provision by Time |
You can provision to the start of any snapshot by selecting that snapshot card from the TimeFlow tab, or by selecting and entering a value in the time entry fields. The values you enter will snap to the beginning of the nearest snapshot. |
|
Provision by LSN |
You can use Provision by LSN control to open the LSN entry field. Here, you can type or paste in the LSN to which you want to provision. After entering a value, it will "snap" to the start of the closest appropriate snapshot. |
Warnings and errors on target environments during VDB operations
It is expected that a number of informational, warning, or error messages may appear in the Windows Event Log or SQL Server Error Log during VDB operations such as Provision and Refresh.
VDB operations perform administrative tasks that include adding and removing iSCSI disks; adding, backing up, restoring, and dropping databases; and changing database properties.
If VDB operations complete successfully, messages that occur during these operations can usually be ignored.