
This quick start guide, which is excerpted from the larger User Guide, is intended to provide you with a focused overview of working with SAP ASE database objects in the Delphix Dynamic Data Platform. It does not cover advanced configuration options. It does not cover advanced configuration options or best practices for performance. It assumes that you are working in a Lab/Dev setting and attempting to quickly test Delphix Engine functionality. It assumes you will use the VMware Hypervisor.
Overview
In this guide, we will walk through deploying a Delphix Engine, starting with configuring SAP ASE Source and Target environments. We will then create a dSource, and provision a VDB. A detailed list can be referred to in the Network and Connectivity Requirements for SAP ASE Environments section of the manual.
For purposes of the QuickStart, you can ignore any references to Replication or Masking, such as the engines shown in the diagram below.
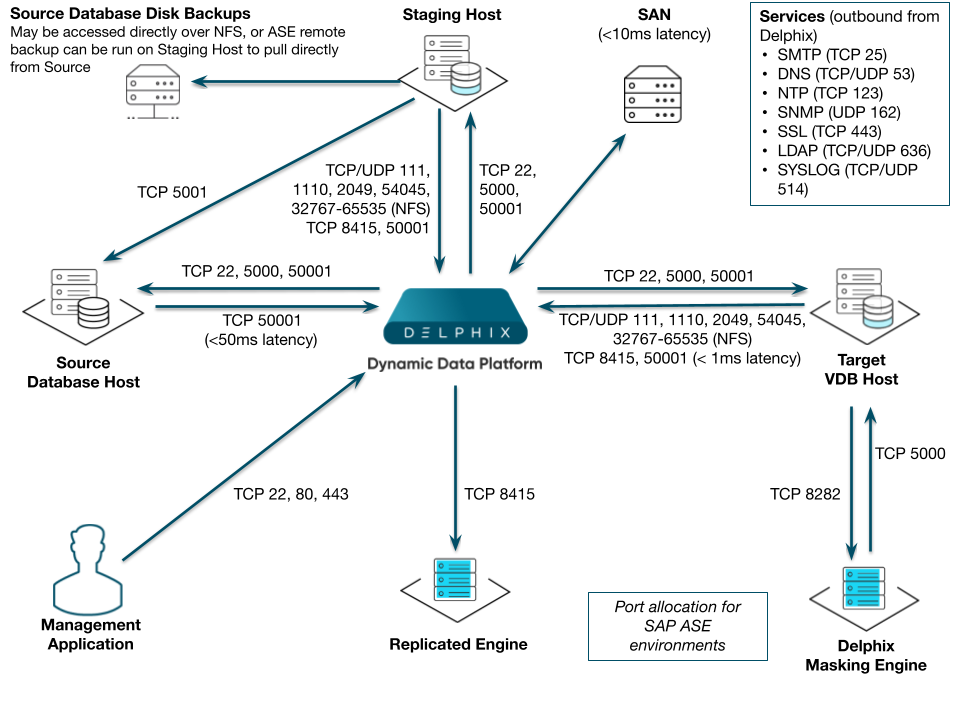
Delphix stays in sync with source databases by monitoring the ASE backup server log. When it sees a new database dump or transaction log has been created, it attempts to load it into the ASE staging instance.
|
Color |
Supported? |
|---|---|
|
Y |
Yes |
|
N |
No |
|
Validated sync Mode |
SnapShot for FULL BACKUP |
SnapShot for TLOGS |
Point-in-Time Restore |
|---|---|---|---|
|
truncate log on chkpt = true |
Y |
Y |
Y |
|
truncate log on chkpt = false + LogSynctruncate log on chkpt = false |
N |
Y |
N |
|
truncate log on chkpt = true + Log Sync |
Y |
N |
N |
|
truncate log on chkpt = false + LogSync |
N |
Y |
Y |
Before proceeding with setting up environments, decide where the databases will be located relative to the ASE staging instance. In the following diagram, we have two ASE hosts (production and staging).
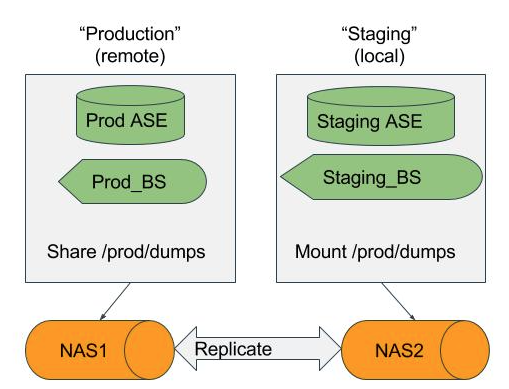
If the database dumps (or transaction logs) are available locally to the staging Backup Server, Delphix considers them “local”. Whereas if they are available to a Backup Server on production, they are “remote”. If the files will be local to the staging server, there are many options to get them from the production host to the staging host including but not limited to:
-
Sharing the directory on the production host over NFS to the staging host.
-
Using Network Attached Storage (NAS) to replicate the files.
-
Using scp to copy the files from one host to the other.
If the files are only available on the production host, Delphix will login to the ASE staging instance and issue the “LOAD DATABASE” command using the remote server syntax (for example LOAD DATABASE pubs2 FROM "/dumps/pubs2.full.9_5_16" AT Prod_BS).
Deploy OVA on VMware
Use the Delphix-supplied OVA file to install the Delphix Engine. The OVA file is configured with many of the minimum system requirements. The underlying storage for the install is assumed to be redundant SAN storage.
-
Download the OVA file from https://download.delphix.com. You will need a support login from your sales team or a welcome letter.
-
Navigate to the Delphix Product Releases/<Current Version>/Appliance Images page.
-
-
-
Login using the vSphere client to the vSphere server (or vCenter Server) where you want to install the Delphix Engine.
-
In the vSphere Client, click File.
-
Select Deploy OVA Template.
-
Browse to the OVA file.
-
Click Next.
-
Select a hostname for the Delphix Engine. This hostname will also be used in configuring the Delphix Engine network.
-
Select the data center where the Delphix Engine will be located.
-
Select the cluster and the ESX host.
-
Select one (1) data store for the Delphix OS. This datastore can be thin-provisioned and must have enough free space to accommodate the 127GB comprising the Delphix operating system.
-
Select four (4) or more data stores for Database Storage for the Delphix Engine. The Delphix Engine will stripe all of the Database Storage across these VMDKs, so for optimal I/O performance, each VMDK must be equal in size and be configured Thick Provisioned - Eager Zeroed. Additionally, these VMDKs should be distributed as evenly as possible across all four SCSI I/O controllers.
-
Select the virtual network you want to use. If using multiple physical NICs for link aggregation, you must use vSphere NIC teaming. Do not add multiple virtual NICs to the Delphix Engine itself. The Delphix Engine should use a single virtual network. For more information, see Optimal Network Architecture for the Delphix Engine
-
Click Finish. The installation will begin and the Delphix Engine will be created in the location you specified.
-
Once the installation has completed, power on the Delphix Engine and proceed with the initial system configuration as described in Setting Up Network Access to the Delphix Engine
If your source database is 4 TB, you probably need 4 TB of storage for the Delphix Engine. Add at least 4 data disks of similar size for the Delphix VM. For example: for a source database of 4 TB, create 4 VMDKs of 1 TB each.
For a full list of requirements and best practice recommendations, see Virtual Machine Requirements for VMware Platform
Setup network access to Delphix engine
-
Power on the Delphix Engine and open the Console.
-
Wait for the Delphix Management Service and Delphix Boot Service to come online. This might take up to 10 minutes during the first boot. Wait for the large orange box to turn green.
-
Press any key to access the sysadmin console.
-
Enter
sysadmin@SYSTEMfor the username andsysadminfor the password. -
You will be presented with a description of available network settings and instructions for editing.
Delphix Engine Network Setup To access the system setup through the browser, the system must first be configured for networking in your environment. From here, you can configure the primary interface, DNS, hostname, and default route. When DHCP is configured, all other properties are derived from DHCP settings. To see the current settings, run "get." To change a property, run "set =." To commit your changes, run "commit." To exit this setup and return to the standard CLI, run "discard." defaultRoute IP address of the gateway for the default route -- for example, "1.2.3.4." dhcp Boolean value indicating whether DHCP should be used for the primary interface. Setting this value to "true" will cause all other properties (address, hostname, and DNS) to be derived from the DHCP response dnsDomain DNS Domain -- for example, "delphix.com" dnsServers DNS server(s) as a list of IP addresses -- for example, "1.2.3.4,5.6.7.8." hostname Canonical system hostname, used in alert and other logs -- for example, "myserver" primaryAddress Static address for the primary interface in CIDR notation -- for example, "1.2.3.4/22" Current settings: defaultRoute: 192.168.1.1 dhcp: false dnsDomain: example.com dnsServers: 192.168.1.1 hostname: Delphix primaryAddress: 192.168.1.100/24 -
Configure the
hostname. If you are using DHCP, you can skip this step.delphix network setup update *> set hostname=<hostname>Note: Use the same
hostnameyou entered during the server installation. -
Configure DNS. If you are using DHCP, you can skip this step.
delphix network setup update *> set dnsDomain=<domain> delphix network setup update *> set dnsServers=<server1-ip>[,<server2-ip>,...] -
Configure either a static or DHCP address.
DHCP Configuration
delphix network setup update *> set dhcp=trueStatic Configuration
delphix network setup update *> set dhcp=false delphix network setup update *> set primaryAddress=<address>/<prefix-len>Note: The static IP address must be specified in CIDR notation (for example,
192.168.1.2/24) -
Configure a default gateway. If you are using DHCP, you can skip this step.
delphix network setup update *> set defaultRoute=<gateway-ip> -
Commit your changes. Note that you can use the
getcommand prior to committing to verify your desired configuration.delphix network setup update *> commit Successfully committed network settings. Further setup can be done through the browser at: http://<address> Type "exit" to disconnect, or any other commands to continue using the CLI. -
Check that you can now access the Delphix Engine through a Web browser by navigating to the displayed IP address, or hostname if using DNS.
-
Exit setup.
delphix> exit
Setting up the Delphix engine
Once you set up the network access for Delphix Engine, navigate to the Delphix Engine URL in your browser for server setup.
The welcome screen below will appear for you to begin your Delphix Engine setup.
.png?cb=826bfa7aed492a1c671d67d637692541)
The setup procedure uses a wizard process to take you through a set of configuration screens:
-
Administrators
-
Time
-
Network
-
Network Security
-
Storage
-
Outbound Connectivity
-
Authentication
-
Network Authorization
-
Registration
-
Summary
-
Connect to the Delphix Engine at
http://<Delphix Engine>/login/index.html#serverSetupThe Delphix Setup application will launch when you connect to the server. Enter your sysadmin login credentials, which initially defaults to the username sysadmin, with the initial default password of sysadmin. On first login, you will be prompted to change the initial default password. -
Click Next.
Administrators
The Delphix Engine supports two types of administrators:
-
System Administrator (sysadmin) - this is the engine system administrator. The sysadmin password is defined here.
-
Engine Administrator (admin) - this is typically a DBA who will administer all the data managed by the engine.
On the Administrators tab, you set up the sysadmin password by entering an email address and password. The details for the admin are displayed for reference.
The default domain user created on Delphix Engines from 5.3.1 is known as admin instead of delphix_admin. When engines created before 5.3.1 are upgraded to 5.3.1 or later they will retain their old username 'delphix_admin'. To avoid complications Delphix recommends creating users with an admin role and then Disabling delphix_admin.
System Time
The engine time is used as the baseline for setting policies that coordinate between virtual databases and external applications.
Choose your option to set up system time in this section. For a Quick Start, simply set the time and your timezone. You can change this later.
Network
The initial out-of-the-box network configuration in the OVA file is set to use a single VMXNET3 network adapter.
You have already configured this in the initial configuration. Delphix supports more advanced configurations, but you can enable those later.
Storage
You should see the data storage VMDKs or RDMs you created during the OVA installation. Click Next to configure these for data storage.
Serviceability
Choose your options to configure serviceability settings.
For a Quick Start, accept the defaults. You can change this later.
Authentication
Choose your options to configure authentication services.
For a Quick Start, accept the defaults. You can change this later.
Registration
If the Delphix Engine has access to the external Internet (either directly or through a web proxy), then you can auto-register the Delphix Engine:
-
Enter your Support Username and Support Password.
-
Click Register.
If external connectivity is not immediately available, you must perform manual registration.
-
Copy the Delphix Engine registration code in one of two ways:
-
Manually highlight the registration code and copy it to clipboard. Or,
-
Click Copy Registration Code to Clipboard.
-
-
Transfer the Delphix Engine's registration code to a workstation with access to the external network Internet. For example, you could e-mail the registration code to an externally accessible e-mail account.
-
On a machine with access to the external Internet, please use your browser to navigate to the Delphix Registration Portal at http://register.delphix.com.
-
Login with your Delphix support credentials (username and password).
-
Paste the Registration Code.
-
Click Register.
Although your Delphix Engine will work without registration, we strongly recommend that you register each Delphix Engine as part of the setup. Failing to register the Delphix Engine will impact its supportability and security in future versions.
To regenerate the registration code for a Delphix Engine please refer to, Regenerating the Delphix Engine Registration Code. Delphix strongly recommends that you regenerate this code and re-register the engine regularly to maximize the Support Security of the Delphix Engine. Delphix recommends doing this every six months.
Summary
The final summary tab will enable you to review your configurations for System Time, Network, Storage, Serviceability, and Authentication.
-
Click the Back button to go back and to change the configuration for any of these server settings.
-
If you are ready to proceed, then click Submit.
-
Click Yes to confirm that you want to save the configuration.
-
Click Setup to acknowledge the successful configuration.
-
There will be a wait of several minutes as the Delphix Engine completes the configuration.
Requirements for SAP ASE hosts and databases
In order to begin using SAP ASE environments with Delphix, you will need to configure the source and target hosts with the requirements described on this page.
SAP ASE source host requirements
There must be an operating system user, such as delphix_os, that meets the following requirements:
-
The $SYBASE environment variable is defined for non-interactive shells (such as via the .bashrc configuration file).
-
Set the PermitUserEnvironment configuration parameter to "yes" in the sshd_config file
-
Add the variable to the user's .ssh/environment file
-
Restart the SSH daemon
-
-
To test this requirement:
ssh delphix_user@ase_hostname env | grep SYBASE -
Can login to the source host via SSH (TCP port 22)
-
Delphix requires superuser permission to run pargs in order to discover Solaris ASE instances. For more information, see Sudo Privilege Requirements for SAP ASE Environments.
-
Designating the Delphix operating system user’s primary group to be the same as the ASE instance’s means the file system permissions can be more restrictive and is a better security practice than granting world read access to the toolkit or the backup files. If the target host is used to host the staging databases, consider the following:
-
If you don’t add the Delphix operating system user to the ASE instance owner’s group, greater permissions will need to be granted to the backup files to ensure read access to the dumps and/or transaction logs. Delphix looks for the backup files on the staging host (unless a "remote" backup server is used in which case, the remote host is used which is often the source environment).
-
If you sync Delphix with a dSource by asking ASE to create a new backup, the ASE instance owner will need the write permission to the toolkit (or the mount point if you use the CLI to specify a directory other than the toolkit). Delphix will issue the "DUMP DATABASE" command to write to the staging database's "temp" directory which is mounted on the staging host.
-
Has write permission for the mount-point directory (by default the toolkit directory but can be a separate mount point specified in the command line interface).
-
-
There must be a directory on the source host where you can install the Delphix platform toolkit, for example: /var/opt/delphix/Toolkit
-
The delphix_os user must own the directory
-
The directory must have permissions 0770, for example, -rwxrwx---. However, you can also use more permissive settings.
-
The directory should have 256MB of available storage.
-
Source database requirements
When adding a source ASE environment to Delphix, you may use a single login to discover the ASE instances and link the source databases OR you may use a single login to discover all of the ASE instances and separate logins to link each dSource.
-
Delphix uses a single database user for the discovery of all ASE instances and their databases for each environment added to Delphix.
-
The discovery database user (delphix_disc for example) must have SELECT privileges on the following tables for each ASE instance on the source host:
-
sysdatabases
-
sysservers
-
syslisteners
-
sysconfigures
-
syscurconfigs
-
-
-
Another user must be specified when linking each dSource (delphix_link for example) that has SELECT privileges on the above tables.
-
If you will select New Full Backup when linking, this user must also have privileges to take a new full database dump of the source database. For more information about linking options, see Linking an SAP ASE Data Source
-
The link database user can be different for each instance and database on the source host.
-
If the source database is resized and trunc log on chkpt is disabled, take a transaction log dump immediately after the resize operation completes. If trunc log on chkpt is enabled, take a full database dump immediately after the resize operation completes. If multiple resizing operations are performed without taking transaction log dumps between each operation it may be necessary to manually sync the dSource with a new full database dump for Delphix to be able to continue ingesting source database dumps.
Target host requirements
-
The operating system on the target environment must be the same as, or binary compatible with, the operating system on the source environment.
-
As the Delphix Engine supports both NFSv3 and NFSv4 for mounting target host filesystems, the prerequisite packages that support NFSv3 or NFSv4 client communication are required for normal operation, and the required services to support NFS client communications (including file locking) must be running.This includes:
-
portmapper / rpcbind
-
status daemon (rpc.statd)
-
NFS lock manager (rpc.lockd/lockmgr)
-
-
The SAP ASE major version on the target environment must be the same as the version on the source environment. However, EBF/SP version on target environment can be different. If the target is used as a staging server, the ASE major version must be the same. The only caveat is for ASE 15.7 - where the source and staging patch levels must both be either any version below SP64 or both be any version above SP100.
-
There must be an operating system user, such as delphix_os, that meets the following requirements:
-
Set the PermitUserEnvironment configuration parameter to "yes" in the sshd_config file
-
Add the variable to the user's .ssh/environment file
-
Restart the SSH daemon
-
The $SYBASE environment variable is set for non-interactive shells (such as via the .bashrc configuration file). Set the variable as follows:
-
To test this requirement:
ssh delphix_user@ase_hostname env | grep SYBASE
-
-
Can login to the target host via Secure Shell (SSH)
-
Can login to ASE instances using isql with LANG=C set
-
Designating the Delphix operating system user’s primary group to be the same as the ASE instance’s means the file system permissions can be more restrictive and is a better security practice than granting world read access to the toolkit or the backup files. If the target host is used to host the staging databases, consider the following:
-
If you don’t add the Delphix operating system user to the ASE instance owner’s group, greater permissions will need to be granted to the backup files to ensure read access to the dumps and/or transaction logs. Delphix looks for the backup files on the staging host (unless a "remote" backup server is used in which case, the remote host is used which is often the source environment).
-
If you sync Delphix with a dSource by asking ASE to create a new backup, the ASE instance owner will need write permission to the toolkit (or the mount point if you use the CLI to specify a directory other than the toolkit). Delphix will issue the "DUMP DATABASE" command to write to staging database's "temp" directory which is mounted on the staging host.
-
Has write permission for the mount-point directory (by default the toolkit directory but can be a separate mount point specified in the command line interface).
-
-
The following permissions are usually granted via sudo authorization of the commands. See Sudo Privilege Requirements for SAP ASE Environments for further explanation of this requirement, and Sudo File Configuration Examples for SAP ASE Environments for example file configurations.
-
Permission to run mount and umountas super-user.
-
On Solaris, permission to run pargson Solaris
-
On AIX, permission to run the nfsocommand as super-user.
-
(Optional) On AIX and Linux, permission to run psas super-user.
-
Disable tty for the delphix_os user for mount and umount.
-
-
There must be a directory on the source host where you can install the Delphix platform toolkit, for example: /var/opt/delphix/Toolkit
-
The delphix_os user must own the directory
-
The directory must have permissions 0770, for example, -rwxrwx--. However, you can also use more permissive settings.
-
The directory should have 1GB of available storage
-
Avoid using the home directory of the delphix_os user
-
If you intend to use the LogSync feature, it is recommended to make the toolkit directory as short as possible to keep the full path to the transaction log file names under ASE's 127 character limit. For example, create the toolkit directory as /tk. Alternatively, link the dSource using the command line interface and specify the "mountBase" parameter to mount the staging database's devices under a directory following your own naming convention.
-
Target database requirements
-
There must be a database user, such as delphix_db, with the sa_role on each instance on the target environment
-
The database user such as delphix_db for any staging instances must also have the sybase_ts_role
-
If the target host will be used as a staging target environment, at least one of the following two options must be configured:
-
You must use sp_addserver to add the staging ASE instance's Backup Server to sysservers on the source ASE instance (so that remote database dump/load works)
OR
-
Full and transaction dump files from the source database must be available locally to the staging database (over NFS, replication, scp, etc.)
-
Specific ASE tuning recommendations
-
In ASE 15.7 SP60 and higher, there is a configuration parameter named "enable large pool for load". ASE automatically tunes the caches for recovery on reboot, but does not do this for load database and load transaction recovery, since it could impact other databases on a production server. Delphix recommends that the staging ASE instance be separate from the ASE production instance and ASE instances hosting VDBs so enabling this parameter should have a beneficial impact on performance for the ASE staging instance.
-
Specify the "relaxed" strategy for replacing the cache in the default data cache (sp_cacheconfig ‘default data cache’, relaxed) in the ASE staging instance. Since the mount/unmount process invalidates the pages anyway, the page chain is really just unneeded overhead on the staging server.
-
Staging and target ASE instances should have disk mirroring disabled.
sp_configure "disable disk mirroring" – run value should be 1, which is the default. If it is 0, change it using
sp_configure "disable disk mirroring", 1 – this parameter is static so the ASE instance must be restarted for this change to take effect.
-
Delphix will mirror the number of devices used on the source database for the staging database (dSource) and each VDB created from that source database. The number of devices parameter should be scaled appropriately based on the max number of virtual databases that will be provisioned to the ASE instance. This parameter can be changed using: sp_configure "number of devices", .
ASE 15.7.0 SP100 and later releases support the shrink command. In some cases, Delphix must increase the number of devices used for databases if this command is used. Delphix creates a minimum of the same number of devices as the source database for the staging database (dSource) and each VDB and will add more devices for every 4TB of fragment holes. See SAP ASE issue CR#799273 for additional details.
To support multiple VDBs and the staging databases, you may need to increase the parameter number of alarms.
Delphix uses ASE operations that use alarm structures such as MOUNT and UNMOUNT. The number of alarms limits the number of these operations which can be run concurrently. Various ASE instance failures can occur if the available alarm structures are exhausted. The amount of memory consumed by increasing the number of alarm structures is small. Delphix recommends that the number of alarms value is increased to at least 4096.
Adding SAP ASE source and target environments
-
Login to the Delphix Management application.
-
Click Manage.
-
Select Environments.
-
From the Actions (...) menu select Add Environment.
-
In the Host and Server tab window, select Unix/Linux.
-
Select Standalone Host.
-
Click Next.
-
Enter a Name for the environment.
-
Enter the Host IP address.
-
For NFS Addresses (Optional): Enter one or more comma-separated IP Address/Hostname
Note: If specified, Delphix Engine only allows NFS requests (mount, etc) originated from IP Addresses specified for the host. -
Enter the SSH port. The default value is 22.
-
Select a Login Type. — Username and Password - enter the OS username and password — Username and Public Key - enter the OS username. — Password Vault - select from an existing Enterprise Password Vault
Using public key authenticationIf you want to use public-key authentication for logging into your Unix-based environment, there are two options: use the engine's key pair or provide a key pair for this environment.
To use the engine's key pair:
-
Select Public Key for the Login Type.
-
Click View Public Key.
-
Copy the public key that is displayed, and append it to the end of your
~/.ssh/authorized_keysfile. If this file does not exist, you will need to create it.-
Run chmod 600 ~/.ssh/authorized_keys to allow only the file's owner to read and write to it (make sure the file is owned by the user).
-
Run chmod 755 ~ to restrict access to the user's home directory so no other user may write to it.
-
Run chmod 700 ~/.ssh so that others cannot write to it. The ~/.ssh directory cannot be writable by group or other users. Otherwise, authentication will fail.
-
As an alternative, you can provide a key pair specific for this environment via the API, CLI, or GUI. See Option 2 in this CLI Cookbook article for instructions
-
-
For Password Login, click Verify Credentials to test the username and password.
-
Enter a Toolkit Path. The toolkit directory stores scripts used for Delphix Engine operations. It must have a persistent working directory rather than a temporary one. The toolkit directory will have a separate subdirectory for each database instance. The toolkit path must have 0770 permissions.
-
To provide your own Oracle Java select the Provide my own JDK checkbox and click Next.
-
In the Java Development Kit tab enter the absolute path to your Oracle JDK and click Next.
-
Click the Discover SAP ASE checkbox.
-
Click Next.
-
In the Summary, tab confirm your selections.
-
Click Submit.
ASE manual discovery
When an environment is added, Delphix discovers your ASE instances. Manual discovery allows users to add instances that were not automatically discovered. This feature is currently only supported via the CLI.
This topic describes how to use CLI commands to manually add ASE repositories to an SAP ASE environment. Discovery is the process by which the Delphix platform identifies data sources and data dependencies on a remote environment. ASE repository discovery is done automatically when an environment is added to the Delphix platform or when an already added environment is refreshed. In some cases, automatic discovery does not discover all of the repositories in an SAP ASE environment. These repositories may be added using manual discovery.
Unlike automatically discovered instances, manually discovered instances are not automatically deleted if the environment is refreshed when the instance isn't running. Manually discovered instances are not updated during an environment refresh either. So for example, if you upgrade ASE to a new version or change the listener port, you must manually update the repository.
To manually discover an ASE repository you will need to:
-
Add the environment to Delphix
-
Use CLI to manually discover a repository
Creating an ASE environment
Please refer to Adding an SAP ASE Environment for detailed steps.
Manually discovering a repository
In the following example, we are using sc-dev3.dc2 as our example environment.
-
Log into CLI and cd to repository menu:
$ ssh delphix_admin@sc-dev3.dc2 Password: sc-dev3.dc2> cd repository sc-dev3.dc2 repository> -
Add (manually discover) an ASE repository instance:
Note: The values used in the following code block are specific to the example instance we are adding.
sc-dev3.dc2 repository> create
sc-dev3.dc2 repository create *> ls
Properties
  type: ASEInstance
  credentials: (unset)
  dbUser: (unset)
  environment: (required)
  installationPath: (required)
  instanceName: (required)
  instanceOwner: (required)
  ports: (required)
  version: (unset)
sc-dev3.dc2 repository create *> set credentials.password=sybase
sc-dev3.dc2 repository create *> set dbUser=sa
sc-dev3.dc2 repository create *> set environment=sc-rhel64-sybase-ase-0
sc-dev3.dc2 repository create *> set installationPath=/opt/sybase/15-7
sc-dev3.dc2 repository create *> set instanceName=ASE1570_S1
sc-dev3.dc2 repository create *> set instanceOwner=sybase
sc-dev3.dc2 repository create *> set ports=5100
sc-dev3.dc2 repository create *> ls
Properties
  type: ASEInstance
  credentials:
      type: PasswordCredential (*)
      password: ******** (*)
  dbUser: sa (*)
  environment: sc-rhel64-sybase-ase-0 (*)
  installationPath: /opt/sybase/15-7 (*)
  instanceName: ASE1570_S1 (*)
  instanceOwner: sybase (*)
  ports: 5100 (*)
  version: (unset)
sc-dev3.dc2 repository create *> commit
  `ASE_INSTANCE-22
sc-dev3.dc2 repository>
Updating a repository
Adding onto the above, the following example illustrates updating an ASE instance's version after upgrading ASE:
sc-dev3.dc2> repository
sc-dev3.dc2 repository> select ASE1570_S1
sc-dev3.dc2 repository 'ASE1570_S1'> update
sc-dev3.dc2 repository 'ASE1570_S1' update *> set version="15.7 SP138"
sc-dev3.dc2 repository 'ASE1570_S1' update *> ls
Properties
   type: ASEInstance
   credentials:
       type: PasswordCredential
       password: ********
   dbUser: sa
   installationPath: /opt/sybase/15-7
   instanceOwner: sybase
   linkingEnabled: true
   ports: 5100
   provisioningEnabled: true
   servicePrincipalName: (unset)
   staging: false
   version: 15.7 SP138 (*)
sc-dev3.dc2 repository 'ASE1570_S1' update *> commit
Be careful when setting the version string. Make sure that it matches output as displayed by the "select @@version" query all the way out to the patch level (PL). For example "15.7 SP138" or "16.0 SP02 PL01".
Enable linking and provisioning for SAP ASE environments
This topic describes how to enable and disable provisioning and linking for SAP ASE databases.
Before a database can be used as a dSource, you must first make sure that you have enabled linking to its SAP ASE instance. Similarly, before you can provision a VDB to a target database, you must make sure that you have enabled provisioning to its SAP ASE instance.
-
Login to the Delphix Management application.
-
Click Manage.
-
Select Environments.
-
Select the Databases tab.
-
Click the pencil icon located next to the database Installation Details.
-
Select the Allow Provisioning checkbox to enable provisioning, deselect the checkbox to disable provisioning.
-
Click show details for the database.
-
Slide the button next to Allow Linking to On or Off to enable or disable linking.
Linking an SAP ASE data source
The dSource is an object that the Delphix Virtualization Engine uses to create and update virtual copies of your database. As a virtualized representation of your source data, it cannot be managed, manipulated, or examined by database tools. For an overview of all dSource related actions, please visit Managing Data Sources. Delphix Virtualization for SAP ASE databases leverages backup-based ingestion, which means that Delphix will look for, or sometimes initiate the creation of, a backup through your SAP ASE backup server. From there, the backup is restored on a staging server and the staging copy is then ingested into Delphix. See Delphix Architecture with SAP ASE for more information.
When linking a dSource from an SAP ASE source database, Delphix offers several different methods of capturing backup information:
-
ASE Managed Backups, where the SAP ASE source database schedules and initiates backups. This method supports various backup types which include:
-
Full backups
-
Transaction log backups (with LogSync disabled)
-
Transaction log backups (with LogSync enabled)
-
-
Delphix Managed Backups, where the Delphix Engine schedules and initiates the backups from the source database, and captures them.
ASE managed backups
Further contextual information on the various backup types (listed above):
-
Full Backups - A snapshot will be created on the Delphix Timeflow for each Full backup.
-
Transaction log backups (with LogSync disabled) - A snapshot will be created on the Delphix Timeflow for each transaction log backup.
Transaction Logs
Transaction logs are not collected if:
-
a) there are gaps in the sequence of log backups (a break in the “log chain”).
-
b) the available log backups do not include any changes since the last successful Delphix snapshot.
Transaction log backups (with LogSync enabled) - A snapshot will be created on the Delphix Timeflow for each transaction log backup. In addition, point-in-time provisioning will be an available option if you would like to provision from any point in between snapshots.
Log Files
Log files consume additional space on the Delphix Engine and are managed according to the defined retention policy for logs.
Delphix managed backups
When the checkbox for Delphix Managed Backups is selected, the Delphix Engine will initiate a full backup of the source database for the initial load of the dSource. Thereafter, the Delphix Engine will initiate full backups of the source database using the schedule specified by the selected SnapSync Policy. If you select the None policy, the Delphix Engine will not automatically initiate a full backup, but you can initiate them manually using the snapshot (camera) icon.
Delphix looks for the backup files on the staging host (unless a "remote" backup server is used in which case, the remote host is used which is often the source environment)
Procedure
-
Login to the Delphix Management application.
-
Navigate to Manage > Datasets.
-
Click the plus icon and select Add dSource.
Note: Delphix looks for the backup files on the staging host (unless a "remote" backup server is used in which case, the remote host is used which is often the source environment. -
In the Add dSource wizard, select the source environment with the correct environment-based user.
-
Enter your login credentials for the source database and click Next.
-
Enter a name and select a group for your dSource. Adding a dSource to a dataset group lets you set Delphix Domain user permissions for that database and its objects, such as snapshots. See the topics under Users and Groups for more information.
-
Select the Data Management settings needed, as described in Data Management Settings for ASE Data Sources.
-
From the Data Management tab under the Initial Load option, select and enter any additional settings needed. There are three options for the initial load of the dSource:
-
If the source ASE instance resides on the same server as the staging ASE instance, the staging database's NFS mounted "temp" directory will be present for the source database to write to in response to the "DUMP DATABASE" command.
-
If the source and staging ASE instances are configured to allow remote access to the backup servers and the dSource is linked using the Remote Server option as described below. Delphix will then issue the "DUMP DATABASE" command and append the "AT <staging_backup_server_name>" clause so that the dump is written to the staging backup server.
-
(Recommended) New Full Backup - Lets Delphix create a new full backup file and load it. Note - that when Delphix creates the backup, it is moved to Delphix’s NFS-mounted storage located on the stage host rather than. The backup will be located in the “temp” directory and will be deleted once the Delphix Engine has restored the backup and created a dSource from the restored staging database. This means that this option will work under two scenarios:
-
Most Recent Existing Full Backup – Find the most recent existing full backup file in the Backup Location and load it.
Note: If Dump History is not active on the Source Database: Choosing this option can delay completion of the dSource link as Delphix attempts to find and catalog every single backup listed in the source database's backup server log file. -
Specific Existing Full Backup – Specify which backup files in the Backup Location you want to load. Choosing this option is much faster because Delphix will skip directly to loading the desired backup and only start to search for and catalog backups in the background after the linking of the source database has completed.
Note: When using a dump taken with the deprecated compression syntax, select the Specific Existing Full Backup option for Initial Load and, for each stripe, type compress::<file name> into the text box.
-
-
Select the Staging environment and ASE instance that will be used to manage the staging database used for validated sync of the dSource.
-
Select any policies for the new dSource.
-
Click Next, then specify any pre-hook and post-hook scripts.
-
Review the dSource Configuration and Data Management information, and click Submit to begin provisioning the VDB.
Provisioning an SAP ASE VDB
Procedure
-
In the Datasets panel on the left-hand side, click the group containing the dSource or VDB from which you want to provision.
-
Click the Timeflow tab.
-
Select a snapshot or open LogSync timeline to provision by a specific log or point in time.
-
Find more detail about initial provisioning options in the section ‘Provisioning by Snapshot or LogSync’ below.
-
-
Click to open the Provision VDB wizard, and select a compatible Target Environment for the new ASE VDB
-
Review the information presented for Target Configuration and edit as necessary.
-
Select a Snapshot Policy for the VDB.
-
(Optional) - Selective Data Distribution - After policies, there is a masking option.
-
Enter any operations that should be run in the Hooks page. These scripts can be managed after provision in the VDB’s configuration page.
When provisioning starts, you can review the progress of the job by selecting the VDB and clicking on the Status tab, or by selecting Manage/Dashboards and viewing the Job History panel. Alternatively, you could see this in the Actions Sidebar. When provisioning is complete, the VDB will be included in the group you designated and listed in the Datasets panel. If you select the VDB in the Datasets panel and click the Configuration tab, you can view information about the database and its Data Management settings.
Provisioning by snapshot or LogSync
When provisioning by Snapshot, you can provision to the start of any particular snapshot by time.
|
Provisioning by snapshot/time |
description |
|---|---|
|
Provisioning By Snapshot |
You can provision by using a Snapshot. In that case, a new VDB will be provisioned to the database state as of the Snapshot. |
|
Provision by Time |
If you have enabled Log Sync, you can provision a new database to a point in time. You can select a snapshot and then using time entry fields, specify a Point in Time. Delphix will use the selected snapshot to restore the VDB and use the log files to roll forward the VDB to the selected time. |
Configuration settings for ASE virtual databases
Each VDB has its own data management settings, found during the provisioning workflow as well as in the configuration page for that VDB. When you create a SAP ASE VDB, Delphix copies most configuration settings from the dSource and uses them to create the VDB. However, you can customize these with the following settings:
|
Setting |
Explanation |
|---|---|
|
Recovery Model |
The current recovery model of the source database. This field will auto-populate with information from the dSource. |
|
Auto VDB Restart |
Enabling this option will automatically restart this VDB whenever its target host is rebooted. |
Automatic VDB restart on target server after reboot
The Delphix platform now automatically detects whether a target server has been rebooted, and proactively restarts any VBD on that server that was previously up and running. This is independent of the data platform. It is done as if you realized a target server was restarted and issued a start command from the Delphix platform. This feature is compatible with Self-Service ordering dependencies and is limited to non-clustered VDBs.
To enable automatic restart, complete the following steps:
-
When provisioning a new VDB in the VDB Provisioning wizard, check the Auto VDB Restart box.
Once the VDB has been provisioned, you will be able to turn Automatic VDB Restart on.
-
In the Datasets panel, select the VDB.
-
Select the Configuration tab.
-
Select Source sub-tab.
-
Select Database edit.
Next steps
Congratulations! You have provisioned your first virtual database!
Now, perform some simple functional tests with your application. You can connect your app to the VDB using standard TNS/JDBC techniques. Delphix has already registered the VDB for you on the target listener.
We suggest the following next steps:
-
Drop a table and use the VDB Rewind feature to test the recovery of your VDB.
-
Take a snapshot of your dSource and refresh your VDB to quickly get fresh production data.
-
Provision a new VDB from your VDB to test sharing data quickly with other teams.
-
Mask your new VDB to protect sensitive data. Provision new VDBs from that masked VDB to quickly provide safe data to development and QA teams.