
Overview
This quick start guide, which is excerpted from the larger User Guide, is intended to provide you with a quick overview of working with Oracle database objects in the Delphix Engine. It does not cover advanced configuration options including Oracle RAC, Linking to Standby, or best practices for performance. It assumes that you are working in a Lab/Dev setting and attempting to quickly test Delphix Engine functionality. It assumes you will use the VMware Hypervisor.
In this guide, we will walk through deploying a Delphix Engine, configuring Oracle Source and Target environments on Linux servers, creating a dSource, and provisioning a VDB.
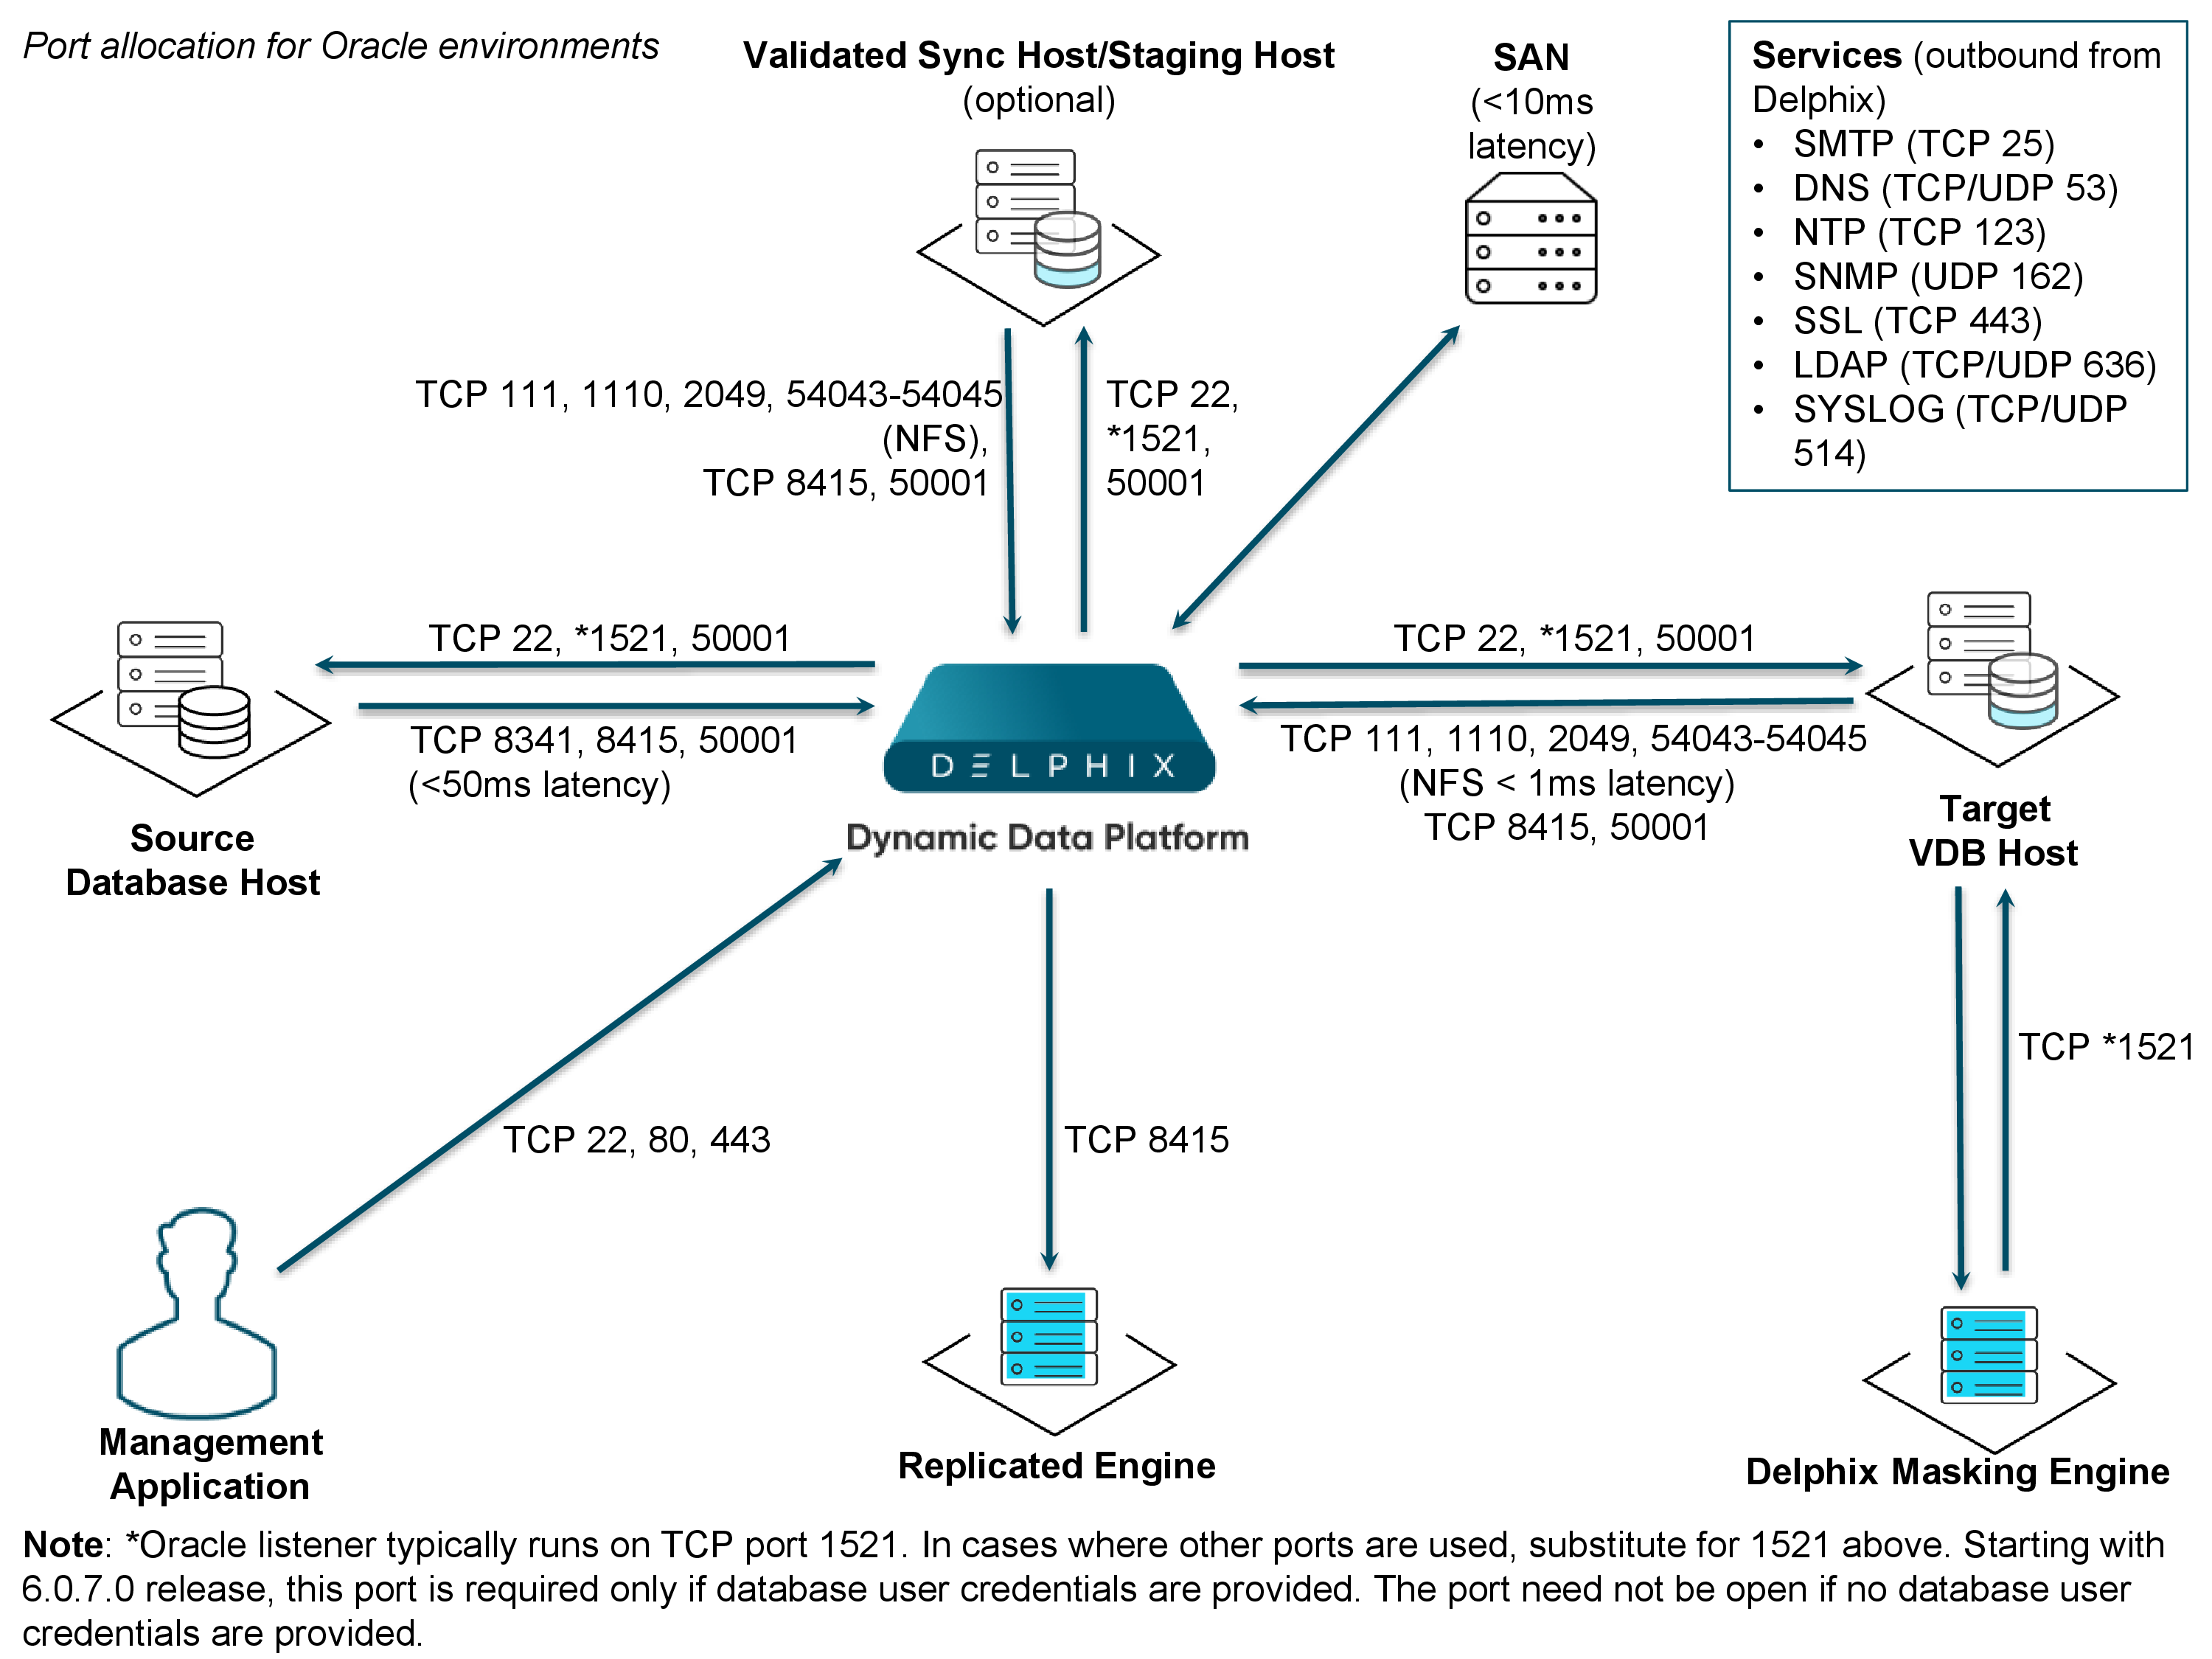
The following diagram describes the engine topology for Oracle environments. It illustrates the recommended ports to be open from the engine to remote services, to the engine, and to the Source and Target Environments.
For this Quick Start Guide, you can ignore the following components: Validated Sync Host, Replicated Engine, and Delphix Masking Engine.
Common tasks for Linux and Solaris SPARC
Complete the following common tasks for both Linux and Solaris operating systems:
Deploy OVA on VMware
Use the Delphix-supplied OVA file to install the Delphix Engine. The OVA file is configured with many of the minimum system requirements. The underlying storage for the install is assumed to be redundant SAN storage.
-
Download the OVA file from https://download.delphix.com. You will need a support login from your sales team or a welcome letter.
-
Navigate to the Delphix Product Releases/ /appliance="" images="">
-
-
Login using the vSphere client to the vSphere server (or vCenter Server) where you want to install the Delphix Engine.
-
In the vSphere Client, click File.
-
Select Deploy OVA Template.
-
Browse to the OVA file.
-
Click Next.
-
Select a hostname for the Delphix Engine. This hostname will also be used in configuring the Delphix Engine network.
-
Select the data center where the Delphix Engine will be located.
-
Select the cluster and the ESX host.
-
Select one (1) data store for the Delphix OS. This datastore can be thin-provisioned and must have enough free space to accommodate the 127GB comprising the Delphix operating system.
-
Select four (4) or more data stores for Database Storage for the Delphix Engine. The Delphix Engine will stripe all of the Database Storage across these VMDKs, so for optimal I/O performance, each VMDK must be equal in size and be configured Thick Provisioned - Eager Zeroed. Additionally, these VMDKs should be distributed as evenly as possible across all four SCSI I/O controllers.
-
Select the virtual network you want to use. If using multiple physical NICs for link aggregation, you must use vSphere NIC teaming. Do not add multiple virtual NICs to the Delphix Engine itself. The Delphix Engine should use a single virtual network. For more information, see Optimal network architecture for the Delphix engine
-
Click Finish. The installation will begin and the Delphix Engine will be created in the location you specified.
-
Once the installation has completed, power on the Delphix Engine and proceed with the initial system configuration as described in Setting up network access to the Delphix engine
If your source database is 4 TB, you probably need 4 TB of storage for the Delphix Engine. Add at least 4 data disks of similar size for the Delphix VM. For example: for a source database of 4 TB, create 4 VMDKs of 1 TB each.
For a full list of requirements and best practice recommendations, see Virtual Machine Requirements for VMware Platform
Setup network access to Delphix engine
-
Power on the Delphix Engine and open the Console.
-
Wait for the Delphix Management Service and Delphix Boot Service to come online. This might take up to 10 minutes during the first boot. Wait for the large orange box to turn green.
-
Press any key to access the sysadmin console.
-
Enter
sysadmin@SYSTEMfor the username andsysadminfor the password. -
You will be presented with a description of available network settings and instructions for editing.
Delphix Engine Network Setup To access the system setup through the browser, the system must first be configured for networking in your environment. From here, you can configure the primary interface, DNS, hostname, and default route. When DHCP is configured, all other properties are derived from DHCP settings. To see the current settings, run "get." To change a property, run "set =." To commit your changes, run "commit." To exit this setup and return to the standard CLI, run "discard." defaultRoute IP address of the gateway for the default route -- for example, "1.2.3.4." dhcp Boolean value indicating whether DHCP should be used for the primary interface. Setting this value to "true" will cause all other properties (address, hostname, and DNS) to be derived from the DHCP response dnsDomain DNS Domain -- for example, "delphix.com" dnsServers DNS server(s) as a list of IP addresses -- for example, "1.2.3.4,5.6.7.8." hostname Canonical system hostname, used in alert and other logs -- for example, "myserver" primaryAddress Static address for the primary interface in CIDR notation -- for example, "1.2.3.4/22" Current settings: defaultRoute: 192.168.1.1 dhcp: false dnsDomain: example.com dnsServers: 192.168.1.1 hostname: Delphix primaryAddress: 192.168.1.100/24 -
Configure the
hostname. If you are using DHCP, you can skip this step.delphix network setup update *> set hostname=<hostname>warning: Use the same
hostnameyou entered during the server installation. -
Configure DNS. If you are using DHCP, you can skip this step.
delphix network setup update *> set dnsDomain=<domain> delphix network setup update *> set dnsServers=<server1-ip>[,<server2-ip>,...] -
Configure either a static or DHCP address.
DHCP Configuration
delphix network setup update *> set dhcp=trueStatic Configuration
delphix network setup update *> set dhcp=false
delphix network setup update *> set primaryAddress=<address>/<prefix-len>
warning:The static IP address must be specified in CIDR notation (for example,
192.168.1.2/24) -
Configure a default gateway. If you are using DHCP, you can skip this step.
delphix network setup update *> set defaultRoute=<gateway-ip> -
Commit your changes. Note that you can use the
getcommand prior to committing to verify your desired configuration.delphix network setup update *> commit Successfully committed network settings. Further setup can be done through the browser at: http://<address> Type "exit" to disconnect, or any other commands to continue using the CLI. -
Check that you can now access the Delphix Engine through a Web browser by navigating to the displayed IP address, or hostname if using DNS.
-
Exit setup.
delphix> exit
Setting up the Delphix engine
Once you setup the network access for Delphix Engine, navigate to the Delphix Engine URL in your browser for server setup.
The welcome screen below will appear for you to begin your Delphix Engine setup.
The setup procedure uses a wizard process to take you through a set of configuration screens:
-
Administrators
-
Time
-
Network
-
Network Security
-
Storage
-
Outbound Connectivity
-
Authentication
-
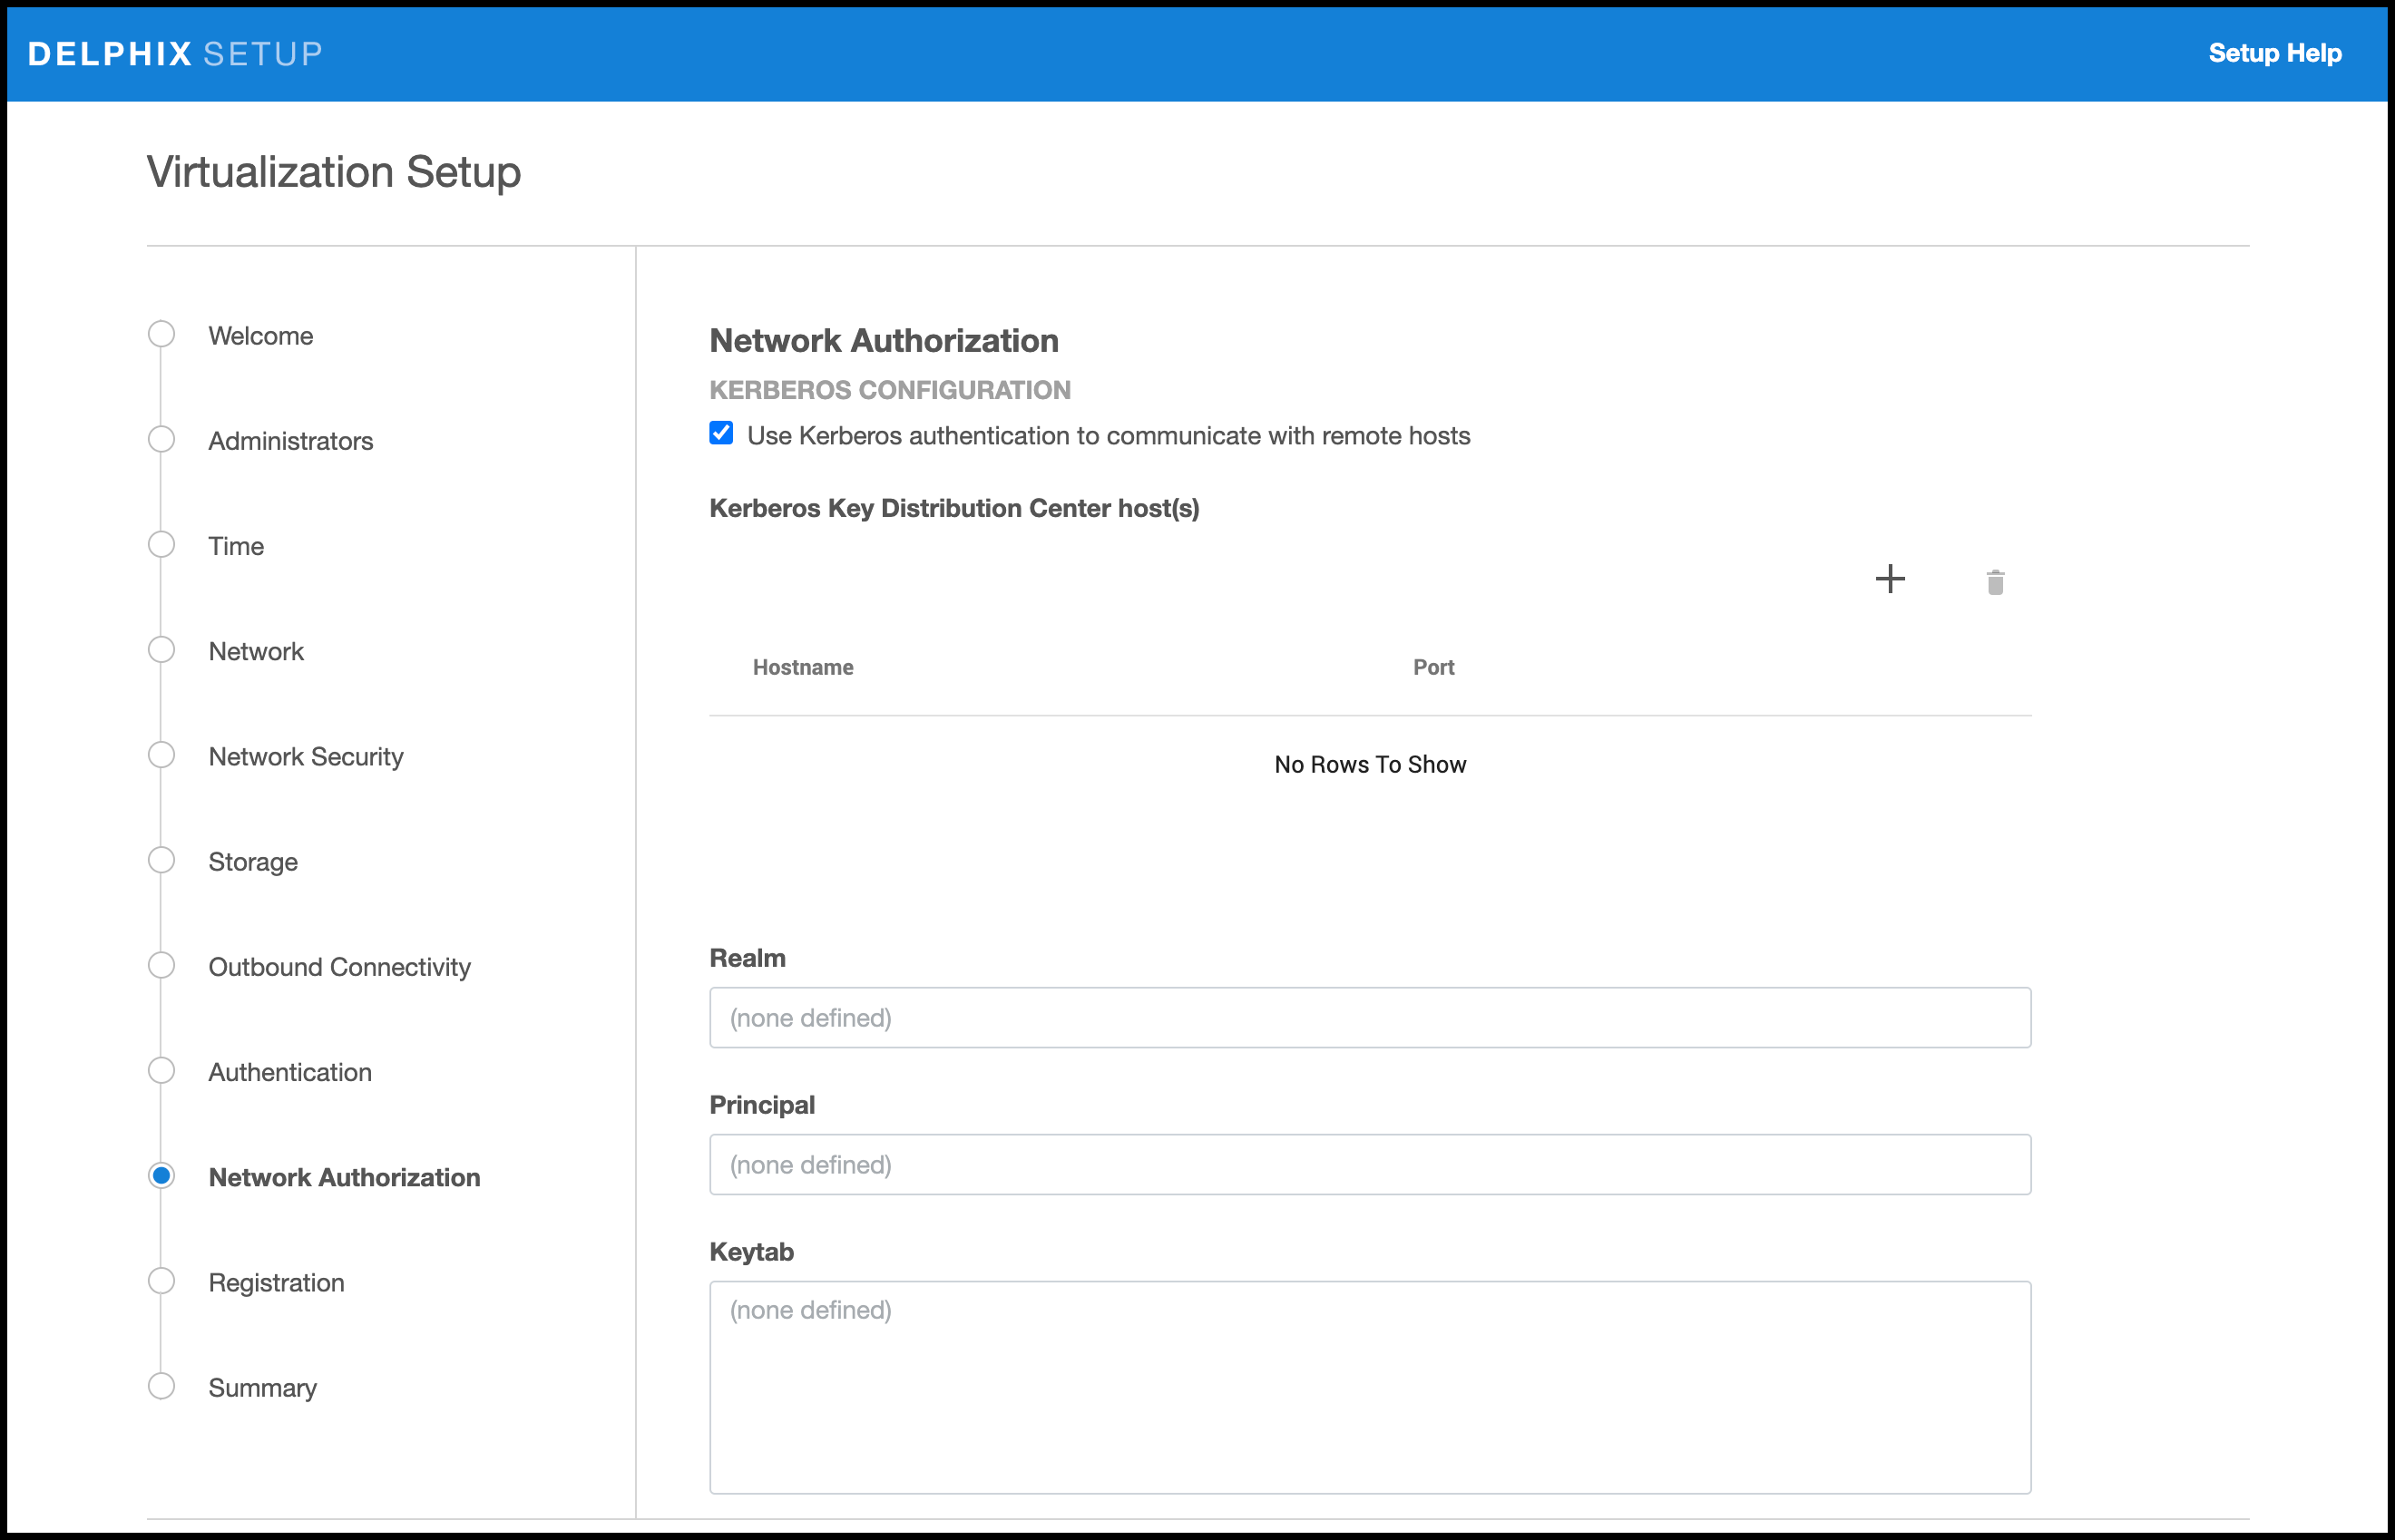
Network Authorization
-
Registration
-
Summary
-
Connect to the Delphix Engine at
http:///login/index.html#serverSetup.
The Delphix Setup application will launch when you connect to the server. Enter your sysadmin login credentials, which initially defaults to the username sysadmin, with the initial default password of sysadmin. On first login, you will be prompted to change the initial default password. -
Click Next.
Administrators
The Delphix Engine supports two types of administrators:
-
System administrator (sysadmin) - this is the engine system administrator. The sysadmin password is defined here.
-
Engine administrator (admin) - this is typically a DBA who will administer all the data managed by the engine.
On the Administrators tab, you set up the sysadmin password by entering an email address and password. The details for the admin are displayed for reference.
The default domain user created on Delphix Engines from 5.3.1 is known as admin instead of delphix_admin. When engines created before 5.3.1 are upgraded to 5.3.1 or later they will retain their old username 'delphix_admin'. To avoid complications Delphix recommends creating users with an admin role and then Disabling delphix_admin.
Time
The engine time is used as the baseline for setting policies that coordinate between virtual databases and external applications
Choose your option to setup system time in this section. For a Quick Start, simply set the time and your timezone. You can change this later.
Network
The initial out-of-the-box network configuration in the OVA file is set to use a single VMXNET3 network adapter.
You have already configured this in the initial configuration. Delphix supports more advanced configurations, but you can enable those later.
Storage
You should see the data storage VMDKs or RDMs you created during the OVA installation. Click Next to configure these for data storage.
Serviceability
Choose your options to configure serviceability settings.
For a Quick Start, accept the defaults. You can change this later.
Authentication service
Choose your options to configure authentication services.
For a Quick Start, accept the defaults. You can change this later.
Registration
If the Delphix Engine has access to the external Internet (either directly or through a web proxy), then you can auto-register the Delphix Engine:
-
Enter your Support username and Support password.
-
Click Register.
If external connectivity is not immediately available, you must perform manual registration.
-
Copy the Delphix engine registration code in one of two ways:
-
Manually highlight the registration code and copy it to clipboard. Or,
-
Click Copy registration code to clipboard.
-
-
Transfer the Delphix Engine's registration code to a workstation with access to the external network Internet. For example, you could e-mail the registration code to an externally accessible e-mail account.
-
On a machine with access to the external Internet, please use your browser to navigate to the Delphix Registration Portal at http://register.delphix.com
-
Login with your Delphix support credentials (username and password).
-
Paste the Registration code.
-
Click Register.
Although your Delphix Engine will work without registration, we strongly recommend that you register each engine as part of the setup. Failing to register the Delphix Engine will impact its supportability and security in future versions.
To regenerate the registration code for a Delphix Engine please refer to, Regenerating the Delphix Engine Registration Code. Delphix strongly recommends that you regenerate this code and re-register the engine regularly to maximize the Support Security of the Delphix Engine. Delphix recommends doing this every six months.
Summary
The final summary tab will enable you to review your configurations for System Time, Network, Storage, Serviceability, and Authentication.
-
Click the Back button to go back and to change the configuration for any of these server settings.
-
If you are ready to proceed, then click Submit.
-
Click Yes to confirm that you want to save the configuration.
-
Click Setup to acknowledge the successful configuration.
-
There will be a wait of several minutes as the Delphix Engine completes the configuration.
Requirements for Oracle hosts and databases
In order to begin using Oracle environments with Delphix, you will need to configure the source and target hosts with the requirements described on this page.
Oracle hosts and databases
On each host with Oracle, there must be an operating system user configured to the required specifications for Delphix, as explained in the table below. This user (i.e. delphix_os) can easily be created by using the createDelphixOSUser.sh script (located at the bottom of the page).
These requirements apply to both source and target environments. However, target environments have additional requirements which are detailed in the ‘Target Host Requirements’ section below.
Source host requirements
|
Host requirement |
Explanation |
|---|---|
|
Privileges should be the same as the Oracle user (e.g. oracle) on the host. |
For example, the delphix_os user should have the same umask and ulimit settings, as the user oracle. |
|
The Delphix software owner account (e.g. delphix_os) must have the same primary OS group as the Oracle software owner account (e.g. oracle). |
Delphix recommends giving the delphix_os user the same primary OS group as the Oracle home owner. This ensures the Delphix engine can fully and automatically discover Oracle homes, databases, and listeners. Often, this is an OS group named oinstall. However, the oinstall group is not always necessary depending on your Oracle configuration. This user requires access to the libobk_proxy.so library in the toolkit for the child processes triggered by RMAN. |
|
The delphix_os user must have the Oracle OSDBA group (typically dba) as a primary or secondary OS group. |
The OSDBA group allows "OS authentication" when connecting to an Oracle database instance by specifying either username or password (i.e. rman target /), thus eliminating the need to store or retrieve a SYSDBA password. Oracle 12c
|
|
For secondary group requirements, the delphix_os user must be a member of the SYSBACKUP OS group (12.1 or higher) or the SYSDBA OS group (11.2 and lower). |
This ensures that the Delphix engine is able to take snapshots of source databases using RMAN. |
|
There must be a directory on the source host where the Delphix Engine Toolkit can be installed, for example: /var/opt/delphix/toolkit |
The delphix_os user and primary OS group (i.e. oinstall) must own the directory. The directory must have at least permissions -rwxrwx--- (0770) The delphix_os user must have read and execute permissions on each directory in the path leading to the toolkit directory. At least 1.6 GB of storage is needed at the time of setting up the environment and at least 500MB of free space is required to allow refreshes and maintenance of the toolkit, especially during upgrades. |
|
The Delphix Engine must be able to make an SSH connection to the source host (typically port 22). |
|
|
Read access to $ORACLE_HOME and all underlying files and directories. |
Delphix needs to run locally available Oracle tools such as sqlplus and RMAN. Those executables, as well as various required libraries, reside inside the Oracle home |
|
Bash shell must be installed and available (not applicable to Solaris operating system) |
Delphix requires the ability to run commands using the Bash shell. For the engine to operate with the host, Bash must be available and included in the system path, allowing for the execution of the 'bash' command. Most of the Linux machine bash is available by default and user may not need to do anything. |
Additional requirements for RAC environments
If the source host is part of a RAC cluster, Delphix will attempt to use all nodes and crsctl for its operations.
|
RAC environment requirement |
Explanation |
|---|---|
|
The delphix_os user and Delphix Toolkit configuration must be the same on each node in the RAC cluster |
|
Masked Provisioning is not supported on Oracle RAC.
Auto-discovery requirements
The preferred way to find source databases it to allow Delphix to automatically discover your Oracle Homes and Databases by examining the inventory and oratab files and the listener setup. Successful autodiscovery requires read access to these and related files.
In most environments, delphix_os group membership is sufficient to perform auto-discovery.
However, if you have overridden Oracle's group permission structure, you may need to modify privileges to allow auto-discovery.
|
Auto-discovery requirements |
Explanation |
|---|---|
|
The ORATAB file must exist (typically in /etc/oratab or /var/opt/oracle/oratab) and be readable by delphix_os. Read access to:
|
The ORATAB is used to determine the location of the Oracle installations on your host. Note: The Oracle inventory file is identified by the contents of orainst.loc (for example, $INVENTORY_HOME/ContentsXML/inventory.xml). |
|
Permission to run pargs on Solaris hosts and ps on AIX, HP-UX, and Linux hosts, as super-user. This permission is usually granted via sudo authorization of the commands. |
Unless you have used a custom TNS_ADMIN setting, elevated access to ps (pargs on Solaris) is not required See the topic Oracle sudo privilege requirements for environments for further explanation of this requirement, and Sudo file configuration examples for Oracle environments for examples of file configurations |
Source database requirements
For each source database, there are specific configurations required for Delphix to ingest data.
|
Source database requirement |
Explanation |
|---|---|
|
For each Oracle Home, the delphix_os user should have execute permission for the programs in $ORACLE_HOME/bin. |
If symlinks are configured, Delphix must be configured with the same $ORACLE_HOME path as was used when starting the instance. Ensure the PermitUserEnvironment configuration parameter = "yes" in the sshd_config file The $ORACLE_HOME/bin/oracle executable must have the SETUID and SETGID flags set. Permissions on the oracle binary must be at least -rwsr-s--x (06751). |
|
Source databases must be in ARCHIVELOG mode to ensure that redo logs are archived. |
Archive logs are required to make SnapSyncs consistent and provisionable. |
|
Enable Block Change Tracking (BCT). (Highly Recommended). |
Enabling BCT will improve SnapSync operation time. Without BCT, incremental SnapSyncs must scan the entire database. |
|
Enable FORCE LOGGING. (Highly Recommended) |
If you do not enable FORCE LOGGING and NOLOGGING operations take place, you will get a Fault from the Delphix Engine. If you must use NOLOGGING to meet specific performance criteria, take a new snapshot of the source database after doing the NOLOGGING operations to bring the dSource up-to-date before provisioning VDBs. |
Operating system specific requirements
Solaris
On a Solaris host, gtar must be installed. Delphix uses gtar to handle long file names when extracting the toolkit files into the toolkit directory on a Solaris host. The gtar binary should be installed in one of the following directories:
-
/bin:/usr
-
/bin:/sbin:/usr
-
/sbin:/usr/contrib
-
/bin:/usr/sfw
-
/bin:/opt/sfw
-
/bin:/opt/csw/bin
Additional target/staging host requirements
This topic describes the user privileges and environment requirements that are required for Oracle target hosts and databases collectively referred to as target environments.
These are in addition to the ‘Oracle Hosts and Database Requirements’ called out above.
|
Target/Staging host requirement |
Explanation |
|---|---|
|
The delphix_os user must be a member of the SYSDBA OS group. |
This ensures that the Delphix engine is able to create new VDBs on target hosts. |
|
There must be a directory (e.g. "/mnt/provision/" or"/mnt/staging/") that will be used as a container for the NFS mount points that are created when provisioning a VDB. |
The delphix_os user and primary OS group (i.e. oinstall or dba) must own the directory. The directory must have at least permissions -rwxrwx--- (0770). There must be no symbolic links in the path of this directory, because NFS can mount into a directory with symlinks in its path, but cannot unmount. |
|
Permission to run:
|
The following permissions are usually granted via sudo authorization of the commands. See Oracle sudo privilege requirements for environments for further explanation of the commands, and Sudo file configuration examples for Oracle environments for examples of the /etc/sudoers file on different operating systems. |
|
(Optional) Write permission to the $ORACLE_BASE_CONFIG/dbs directory. |
(i.e. chmod g+w $ORACLE_BASE_CONFIG/dbs) |
|
An Oracle listener process running on the target host for provisioning a VDB |
The listener's version should be equal to or greater than the highest Oracle version that will be used to provision a VDB. |
|
Required packages on target hosts:
|
As the Delphix Engine uses NFSv3 for mounting target host filesystems, the prerequisite packages to support NFSv3 client communication are required for normal operation, and the required services to support NFS client communications (including file locking) must be running. NFSv3 is enabled by default and to enable NFSv4, see NFSv4 Configuration. |
Deploy Hostchecker to Validate Delphix Requirements
Delphix has developed a hostchecker script that contains standardized checks for source and target hosts - these checks generally fall into three buckets
-
OS and Host permissions/access
-
Network Port Checks
-
DB-specific functionality
OS and Host permissions/access and network port checks can (and should) be performed prior to Delphix installation to ensure a smooth deployment.
Each DB should have a specifically associated hostchecker - you can find detailed documentation on the DB-specific hostchecker page.
-
Download the appropriate HostChecker tarball for your engine from https://download.delphix.com/ Tarballs follow the naming convention "hostchecker_<OS>_<processor>.tar". For example, if you are validating a linux x86 host you should download the hostchecker_linux_x86.tar tarball.
-
Create a working directory and extract the HostChecker files from the HostChecker tarball.
mkdir dlpx-host-checker cd dlpx-host-checker/ tar -xf hostchecker_linux_x86.tar -
Run the
shscript contained within:sh hostchecker.shThis will extract the JDK included in the tarball (if necessary) and invoke the HostChecker.
ora10205@bbdhcp:/home/ora10205/hostchecker-> sh hostchecker.sh Extracting the JDK from the tarball jdk-6u45-linux-i586.tar.gz.warning: Don't Run as Root Do not run the HostChecker as root; this will cause misleading or incorrect results from many of the checks.
-
Select which checks you want to run.
Info: Run Tests without the Interface
You can also run checks without spawning the interface. Enter
--helpto get a list of arguments you can pass to the HostChecker. -
As the checks are made, enter the requested arguments.
-
Read the output of the check. The general format is that severity increases as you scroll down the output. First comes informational output, then warnings, then errors. warning : Internal Errors If you see a message that starts with
Internal Error, forward it to Delphix Support immediately. This represents a potential bug in the HostChecker, and not necessarily a problem with your environment. -
Error or warning messages will explain any possible problems and how to address them. Resolve the issues that the HostChecker describes. Do not be surprised or undo your work if more errors appear the next time you run HostChecker, because the error you just fixed may have been masking other problems.
-
Repeat steps 3 - 7 until all the checks return no errors or warnings.
Adding Oracle source and target environments
Follow the steps below to add both source and target environments for Oracle.
-
Login to the Delphix management application.
-
Click Manage.
-
Select Environments.
-
Click the Plus icon next to Environments.
-
In the Add environment dialog, select Unix/Linux.
-
Select Standalone host or Oracle cluster, depending on the type of environment you are adding.
-
For standalone Oracle environments enter the Host IP address.
-
For Oracle RAC environments, enter the Node address and Cluster home.
-
Enter an optional Name for the environment.
-
Enter the SSH port. The default value is 22.
-
Enter a Username for the environment. See Requirements for Oracle hosts and databases for more information on the required privileges for the environment user.
-
Select a Login Type: — Username and Password - enter the OS username and password, or — Username and Public Key - enter the OS username. — Password Vault - select from an existing Enterprise Password Vault
Info : Using Public Key Authentication
If you want to use public-key encryption for logging into your Unix-based environment:
-
Select Public key for the Login type.
-
Click View public key.
-
Copy the public key that is displayed, and append it to the end of your
~/.ssh/authorized_keysfile. If this file does not exist, you will need to create it.-
Run
chmod 600 ~/.ssh/authorized_keysto allow only the file's owner to read and write to it (make sure the file is owned by the user). -
Run
chmod 755 ~to restrict access to the user's home directory so no other user may write to it. -
Run
chmod 700 ~/.sshso that others cannot write to it. The~/.sshdirectory cannot be writable by group or other users. Otherwise, authentication will fail.
-
The public key needs to be added only once per user and per environment.
-
-
For Password login, click Verify credentials to test the username and password.
-
Enter a Toolkit path. The toolkit directory stores scripts used for Delphix Engine operations, and should have a persistent working directory rather than a temporary one. The toolkit directory will have a separate subdirectory for each database instance. The toolkit path must have 0770 permissions and at least 345MB of free space.
-
Click Submit.
Linking an Oracle data source
-
Login to the Delphix management application.
-
Navigate to Manage > Datasets.
-
Click the plus icon and select Add dSource.
-
In the Add dSource wizard, select the source database with the correct environment user-specified.
-
Enter your login credentials for the source database and click Verify credentials. If you are linking a mounted standby, Click Next. See the topics under Linking an Oracle physical standby database for more information about how the Delphix Engine uses non-SYS login credentials.
-
Enter a name and select a group for your dSource. Adding a dSource to a dataset group lets you set Delphix Domain user permissions for that database and its objects, such as snapshots. See the topics under Users and Groups for more information.
-
Select the Data Management settings needed. For more information, visit Data management settings for Oracle data sources
-
Assign existing policies to the new dSource. New policies can be created and associated later.
-
Enter any scripts that should be run using the Hooks page.
-
Review the dSource Configuration and Data Management information, and then click Submit.
For linking an Oracle staging push dSource, follow the procedure in Data ingestion with staging push.
Once the action to add a dSource has been submitted, the Delphix Engine will initiate a DB_Link job to create the dSource. If the Load Immediately option was selected in the data management page a DB_Sync job will also be executed to ingest data from the source, otherwise, this first DB_Sync job will run as per the associated SnapSync policy.
When the jobs have successfully completed, the database icon will change to a dSource icon on the Environments > Databases screen, and the dSource will be added to the list of Datasets under its assigned group.
Provisioning an Oracle VDB
-
Login to the Delphix management application.
-
Select Manage > Datasets.
-
In the Datasets panel on the left-hand side, click the group containing the dSource or VDB from which you want to provision.
-
Click the TimeFlow tab.
-
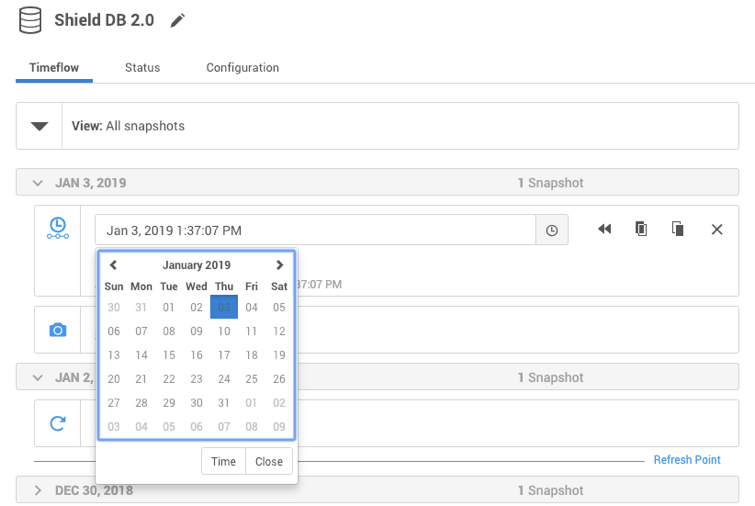
Select a snapshot.
You can take a snapshot of the dSource from which to provision. To do so, click the Camera icon.
-
Optional: Select
.png?cb=8af8294f744dceebe57b1803ac085c34)
to open LogSync timeline.
-
Select
.png?cb=4b9478ab614f5e60b9e15d9b0b8ab382)
to provision from a point of time within a snapshot. You can select by date or time.
-
Click
.png?cb=a66d1f389271b2284d016cd1861b3eb5)
and the Provision VDB wizard will open:
-
For Oracle single instance the fields Installation home, Database unique name, SID, Database name, Mount base, and Environment user will auto-populate with information from the parent.
-
For Oracle RAC the fields Installation home, Database unique name, SID, Database name, Mount base, Instance number, Instance name and Environment user will auto-populate with information from the parent.
Editable Fields in the VDB Provision Wizard
The following fields are editable:
Installation Home (need to have an additional compatible target)
Database Unique Name
SID
Database Name
Mount Base
Instance Number (RAC Only)
Instance Name (RAC Only)
-
-
If you need to add a new target environment for the VDB, click the green Plus icon next to the Filter target field, and follow the instructions in Oracle Single Instance or RAC Environment
-
Review the information for Installation home, Database unique name, SID, and Database name. Edit as necessary.
-
Review the Mount base and Environment user. Edit as necessary. The Environment User must have permission to write to the specified Mount Base, as described in Requirements for Oracle hosts and databases. You may also want to create a new writeable directory in the target environment with the correct permissions and use that as the Mount Base for the VDB.
-
Select Provide privileged credentials if you want to use login credentials on the target environment that are different from those associated with the Environment user.
-
Click Advanced to customize the VDB online log size and log groups, archivelog mode, local_listener parameter (TCP/IPC protocol addresses), additional VDB configuration settings or file mappings, or custom environment variables. For more information, see Customizing Oracle VDB environment variables, Customizing VDB file mappings, and Customizing Oracle VDB environment variables
If you are provisioning to a target environment that is running a Linux OS, you will need to compare the
SGA_TARGETconfiguration parameter with the shared memory size in/dev/shm. The shared memory configured on the target host should match the SGA memory target. You can check the Linux OS shared memory size with the command df -k /dev/shm and the SGA_TARGET configuration parameter by opening the Advanced settings and then finding the value forSGA_TARGETunder VDB Configuration templates. -
Click Next.
-
Select a Target Group for the VDB.
-
Enable Auto VDB Restart to allow the VDB to be automatically restarted when the target host reboot is detected by Delphix.
-
Click Next.
-
Select a Snapshot policy for the VDB.
-
Click Next.
-
Enter any operations that should be run at Hooks during the provisioning process. Click Next.
-
Click Submit.
When provisioning starts, you can review the progress of the job by selecting the VDB and clicking on the Status tab, or by selecting Manage/Dashboards and viewing the Job history panel. Alternatively, you could see this in the Actions sidebar. When provisioning is complete, the VDB will be included in the group you designated and listed in the Datasets panel. If you select the VDB in the Datasets panel and click the Configuration tab, you can view information about the database and its Data Management settings.
Next steps
Congratulations! You have provisioned your first virtual database!
Now, perform some simple functional tests with your application. You can connect your app to the VDB using standard TNS/JDBC techniques. Delphix has already registered the VDB for you on the target listener.
We suggest the following next steps:
-
Drop a table and use the VDB Rewind feature to test the recovery of your VDB.
-
Take a snapshot of your dSource and refresh your VDB to quickly get fresh production data.
-
Provision a new VDB from your VDB to test the sharing data quickly with other teams.
-
Mask your new VDB to protect sensitive data. Provision new VDBs from that masked VDB to quickly provide safe data to development and QA teams.